


")


Table Of Content
Introduction
Blue Cat's MB-7 Mixer is a unique plug-in that splits the signal into several frequency bands and lets you re-mix and process them as if they were separate tracks: change levels, apply panning, add built-in effects, or even third party plug-ins.
Each band proposes controls that can be found on a mixing console, and more: bypass, mute or solo each band separately to isolate frequencies you want to work on, adjust the gain, the "stereoness" and the position in the stereo field. When manipulating the stereo image, a master mono switch also lets you check mono compatibility.
You can also apply different audio effects to each band to achieve any kind of spectral manipulation: the plug-in can operate as a multiband plug-ins host. You can process each band independently with your favorite VST, VST3 or Audio Unit plug-ins or choose from any of the 28 built-in effects! Up to four plug-ins can be loaded on each band, pre or post fader. It also include 25 built-in audio effects that can be inserted in each plug-in slot. Latency compensation, presets management, undo/redo integration, and individual plug-in bypass are included for optimal operation.
The plug-in also proposes unique linking and grouping options thanks to our multi-instances technology. You can link bands together within a single instance or between several instances of the plug-in on different tracks. This lets a simple fader control as many bands on as many tracks as you want. This is particularly useful when adjusting the placement or the balance of several competing tracks.
And as usual with Blue Cat Audio, the plug-in provides comprehensive visual feedback to let you know what's exactly going on: for each channel, monitor the spectrum, the in/out levels and the frequency response.
Thanks to its advanced MIDI and automation input capabilities, when combined with our other plug-ins, Blue Cat's MB-7 Mixer is capable of advanced side-chaining features that really unveils its potential. Check out our MB-7 Mixer Tutorials for more details.
If you are looking for a simpler plug-in to host VST, VST3 and Audio Unit plug-ins, please try Blue Cat's PatchWork. If you are looking for a multiband dynamics processor that can be combined to this plug-in for side chain effects, check out the Blue Cat's MB-5 Dynamix plug-in. Also, any Blue Cat Audio plug-in is compatible and can be hosted by this plug-in.
Copyright Note: VST is a trademark of Steinberg Media Technologies GmbH.


Typical applications: Multiband levels correction, multiband VST hosting, spectral enhancement, multiband stereo widening, multiband stereo placement, frequency isolation, spectral manipulation, EQ, spectrum inspection, mastering, spectrum-based side chain effects, apply audio effects to a selected frequency range, VST, VST3 and AU plug-in bridge.
System Requirements
MacOS
- An Intel or Apple Silicon processor.
- Mac OS 10.9 or newer.
- Any VST / Audio Unit / AAX compatible application (64-bit) .
Windows
- An SSE2-enabled processor (Pentium 4 or newer).
- Microsoft Windows Vista, Windows 7, 8, 10 or 11.
- Any VST / AAX compatible host software (32 or 64 bit).
For more information about supported platforms, see our Knowledge Base.
Demo Limitations:
- 5 instances of the plug-in allowed per session.
- The effect is bypassed for half a second every minute.
Installation
The plug-ins versions cannot be run standalone: they require a host application (see the System Requirements chapter for more information). Depending on which host application you use, you might need to install the plug-ins in different locations.
Before installing one of the plug-in versions, you should close all your host applications.
Windows
Install
All versions of the plug-in provide an installation program. Follow the steps of the wizard to install the software on your machine. During the installation you will be asked where you want the software to be installed. For the VST version, you should install the plug-in inside the VST plug-ins folder used by your host application(s). The default path set in the installer should work for most applications, but you should check your host software documentation to know where it looks for VST plug-ins. For other plug-in types, you should just use the standard path.
Some applications will not automatically rescan the new plug-ins, so you might have to force a refresh of the plug-ins list.
Upgrade
When a new version of the software is released, just launch the new installer: it will update the current installation.
Uninstall
To uninstall the software, simply launch the "Uninstall" program that is available in the start menu or in the configuration panel. It will take care of removing all files from your computer.
Mac
Install
On Mac the plug-ins are available as drive images with an installer. After download, double click on the dmg file to open it. You can then double click on the installer (.pkg file) to install the package.
Note for Mac OS 10.15 Catalina or newer: you may have to right click on the installer and select "Open" instead of double clicking on the file to launch the installation if your computer is not connected to the Internet.
Upgrade
When a new version of the software is released, just launch the new installer: it will update the current installation.
Uninstall
To uninstall the software, simply remove the component(s) from their install location (move them to the trash):
- AAX plug-ins are installed in the /Library/Application Support/Avid/Audio/Plug-Ins/ folder
- Audio Units (AU) are installed in the /Library/Audio/Plug-Ins/Components/ folder
- RTAS Plug-ins are installed in the /Library/Application Support/Digidesign/Plug-Ins/ folder
- VST plug-ins are installed in the /Library/Audio/Plug-Ins/VST folder
- VST3 plug-ins are installed in the /Library/Audio/Plug-Ins/VST3 folder
If you want to completely remove all settings and configuration files, you can also remove these additional directories that may have been created on your computer:
- ~/Library/Preferences/Blue Cat Audio/[Plug-in name and TYPE], where TYPE is VST, AU, RTAS or AAX: global preferences.
- ~/Library/Preferences/Blue Cat Audio/[Plug-in name]: license information
- ~/Documents/Blue Cat Audio/[Plug-in name]: user data, such as presets, additional skins and user-created plug-in data.
Please be aware that these directories may contain user data that you have created. Remove these directories only if you do not want to reuse this data later.
First Launch
Blue Cat Audio plug-ins cannot be run standalone, they require a host application (see the System Requirements chapter for more information). Some host applications will require you to scan the plug-ins before they are available in the application.
If the plug-in is not available in the application, please check that it has been installed in the appropriate directory (with no host application running), and that the host application has scanned it.
Using Blue Cat's MB-7 Mixer
Introduction
Blue Cat's MB-7 Mixer can be called a "multi band mixing console": it splits the incoming signal into a variable number of bands (up to 7) that can be processed separately and mixed again together as if they were separate tracks. It thus provides controls that you would usually find on a mixing console, in addition to frequency splitting configuration capabilities.
Each band can also host external VST or Audio Unit plug-ins, just like many DAWs.
Multi Band?
Blue Cat's MB-7 Mixer is called a multi-band processor, because it splits the incoming signal into several frequency bands before processing them separately:
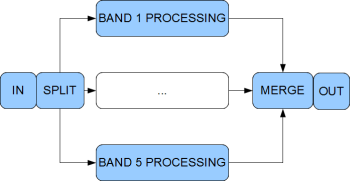
It means that each band can be affected differently, depending on the chosen settings. You can for example monoize the low-end of the spectrum while spreading the mids and keeping the highs unchanged. Since each band can host third party plug-ins, you can even apply different audio effects to different parts of the spectrum!
The split between bands is realized with crossover filters which let you control the separation (the higher the slope of the filter, the sharper the separation):
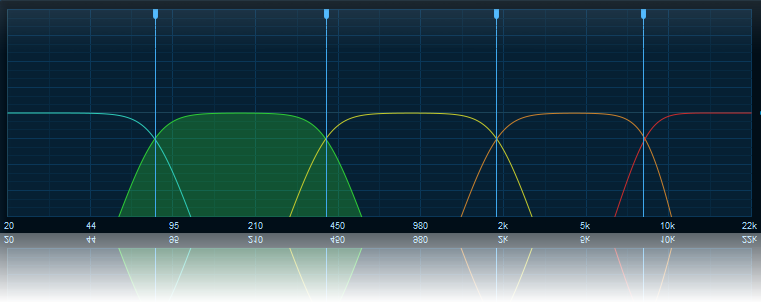
The slope of the crossovers can be set up to 192 dB/Octave. You should however be aware that such sharp separation may cause artefacts (such as ringing frequencies), so you might want to keep the crossovers below 60 dB/Oct in most cases.
Band Mixing Controls

The plug-in comes in three flavors: a mono, a stereo and a dual channels ("Dual") version.
For each band, the mono version provides mute and solo switches that have the same behavior as the ones you can find on a mixing console: "mute" will mute the current band, whereas "solo" will mute all other bands.
The mono version also provides a gain control that affects the volume of the band, as well as a bypass option that lets the signal unchanged, which is particularly convenient for A/B comparisons: all processing performed on this band is bypassed.
4 plug-ins slots are available, in order to insert built-in effects, or external VST and Audio Unit plug-ins on each band. Two slots are placed before the band fader, meters and other controls ("pre-fader" slots), and two others are placed after the controls and meters ("post fader" slots). More information about third party plug-ins hosting is available below.
The stereo version has two additional parameters to control the stereo width and placement of the chosen band:

- You can increase or decrease the width of the signal with the "spread" control. It adjusts the amount of mono and stereo signal in the chosen band. When set at its minimum value, the sound is completely mono (same signal on the left and right channels), while with the maximum value the left and right channels are out of phase. A typical usage of this control is to keep the bass in the center of the stereo field ("monoize") and increase the stereo spread for higher frequencies. Beware that out of phase signals disappear from a mono mix, so you should not in general overuse positive spread values.
- The "pan" pot lets you control the placement of the band in the stereo field. You can move it to the left or right independently from other frequency bands. You can thus create interesting stereo effects or correct stereo placement issues in a mix.
The dual channels version lets you control the gain for the left and right channels independently, and also pan them freely in the stereo field. Each channel can also be muted independently.
A Mid/Side switch is also available to switch the controls to mid/side mode (instead of default left/right). When switched on, you can control the mid and side gains separately, and pan the mid and side signals from mid (-100%) to sides (+100%). More information about mid/side processing is available below.
With the dual channels version, gain sliders for both channels can also be linked together in order to provide a single gain control for both channels.
Master Controls
In addition to its multiband mixing capabilities, the plug-in offers a master section to control the master gain and the output level. The stereo version also comes with a mono switch to check the mono compatibility of the output: using panning and stereo spreading heavily may affect the mono component of the signal, so you may want to check that the sound is still fine in mono.
Grouping
With so many bands available in the plug-in and with multiple instances on several tracks, there are a whole bunch of parameters to control! That's where grouping can be useful, just like on modern mixing consoles.
The plug-in proposes three different types of groups:
- "Local groups" let you link several bands together within a single instance of the plug-in.
- "Global groups" are shared by all instances of the plug-in within a host application. They let you adjust controls accross several instances of the plug-in.
- The "quick group" is a special form of local group. Using the quick group deactivates any other grouping option. It is useful to temporarily adjust several bands at the same time quickly.
When a band is linked to a group, any change to any parameter on this band is reflected to other bands in the same group. The link to the group can be reversed so that increasing the value of the gain, spread or pan parameters on the reversed band decreases these same parameter on non reversed bands.
VST or Audio Unit Hosting
The plug-in is able to host VST or Audio Unit plug-ins on each band, so that you can apply any kind of audio effect on selected frequency ranges. This is particularly useful on pre-mixed tracks, when you want to affect only a part of the mix, but it can also be used on individual tracks, to affect only a part of the spectrum. For example, you can apply a chorus effect only to the low-end of a vocal track, or a delay only to high end of a guitar track, etc.
DISCLAIMER: while we guarantee that Blue Cat Audio plug-ins are compatible with this plug-in, we cannot ensure full compatibility with all existing VST or Audio Unit plug-ins, especially in all host applications. If you find an issue with a third party plug-in, please report it to us. You may also have to contact your plug-in vendor to find a solution to the problem.
Third Party Effects and Mid/Side mode
With the dual version, when using the mid/side mode, inserted plug-ins are operating on the mid and side channels (instead of left/right). This can be a way to transform any regular stereo effect into a mid/side effect.
Latency Compensation
The plug-in integrates a latency compensation engine, so that if you insert a plug-in that introduces latency, this does not affect the reconstruction of the fully mixed signal. The latency is also reported to the host application in real time. Please note that some host applications may require that you restart transport (or deactivate/re-activate the plug-in) to take latency changes into account.
MIDI support
Incoming MIDI events are sent to all inserted plug-ins that support it. You can typically control inserted Blue Cat Audio plug-ins with a MIDI control surface, or use our advanced side chaining techniques inside the plug-in, just like you would do if they were directly hosted by the DAW.
Please note that the plug-in does not currently support MIDI output for inserted VST or Audio Unit plug-ins.
Undo Integration
For most VST and AU plug-ins, the plug-in is able to track changes and perform undo/redo on inserted plug-in operations. This feature is optional and can be disabled for some plug-ins that would not support it, or if you prefer not to include external plug-in changes in the undo history.
External Side Chain
When the plug-in's external side chain is connected, it is distributed to all sub plug-ins, unprocessed. So each plug-in can use the external side chain signal as if it was directly connected to the host application. Using audio I/O routing (see below), it is also possible to choose another source for the side chain for each plug-in (for example the signal of the current band), or apply effects to the side chain signal.
Audio I/O Routing For Plug-Ins
For each audio plug-in, it is possible to choose the audio channels to use for both inputs and outputs. It is thus possible to apply effects to only a subset of audio channels (for multi-mono processing for example, or to apply effect to only the side chain channel). It is also possible to achieve complex routing within the effect chain (such as sending specific channels to the side chain input of a plug-in) and yet keep it simple.
Note: when using audio I/O routing intensively, it is recommended to change the names of the plug-ins according to the channels being processed
Note: each band operates separately, so it is not possible to send the signal from one band to another.
Multicore Processing
The MB-7 Mixer includes a multicore processing engine that can spread multiband processing on separate processor cores. It lets you use all your processor cores at the same time and load more effects simultaneously on different bands.
Note: effects that are processed in series (one after the other) cannot be parallelized and do not benefit from multicore processing. Only separate bands can be processed independently.
The multicore engine can be activated or deactivated for each preset independently. When using very few plug-ins with low CPU usage in parallel, the cost of multicore processing can be higher than the benefits (you can check the CPU usage with the built-in CPU meter at the bottom right of the user interface).
Performance also depends on the host application and its own multicore processing strategy, so you may want to try and compare with or without multicode enabled.
Mid/Side Processing
Blue Cat's Blue Cat's MB-7 Mixer offers mid/side processing capability. With this feature you can process the mid (center) and side (sides) channels instead of the usual left and right channels.
Concept Origin: Mid/Side Recording
Mid/Side recording is a famous recording technique that is preferred in some cases to the traditional left/right recording. Looking for “mid side recording” in an internet search engine will give you many tutorials about this technique.
The result of such a recording is a pair of mid/side (M/S) channels instead of classic left/right (L/R) channels in an audio stream. The mid channel is also often called “Mono” and side “Stereo”: the mid channel contains the signal that is in the center of the stereo mix, and the side channel contains the rest (everything that is on the sides of the mix):

From Mid/Side Recording to Processing
The relationship between L/R and M/S channel can be computed so that you can transform any Mid/Side recording to standard listenable left/right stereo stream. The reverse operation is also possible, which means that you can artificially separate mid/side information from your usual L/R stereo tracks. That’s what is done by our mid/side processing plug-ins.

Processing separately the mid/side channels instead of left/right channels offers more control over the stereo character of a sound. Reducing the volume of the side channel makes it sound more "mono" and vice versa.
Built-In Effects
Blue Cat's MB-7 Mixer includes 28 top quality built-in effects that can be used in plug-in slots, next to third party VST, VST3 or AU plug-ins:
Bit Crusher, Chorus, Comb Filters, Compressor, Ducker, Echo, Multitap Delay, EQ, Multimode Filter, Flanger, Frequency Shifter, Gain, Gate, Stereo Pan, Mute, Phase Shifter, Phaser, Pitch Shifter, Harmonizer, Stereo Strip, Sweep Filter, Tremolo, Wah, and Waveshaper.
Built-in plug-ins offer the same preset management and control features as the external plug-ins (MIDI learn, undo/redo, parameters range...). For more details about each effect and its controls, please refer to the included documentation ("?" icon in the toolbar of each plug-in).
Parameters Mapping & Macros
With Blue Cat's MB-7 Mixer, it is possible to map sub plug-ins parameters in order to control them with host automation, an external control surface, or simply within the MB-7 Mixer's user interface. Thanks to the included "learn mode", simply touching the knobs of your favorite plug-ins will let you assign parameters for external control (up to 16 controls are available).
Starting with version 3.5, it is possible to map several parameters to a single control and adjust the range of each parameter, to create macro controls that can adjust multiple parameters at once.
MIDI Preset Loading
It is possible to load presets using MIDI (with Bank Select and Program Change messages). More details about MIDI and presets loading is available in the presets section.
The User Interface
Note: The main toolbar, menus and basic features available with all our plug-ins are detailed in the Blue Cat Audio Plug-ins Basics section.
The plug-in is bundled with a single skin for each version (Mono, Stereo and Dual), and you may create your own and download new ones on www.bluecataudio.com. Only the specific features of the included skins are discussed here. The next section describes the other features that are common to all Blue Cat Audio plug-ins.
In this chapter we'll detail the user interface for the stereo and dual channels versions. The mono version is very similar to the stereo version: it just has fewer controls.
Overview

Main toolbar (1)
At the top of the plug-in stands the main toolbar, with multiple controls to configure the plug-in:

- Main bypass (to enable/disable the plug-in)
- generic menu, controls settings, undo redo, help and plug-in info buttons. More details are available in the next section.
- Select user interface scaling (zoom level).
- Select the appropriate size for the user interface (small, medium, large).
- Enable/disable multicore processing.
- Show/hide the presets browser.
- Show/hide the main graph display.
- Show/hide the bands and master controls areas (bottom of the plug-in).
- Show/hide the pre fader plug-ins slots.
- Show/hide the post fader plug-ins slots.
- Assignable controls menu: show/hide assignable controls (macro params), open the params map editor, or select the style of assigned controls.
- Enable/disable tail spilllover on bypass.
- Lock the user interface settings so that they are not affected when loading presets.
- Display the preferences pane.
Header (2)
Just below the graph display stand various global controls:
- You can select the number of bands for the plug-in. It ranges from one (broadband) - to seven.
- You can customize the range for the gain faders and the response curve graph (+-12 to 60 dB).
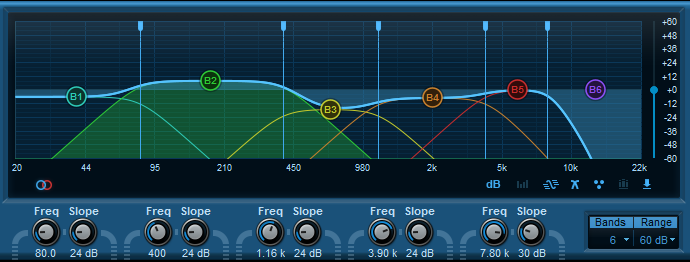
Main Graph Display (3)
Overview
The main graph display occupies a central spot at the top of the user interface. It shows a lot of information about what is happening inside the plug-in:

- If not displaying the maximum range (+/-60 dB), dragging this area lets you offset the range of the gain controls and display. This also affects the band and master faders. Please note that it does not apply to the spectrum analyzer.
- Crossover frequencies: the vertical lines can be dragged left and right to modify the crossover points.
- Spectrum: the built-in spectrum analyzer shows the spectrum of the signal at the output of the plug-in. For the stereo version, the left channel is represented with a blue curve, and the right channel with a pink curve.
- Gain control: you can drag the band controls vertically to change the gain for each band. Clicking on this control also selects the band as current.
- The frequency response of the crossover filters is displayed with a different color for each band. The displayed curve is the actual curve of the filter, not a theoretical or simplified representation of it. The response curve of the selected band is filled with the associated color (band number 3 in the screen shot above).
- Global response: this curve represents the global spectral response of the plug-in (it does not include the gain stage of the master section).
- Additional controls at the bottom right give you access to the following features, from left to right:
- Select the dB range for the graph display. It also affects the range of the slider.
- Activate spectrum analysis and select spectrum display type. When "spectrogram" is selected, an extra knob appears to let you adjust the contrast.
- Show/hide the global response curve.
- Show/hide the crossover filters response curves.
- Show/hide the gain controls.
- Show/hide the reference curve. The reference curve can be used to match external filters measured with Blue Cat's FreqAnalyst Multi or copied from the global response curve.
- Open the reference curve menu to load reference curves or paste them from the FreqAnalyst Multi plug-in. The current global response curve can also be copied or saved similarly:

Spectrum Analysis Modes
Two modes are available for output spectrum display. In spectrum mode, curves representing the instant spectrum of both channels is displayed (blue is channel 1 and red is channel 2):

In spectrogram mode, the evolution of the spectrum over time is displayed as a color (or greyscale) map. In color mode, louder parts of the spectrum are visible as bright red spots, whereas quieter parts will show in dark blue/black. In greyscale mode, the brighter also means the louder:

For stereo signals, you can also select for which channels you want the analysis curves to be displayed.
Crossovers (4)
The crossovers area displays controls for each band to modify either the frequency or the slope of the crossover filters:

The slopes of the crossovers range from 12 to 192 dB/Octave. They can be controlled independently thanks to the black drop-down boxes.
Bands (5)
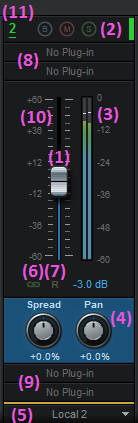
Below the crossovers section stand the various mixing controls for each band:
- Gain control.
- Bypass, Mute and Solo buttons.
- Peak level meters.
- On the stereo version only: spread ("stereoness") and pan controls.
- The group drop-down box lets you choose a group to link with.
- Quick group button. Using the quick (local) group overrides any other group that has been chosen with (5)
- Reverse link: reverses the link with the selected group (if any).
- Pre-fader plug-ins slots.
- Post-fader plug-ins slots.
- With +/-12 and +/-24 dB ranges, this area can be dragged to offset the operating range of the fader as well as the main display.
- Click on the band number to open the band presets menu that lets you save and load or copy/paste settings for the current band, including plug-ins and their state:
Note: grouping affects the following controls: bypass, mute, solo, gain, spread and pan. The reverse button affects only the gain, spread and pan controls.
Master Section (6)

The master section lets you manage the main output levels. It also shows output peak level meters.
On the stereo version, a mono/stereo switch can be used to check the mono compatibility of the effect. On the dual version the switch is replaced by a stereo/mid-side modes selector.
The gain control can also be part of a group, just like with bands.
You can reset the max level meters available at the top of the master section by clicking on them. Note: these meters become red when the maximum output level is above 0dB.
Workload Meter (7)
The workload meter on the bottom right of the user interface gives an idea of the amount of cpu used by the plug-in to process audio frames:

It measures the realtime workload, which corresponds to the time spent processing an audio buffer compared to its duration. This value may be impacted by other tasks running on the system.
In general the average value gives a good idea of the cpu usage of the plug-in, while the peak value is an indication of potential audio dropouts (if larger than 100% for too long), that may be caused by overall system load (not just the plug-in's audio processing).
The workload meter becomes orange then red when the peak load grows. Hover the mouse on the meter to see numerical values in a tooltip.
The Dual Channels Version
With its two independent channels, the "dual" version has a couple of differences with the other flavors of the plug-in.

First, most controls are available as pairs, channel 1 on the left, channel 2 on the right. In stereo mode, channel 1 is simply the left channel and channel 2 the right channel, while in mid/side mode, channel 1 is the mid channel (the mono part of the signal), and channel 2 is the sides channel (the stereo part of the signal).
You can switch from left/right to mid/side mode thanks to the "mid/side" switch available at the top of the user interface.
Additional features are also available, compared to the stereo version:
- Link gain controls for both channels.
- In addition to the general band mute button, each channel can be muted independently.
- Each channel can be panned independently (for left to right in stereo mode, and from mid to side in mid-side mode).
Browsing Presets
In order to browse both factory and user presets, you can either use the simple presets menu or open the full featured presets browser from the toolbar that remains visible until you close it:
Click on preset files and folders to open them, or use the arrows to navigate between displayed presets. You can navigate upward in the folders tree by clicking on the current folder at the top. Type in the search box to find presets by name (it also searches in folder names). The search is performed recursively in the currently selected folder (displayed at the top).
Search Tips: you can search for multiple terms by separating them with commas. Wildcards are also supported (with * and ? characters), but they are applied to the full path of the preset. For example, to search for all presets containing the word "phase", type *phase* in the search box. To look for these presets only in the factory presets, you can type Factory Presets/*phase*.
Using VST, VST3, Audio Unit or Built-In Plug-Ins
Note: before using VST plug-ins, it is strongly recommended that you setup your main VST plug-ins directory in the preferences pane, as detailed later in this manual (this setting does not affect VST3 plug-ins).
Warning: in a 64-bit application you can only load 64-bit plug-ins, and in a 32-bit application you can only load 32-bit plug-ins, unless your are using a third party bridging application.
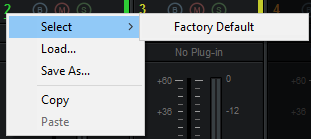
Each Plug-in slot lets you insert a third party plug-in. When clicking on an empty slot, the following menu appears:

The "Select" item is enabled if you have previously saved plug-ins as favorites using the "save as" command described below. It lets you choose a favorite plug-in directly from the menu, instead of having to load it from the file system.
Selecting "Load VST" will open a standard system window where you can select the VST plug-in you want to load. If the preferences have been properly set, the window should open the appropriate location where you can find the VST plug-ins.
Selecting "Load VST3" will open a standard system window where you can select the VST3 plug-in to be loaded.
On Mac, an additional "Load AU" menu item is available to load Audio Units. It opens a file open dialog in the standard location for Audio Units on your system. Note: if you want to load the system Audio Units provided by Apple, you will need to open the CoreAudio component located in the /System/Library directory (/System/Library/Components/CoreAudio.Component).
You can also choose to paste an existing VST or Audio unit plug-in if previously copied into the system clipboard from another slot (or another plug-in, such as Blue Cat's PatchWork). When using the "Paste with Map" command, if the plug-in in the source slot had mapped parameters, these parameters will be added to the map until no more assignable parameters are available.
Once a plug-in has been loaded into a slot, a mouse click will display the following plug-in menu that offers various controls over the plug-in:

- Show (Hide) Editor: display or hide the plug-in's user interface.
- Bypass: toggle bypass for the plug-in.
- Presets: access the plug-in's factory presets if any, and load/save presets files in the plug-in's native format (fxb/fxp, vstpreset or aupreset).
- Copy: copy the plug-in and its settings into the system clipboard. Onced copied, it can be pasted to any other slot, in any instance of the MB-7 Mixer plug-in (even in a different application) .
- Save As: save the plug-in in the slot and its settings as a favorite. Favorites are saved in the plug-in documents folder and can be organized using folders to appear later in sub menus. .
- Cut: copy the plug-in and its settings into the system clipboard and remove it from the slot.
- Center Editor: bring back the editor of the plug-in to the center of the screen, in case you cannot find it.
- Select: select a plug-in and its settings from the favorites list.
- Load VST: load another VST plug-in in the slot (will replace the existing plug-in if any).
- Load VST3: load another VST3 plug-in in the slot (will replace the existing plug-in if any).
- Load AU (Mac only): load another Audio Unit plug-in in the slot (will replace the existing plug-in if any).
- Paste: paste a plug-in and its settings from the system clipboard into the slot.
- Paste with Map: paste a plug-in, its settings and mapped parameters from the system clipboard into the slot. Parameters are re-mapped in order, until no more assignable parameter is available.
- Remove Plug-in: remove the plug-in from the slot.
- Params Map: lists the plug-in's parameters that can be mapped for automation, and lets you assign them to external controls (see the next paragraph).
- MIDI In: select the MIDI port(s) this plug-in is receiving data from (see below).
- MIDI Out: select the MIDI port(s) this plug-in is sending MIDI data to (see below).
- Audio I/O: opens the audio i/o routing window for this plug-in (see below).
- Oversampling: select oversampling ratio and quality for the plug-in (see below).
- Rename: rename the instance of the plug-in. Setting an empty name reverts back to the plug-in's default name.
- Set Color: open the system color dialog to select the color for the plug-in slot.
- Track Undo: toggle undo tracking for the slot. If enabled, inserted plug-ins changes will be inspected and added to the MB-7 Mixer plug-in undo history when possible. Please note that some plug-ins may not work properly when this feature is enabled.
When the mouse is over a plug-in slot, the following buttons appear:
Clicking on the power button on the left will bypass/unbypass the plug-in in the slot. The button on the right can be used to show/hide the plug-in's editor.
Missing Plug-Ins
Sometimes it may happen that you are working on a workstation that does not have all plug-ins that were previously loaded into your session. In this case, the MB-7 Mixer plug-in will display a "Missing Plug-in" message on corresponding slots. You can still continue working on your session: the MB-7 Mixer plug-in will retain the state of the missing plug-ins as if they were here. The session can be saved later: the data for missing plug-ins will be saved as well, and the session can be restored later without losing data.
For VST and VST3 plug-ins, if the plug-in is missing because of a path issue (the plug-in is located in another directory that is not referenced in the preferences, or the 64-bit version has a different name from the 32-bit version...), you can choose to relocate the plug-in:
This lets you find the plug-in on your workstation and re-link to it. The state of the plug-in that was previously saved in the preset or the session will be restored, making sure all data is kept.
Note: the plug-in chosen with the relocate function has to be compatible with the plug-in that was originally loaded in this slot. Relocation will fail otherwise.
Mapping Parameters (one To One Quick Mapping)
The "Params Map" item in the plug-in menu lets you map sub plug-in parameters so that they can be automated or controlled with an external control surface. It also lets you view existing mapping for this plug-in if any:
- Map All Params: assign all parameters of this plug-in to remaining controls (in the same order as exposed by the plug-in). The maximum number of parameters that can be mapped is 40.
- Learn Mode (on/off): when learn mode is on, touching a control in your plug-in's user interface will automatically add it to the parameters map (if the plug-in supports it). Once you are done with parameters assignment, you may want to disable learn mode to avoid mapping unwanted parameters.
- Reset All Assignments: removes all assigned parameters from the params map, for this plug-in. This frees all controls used by previously assigned parameters (for this plug-in only).
- All parameters available for assignment are then displayed in the menu. Clicking on a parameter toggles mapping on or off. When a parameter is mapped, the name of the external control (as displayed in the host application) appears next to it, inside parentheses.
Parameters Mapping works the following way: 16 parameters are available for mapping in Blue Cat's MB-7 Mixer. They are named "Control 01" to "Control 16". When a sub plug-in parameter is selected for mapping, the first control available within Blue Cat's MB-7 Mixer is used. Once mapped, the sub plug-in parameter and this control are linked together, so that any change to either of them is reported to the other.
This enables the sub-plug-in to expose its parameters to the outside of the MB-7 Mixer plug-in. You can for example use these external controls for automation, MIDI control , control surface assignment etc.
If assigned controls are shown in Blue Cat's MB-7 Mixer ("Show Assigned Controls" button), new knobs will appear when new parameters are mapped, until the maximum number of 16 controls is reached.
Macro Controls: The Parameters Map Editor
It is possible to access more advanced options for parameters mapping and create macro controls assigned to multiple parameters from multiple plug-ins by launching the Params Map Editor:

The Map Editor is displayed in a separate window that you can re-size at your convenience:

Available controls are displayed on the left (you can add or remove them with the icons on at the top), and when a control is selected you can see the parameters that have been assigned in the pane on the right.
Assignments can either be created manually (using the "Add" icon and then selecting the plug-in and parameter in the menus), or automatically with the learn button at the top right of the pane. When this assignment learn function is engaged, clicking or moving a knob of a plug-in should add the corresponding parameter to the list. Do not forget to disengage it when you are done or unwanted parameters might be added when touching the plug-ins later!
It is also possible to learn parameters individually using the learn button on the left of each line.
Once parameters have been added, their range can be adjusted using the knobs on the right (or by double clicking on the value). To reverse the range, simply invert the min and max values (using a min value that is larger than the max value).
You can also change the name of the controls by double clicking on them in the list displayed in the left pane.
It is also possible to change the order / add parameters by dragging and dropping items in the left column (it works between different instances too).
Audio I/O Routing
Using the "Audio I/O" command in the plug-in menu, it is possible to manually change which audio channels are processed by each plug-in.
Automatic Selection
By default, Blue Cat's MB-7 Mixer will automatically detect the number of channels to use for each plug-in depending on its own configuration: effect plug-ins will process only the main audio channels and leave side chain channels unaffected. Plug-ins which appear to have a side chain input will receive the side chain channels.
About mono plug-ins: in automatic mode, mono plug-ins will process only the first audio channel, and the wet mono output will be copied to all channels of the main bus (side chain unaffected). If you want to only apply the plug-in to one of the incoming audio channels instead, you can use the manual configuration.
Manual Selection
Automatic detection may however not work properly for some plug-ins, and you may want to change which channels the effect applies to (for multi-mono effects, or to process side chain channels for example). That's what the audio I/O window is for:
When selecting a specific number of inputs and/or outputs instead of using "automatic", you can choose which channels are connected to each i/o for this particular plug-in:

- if the same channel is selected for multiple outputs, only the last selected plug-in output will be audible (plug-in outputs are not summed).
- By default, all channels that are not used as outputs by the plug-in remain unchanged (copied from the same channels before the plug-in). For example, on a stereo configuration, if a mono plug-in is set to process only channel 1 and use channel 1 as output, channel 2 will remain unaffected. Select "mute unused audio channels" to mute these unprocessed channels instead.
Oversampling
Starting with MB-7 Mixer 3.55, it is possible to have a plug-in process audio (and MIDI) at higher samplerates. You can select the oversampling ratio and resampling quality with the oversampling menu:

Oversampling can be useful for plug-ins doing non-linear processing (distortion, compression...) which do not have built-in oversampling capabilities and cause artefacts (aliasing). It may also benefit EQs (you can get smoother curves in the upper frequencies).
Oversampling may however result in other types of artefacts and will require more CPU to process the same amount of data. With high quality resampling, additional latency may also apply.
Warning: please note that some third party plug-ins may not support higher sample rates. Save your work before trying this feature on new plug-ins!
Note: The oversampling settings are saved when using the "Save As..." command to save the plug-in as a favorite.
The Preferences Pane

In the preferences pane, you can set the default VST plug-ins path by clicking on it or on the button labelled "...". This VST plug-ins directory is used for several purposes:
- It is the default directory that is opened when you want to load a VST plug-in.
- It is used as the root path when saving/loading presets that include VST effects: the path of VST plug-ins is saved relatively to this root path, so that you can reopen your sessions on different machines that may have different VST paths (typically on a Mac and a PC).
If you happen to have your VST plug-ins installed in several paths, we advise you to choose the VST path that contains most of your plug-ins. You can then use the "User VST plug-ins directory" to define an extra location for plug-ins. This extra path will be used by the MB-7 Mixer plug-in as an alternative root path to load and save the plug-ins.
Please note that these paths are used for VST2 plug-ins only - they do not affect the location of VST3 plug-ins.
If the "Restore plug-ins editors on open" option is checked (default), when the MB-7 Mixer plug-in is opened, inserted plug-ins user interfaces will be restored at the same position as when the MB-7 Mixer plug-in was last closed. If the option is unchecked, all plug-ins user interfaces will be kept closed when re-opening the MB-7 Mixer plug-in, and their position on screen will not be saved.
Drag and drop support
The user interface supports drag and drop to manipulate plug-ins easily:
- drag and drop plug-ins between slots (copy or move).
- hold the alt key on Mac and Ctrl key on windows to copy (duplicate) a plug-in instead of moving it.
- drop the plug-in before another to insert it in the chain
- drag and drop plug-ins between several instances of Axiom or accross plug-ins (compatible with the latest preview of Late Replies, MB-7 Mixer and PatchWork).
- drag and drop .dll, .vst, .vst3, or .component files directly from the Finder or Explorer onto plug-in slots.
- drag and drop .plgnfo files (previously saved from the software) directly from the Finder or Explorer onto plug-in slots.
The various elements of the user interface (knobs, sliders, buttons...) are simple and intuitive to operate, but more information about how to interact with them is available in the "Plug-ins Basics" chapter of this manual.
Operation
This section decribes several common use cases for the plug-in. A complete list of the parameters exposed by the plug-in is available in the next section.
Setting the Crossover Points
Be it on a full mix or a single track, at this step your aim is to isolate particular frequencies to apply a specific treatment to it. The best way to adjust the frequency ranges is to use the "Solo" button of the monitoring section to hear the signal processed by each band.
This method also applies to selecting the appropriate filters slopes. You will usually avoid very steep filters (artifacts at the crossover points may be more prominent), but they can be useful to isolate very particular frequencies.
Using the plug-in as an Equalizer
Thanks to its flexible crossover filters and with the gain controls offered for each band, the plug-in can be used as a powerful equalizer with very good control over the response curve. Isolating bands using the solo button helps finding the right spot to boost or cut. The mute button will transform a band into a notch, high-cut or low-cut filter.
The additional grouping capabilities are very helpful to setup the balance between bands and boost/cust several portions of the spectrum simultaneously.
Using the Plug-in as a Stereo Enhancer
The extra features offered by the stereo version of the plug-in can help you control how the spectrum occupies the stereo field.

Using the Spread Control
As stated in the introduction, you may want to use the positive values of the spread parameter sparingly in order to avoid completely out of phase left and right signals. The mono button on the master section will help you check that your settings do not affect the mono part of the signal too much.
A common practice is to narrow the lower end of the spectrum (bass) to keep it centered. To do so, you just need to decrease the spread value on the lowest band. It may be necessary to use this technique on a full mix or on stereo instruments with strong stereo effects on the full spectrum.
Panning
Several panning techniques can be achieved very easily with the Blue Cat's MB-7 Mixer plug-in.
You may want to pan instruments in a mix without affecting the lower end of the spectrum (since you will probably want to keep it centered). A simple two-band setup will let you do that, panning only the higher end of the spectrum.
It is also possible to create interesting stereo effects on single instruments in order to widen their presence in a mix: just pan various parts of the spectrum differently (but try to keep the bass centered). Alternating left and right panning on a large number of bands can completely the transform the perception of an instrument.
While mixing, you may also encounter problems with instruments that fight for the same frequencies at the same location. In this case, you may want to pan differently the competing frequencies on both tracks and solve the conflicts.
Both panning and spread controls may also be used to fix recording issues (wrongly placed mics, unwanted room effects...) or revist an existing mix.
Creative Grouping for Optimal Workflow
The grouping features included in the plug-in can be used for a wide range of workflow enhancements. Below are typical examples where grouping can help work faster and more efficiently.
Single Instance
In a single instance you can group several frequency bands in order to move all of them in parallel with a single slider. Most of the time you will be using the "quick group" feature to quickly switch linking on and off.
If you are boosting the levels, you can also add the master slider to the group you are using, in reverse mode. This way it will compensate the overall increase in volume so that the output does not clip.
Multiple Tracks
If you are using the plug-in on several tracks, it can be very handy to use "global groups" to limit the number of controls that need to be moved to get the sound you are looking for. Typically, when adjusting the spectral balance between two tracks and their location in the stereo field, you can use several instances of the Blue Cat's MB-7 Mixer plug-in and link them together in reverse mode: panning a frequency range to the left on one track will pan it to the right on the other track and so on.
Pre and Post Adjustments on a Single Track
If you are using non linear processors (dynamics processors such as a compressor, a gate, an expander, or distortion, analog-style processing etc.), it is sometimes very useful to change the content of the spectrum before applying the effect, because it may respond very differently (for instance remove lower frequencies before a compressor).
In such a scenario you will usually apply an EQ before the non-linear effect. But the issue with that is that you will have to compensate the boosts and cuts with another EQ after the effect so that the overall spectrum remains unchanged. The process can become very tedious, and that's where using global groups with the Blue Cat's MB-7 Mixer can help: simply add all bands (+master) to the same global group on both instances (before and after the effect), switch all bands of one of the instances to reverse mode, and you are done: the instance after the effect now compensates the modifications applied to the spectrum by the first instance.
Applying Audio Effects to a Selected Frequency Range
In many cases, applying an audio effect to the full spectrum range may result in unwanted side effects (too much ringing the higher frequencies, increasing the DC offset etc.). With the MB-7 Mixer plug-in's ability to host third party plug-ins, you can select the frequency range to which you want to apply effects:
- Set the plug-in to use 3 bands.
- Bypass the upper and lower bands (1 and 3).
- Insert the VST or Audio Unit plug-in you want to use in the mid band (2).
- Tweak the crossovers to select the appropriate frequency range the effect should apply to.
The VST or Audio Unit effect will keep the upper and lower frequencies unchanged and will apply only to the selected range!
The example below shows the Blue Cat's Chorus plug-in applied between 200 and 2500 Hertz:

Macro Controls And Custom Plug-In
With macro controls (controls assigned to multiple plug-ins parameters), it is possible to create your own custom multiband plug-in with a reduced set of parameters, out of a complex multiband setup of existing plug-ins:

It can be saved as a preset and used as a custom effect in the future, without having to open each plug-in's individual editor to perform adjustments.
Using the Plug-in as a Spectrum Inspector
The plug-in includes a premium spectrum analyzer that lets you see the spectral content of a track. It can be used in combination with the solo button of one or several bands to isolate parts of the spectrum and check with your ears what's going on.
The peak level meters available on each band are also very helpful to monitor the spectrum and check for unwanted frequencies.
Setting up the Plug-in as a MIDI Side Chain Destination
Thanks to its zipper-free MIDI controllable and automation-capable parameters, the plug-in can be used as a destination of a MIDI side chain.
A typical application is multiband side-chain compression/expansion/gating, using the Blue Cat's MB-5 Dynamix plug-in as a side chain source to control the gain of various bands of an instance of the Blue Cat's MB-7 Mixer plug-in:

A complete step by step tutorial about this topic is available on our website. It explains how to setup the plug-in for such tasks.
Since MIDI events are sent to VST plug-ins inside the MB-7 Mixer plug-in, it is even possible to use a similar technique to control plug-ins inside the plug-in!
For other types of side chain applications, we also have many plug-ins that can output parameter values to be reused with another plug-in such as this one.
Using the Plug-in as a MIDI Side Chain Source
The plug-in is also able to output MIDI or automation data (individual band and master levels). You can reuse these parameters for side chain effects as explained above.
Using the Plug-in as a VST/AU bridge
Since the plug-in is able to host VST and Audio Unit plug-ins and is available in multiple formats, it can be used to host VST and AU plug-ins in a DAW that does not support the VST or AU formats. When used in broadband mode, the plug-in will simply operate as a VST or AU plug-in bridge, with additional gain and stereo controls, like a simple channel strip.
Blue Cat Audio Plug-Ins Basics
This chapter describes the basic features that are common to all our plug-ins. If you are already familiar with our products, you can skip this part.
User Interface Basics
About Skins
Like all Blue Cat Audio plug-ins, Blue Cat's MB-7 Mixer uses a skinnable user interface. It means that the appearance and behavior of the user interface can be entirely customized.
Especially with third party skins, the experience may be quite different from the one offered by the default skins that we provide. However, our plug-ins and our skinning engine have several standard features that will be available whatever your favorite skin.
More information about custom skins can be found in the skins section.
The Main Toolbar
In most skins, an optional toolbar at the top of the user interface gives you access to the main options and settings of the plug-in:

Smooth Bypass
On the left, the power button can be used to smoothly bypass the plug-in.
Presets Area
At the center of the toolbar, you can see the current preset area (the "Default Settings" box). It displays the name of the current preset, with a "*" at the end if it has been modified since loaded.
The arrows on the left and right let you navigate thru the (factory and user) presets available for the plug-in.
Clicking on the preset name opens the presets menu which lets you manage the presets of the plug-in.
Using the knob on the bottom right of this area, you can reduce the opacity of the window, and make it transparent (the actual result may depend on the host application). Additional messages may appear in the area next to this knob, depending on the plug-in.
Some plug-ins may also propose you to manually select the audio I/O inside the plug-in (bottom left of the presets area), regardless of the host configuration. It can be useful for example to save CPU by selecting mono to stereo configurations (instead of full stereo sometimes chosen by default by the host), or add extra channels to manage side chain internally, when the host does not provides any side chain input. Please note that this does not change the number of I/O seen by the host application.
Commands
The icons in the toolbar give you access the to the following commands that are detailed in the next paragraph:
| Icon | Name | Function |
|---|---|---|
|
|
Menu | Open the main menu |
|
|
Control Settings | Display the controls settings menu (to manage automation and MIDI control, as described here). |
|
|
Undo | Undo |
|
|
Redo | Redo |
|
|
Manual | User Manual |
|
|
About | About |
|
|
Zoom | Scale the user interface (from 70% to 200%). |
The Main Menu
The main menu is available from the main toolbar, or if you right click anywhere on the background of the plug-in:
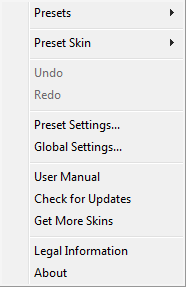
- Presets: opens the presets menu to manage presets.
- Preset Skin: opens the skins menu to choose the skin for the current preset and manage alternative skins for the software.
- Undo/Redo: undo or redo the latest modifications. This includes all changes made to the current preset settings such as MIDI or automation preferences.
- Presets Settings: open the presets settings window. It lets you change the skin, MIDI and automation settings for the current preset.
- Global Settings: open the global settings window. It lets you change the skin, MIDI and automation settings that are used by default in all instances of the plug-in (if not overridden by the current preset).
- User Manual: open this user manual.
- Check for Updates: opens up our website to let you check if any update for this software is available.
- Get More Skins: get more skins for this software.
- Legal Information: browse licensing and misc legal documents.
- About: displays the “about” dialog box.
Controls
Examples
Here are a few examples of typical controls you will encounter in the user interface of our plug-ins:
| slider | slider | knob | button | Text control |
|
|
 |
 |
|
|
Interacting with Controls
You can interact with the controls of the plug-in interface either with the mouse or the keyboard.
Setting the keyboard focus on a control (so that it responds to key strokes) may be automatic (when you pass the mouse over it it gets focus) or manual (you have to click on the control to set the focus on it). Note that all host applications behave differently regarding keyboard handling. In some applications you may not be able to use all keys described later in this manual to interact with our plug-ins. It is usually made obvious to you to know the active surfaces of the skin (the places where you can click with the mouse): the mouse cursor usually changes when you can do something on a control. In the default skins delivered with the plug-in, the cursor changes to a small hand or an arrow to tell you when your mouse is over an active control.
Mouse
Various mouse movements will let you interact with the controls:
| Mouse Interaction | Action |
|---|---|
| Left Click | Acquire focus and start dragging or push (button) |
| Left Click + Alt Key | Set the value to default |
| Left Double Click |
Acquire focus and launch the “fine
tuning” edit box (except button):
 |
| Right Click | Set the value to default |
| Mouse Wheel | Increment or decrement the position (focus required) |
| Mouse Drag | Change the control position depending on mouse movement (except button) |
Keyboard
All control widgets support the following keys (note that some of them are caught by the host and thus never forwarded to the control. For example in Steinberg Cubase SX you cannot use the arrow keys to control the plug-in):
Keys Common to All Controls
| Key | Action |
|---|---|
| Up Arrow | Small increment of the position (up or right) |
| Down Arrow | Small increment of the position (down or left) |
| Left Arrow | Same as Down Arrow |
| Right Arrow | Same as Up Arrow |
| Page Up | Large increment of the position (up or right) |
| Page Down | Large decrement of the position (down or left) |
| + | Small increment of the value of the control |
| - | Small decrement of the value of the control |
| d | Set to default value (same as mouse right click) |
| e |
Opens the 'fine tuning' window to precisely
set the parameter:
|
| SHIFT | When the key is down, the fine tuning mode is on, and you can modify the value with better precision when moving the mouse, the mouse wheel or using the keyboard. Just release the key to get back to the normal mode. |
Keys Specific to Buttons
| Key | Action |
|---|---|
| Enter | Pushes the button |
Presets
To get started with the plug-in and discover its capabilities, a couple of factory presets are provided. You can also save your own presets and recall them later for other projects. Our plug-ins propose a full-featured preset manager to let you save, browse, organize and recall its presets.
The Presets Menu
The presets menu can be opened from the main menu or the main toolbar. It displays the list of presets available for the plug-in as well as commands to load, save or organize presets:
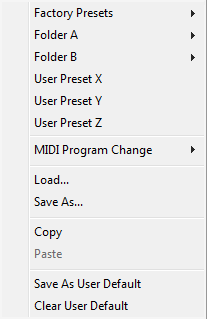
- Factory Presets: shows the list of factory presets delivered with the plug-in.
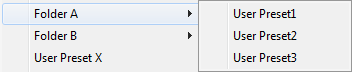
- "Folder A" to "User Preset Z": user presets and categories.
- MIDI Program Change: activate MIDI Program Change support (see below).
- Load: load preset from file.
- Save: save current state to last loaded user preset.
- Save As: save current preset to a file.
- Copy copy preset to the system clipboard.
- Paste paste preset from the system clipboard, if available.
- Save As User Default: save the current state as the default preset. This preset is used every time a new instance of the plug-in is created.
- Clear User Default: reset the default preset to its factory state: this makes the plug-in forgets the custom settings you might have saved as a default preset.
More about Presets
There are two types of presets: factory presets (read only) that are provided with the plug-in, and user presets that can be created and stored by the user.
The user presets are stored in a subdirectory of the documents folders of your profile ("Documents" on Mac, and "My Documents" on Windows): Blue Cat Audio/[Plug-in Name]/Presets. Each preset is stored as an individual file. You can create folders and subfolders in the Presets directory to classify your presets, as shown in the example below:
If you save a preset named "Default" in the root Presets directory, it will override the factory default preset (that's what "Save As Default" does). To restore the factory default preset, you can just remove this file or use the "Reset Default" command.
MIDI Program Change
It is possible to load presets remotely using MIDI "Bank Select" and "Program Change" messages. To enable this feature, select a MIDI channel to receive the events from in the MIDI Program Change menu item from the presets menu:
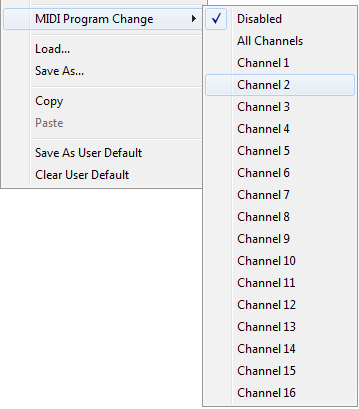
This setting is saved for each plug-in istance with your session but not in presets (except for the default preset, using the "Save as User Default command"). Once activated, the plug-in menu will display the bank number followed by the preset number for each preset:
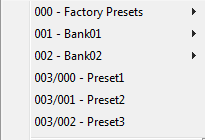
Every root folder is considered as a new bank, starting with the factory presets (bank 0). Program and bank numbers may change while you add folders and presets, so you should be careful when naming them if bank and program numbers matter to you. It is recommended to use folders to make this task simpler. As a side note, sub folders do not define additional banks (all presets contained in sub folders are associated with the current bank.
As specified by MIDI, bank select messages are not used until a program is actually selected.
MIDI Implementation note: the software supports all types of Bank Select methods. You can use either MIDI CC 0 or MIDI CC 32 to select banks. If both are used simultaneously, they are combined together so that you can use more banks (in this case CC0 is LSB and CC32 is MSB, and actual bank number is 128*CC0+CC32).
MIDI and Automation Control
Blue Cat's MB-7 Mixer can also be remotely controlled via MIDI using MIDI CC ("Control Change") messages or automation curves, if your host application supports it. It is possible to customize the channel, control numbers, range and response curve used for each parameter in the settings panel available from the main menu (see the Plug-in Settings chapter for more details).
MIDI and Automation Settings Menu
The main menu
Most skins also provide the ability to change MIDI and automation settings directly in the main user interface. Clicking on the control settings icon in the main toolbar opens the following menu:
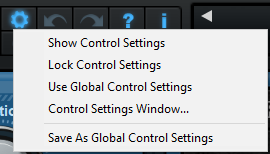
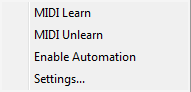
- Show Control Settings: show direct access to individual control settings for each parameter in the user interface (see next paragraph).
- Lock Control Settings: lock the current controls settings for MIDI and automation so that they remain unchanged when loading presets.
- Use Global Control Settings: ignore the current MIDI/automation settings and use the global settings instead.
- Control Settings Window: display the control settings window, to change control settings for all parameters.
- Save As Global Control Settings: save the current settings as global settings (used by default, when no specific MIDI/Automation setting has been set for the cuirrent preset).
Individual Control Settings
When this feature is activated using the "Show Control Settings" item in the MIDI and Automation Settings menu, dropdown menu buttons appears next to the main controls displayed by the plug-in:
Clicking on this button shows the MIDI/Automation settings menu:
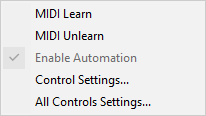
- MIDI Learn: launches MIDI learn mode for the control: touch your MIDI controller and the control will learn from it the MIDI channel and CControl Number. To end the learn mode, reopen this menu and deselect the option.
- MIDI Unlearn: deactivates MIDI control for this parameter.
- Control Settings: launches the advanced settings panel described below. This controls the settings for the current preset.
- All Control Settings: display the control settings window, with access to all parameters.
Advanced MIDI and Automation Settings
You can completely customize the way the plug-in is controlled by automation and MIDI. For a global view of all parameters at a time, you can use the Plug-in Settings window for the current preset which is available from the main menu.
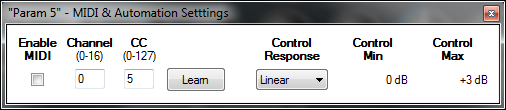
MIDI Settings:
- Enable MIDI: enable/disable the MIDI control of the parameter.
- Channel: MIDI Channel for the parameter control. If set to 0, the plug-ins will accept Control Change Messages from all MIDI Channels (MIDI Omni mode).
- CC: Control Change Number.
- Learn: click on this button to activate the MIDI learn functionality. When it is activated, you can move your MIDI controller, and the plug-in will automatically detect the control settings .
MIDI and automation settings:
- Response: response curve of the MIDI or automation control: from very fast to slow control.
- Min: minimal value of the parameter when MIDI controlled or automated.
- Max: Maximum value of the parameter when MIDI controlled or automated.
Note: if the Min value is higher than the Max value, the response curve will be reversed: increasing the control value will decrease the parameter value.
Note: if you double click on the parameter text control boxes for the max and min values, a “fine tuning” edit box will appear and let you change the min and max values with more precision:
MIDI and Automation Output
Blue Cat's MB-7 Mixer can also generate MIDI CC Events or automation curves thanks to its output parameters.
You have access to the same settings for the output parameters as for input parameters using the dropdown menu, except that you can also enable or disable automation.
The output parameters MIDI and Automation Menu:
The advanced output parameters MIDI and Automation settings window:

More
Check our online tutorial for more screenshots and more examples of our plug-ins user interfaces.
Blue Cat's MB-7 Mixer Parameters
All parameters described below can be automated and controlled via MIDI if your host application supports it. You can precisely define this behavior in the settings panels described later in this manual.
Input
The input parameters of this plug-in are the following:
| Name | Unit | Description | Comment |
|---|---|---|---|
| General | |||
| Bypass |
|
Bypass the effect. |
|
| Bands |
|
Number of Bands. |
|
| For each band (band index: i) | |||
| Bi Bypass |
|
Bypass the effect for this band. |
|
| Bi Mute |
|
Mute this band. |
|
| Bi Solo |
|
Solo this band (listen to the band). |
|
| Bi Gain | dB | Gain for this band. |
|
| % Spread | % | Stereo spread for this band (stereo version only). Set to -100% for mono only, and to +100% for opposite phase. |
|
| Bi Pan | % | Pan value for this band (stereo version only). Set to -100% for full left panning, and to +100% for full right panning. |
|
| Bi Reset Max |
|
Changing the value of the parameter resets the max peak value recorded for this band. |
|
| Freq i - i+1 | Hz | Center frequency for the crossover between this band and the next one. |
|
| Slope i - i+1 | dB/Octave | Slope for the crossover between this band and the next one. Controls the separation between bands (the higher the sharper the separation). |
|
| Master Section | |||
| Gain | dB | Master output gain. |
|
| Spread | % | Stereo spread for the master output. Used for mono compatibility check (ranges only from -100 to 0%). |
|
| Reset Max |
|
Changing the value of the parameter resets the max peak value recorded for the master output. |
|
Output
Mono and stereo versions of the plug-in offer almost the same outputs. The main difference is that the stereo version exposes the same value twice (one of each channel), except if not specified.
| Name | Unit | Description | Comment |
|---|---|---|---|
| For each band (band index: i) | |||
| Bi Peak | dB | Measured peak level for this band. | (L) and (R) for the stereo version |
| Bi Peak Hold | dB | Local Maximum value of the Audio level over time for this band. This value is automatically reset by the plug-in on a regular basis. | (L) and (R) for the stereo version |
| Bi Max Peak | dB | Maximum value of the Audio level over time for this band (can be reset by "Bi Reset Max" parameter changes) for both channels. | (L) and (R) for the stereo version |
| Master Section | |||
| Peak | dB | Measured peak level at the output of the plug-in. | (L) and (R) for the stereo version |
| Peak Hold | dB | Local Maximum value of the Audio level at the output of the plug-in. This value is automatically reset by the plug-in on a regular basis. | (L) and (R) for the stereo version |
| Max Peak | dB | Maximum value of the Audio level over time at the output of the plug-in (can be reset by "Reset Max" parameter changes) for both channels. | (L) and (R) for the stereo version |
Plug-in Settings
In addition to the controls offered in the main user interface, Blue Cat's MB-7 Mixer has various settings that let you fine tune the behavior of the plug-in. You can choose to change these settings either for the current preset or globally for all instances of the plug-in.
The Global Settings Window
The settings available in this window apply to all instances of the plug-in, for all presets, if not overridden in the presets settings. Consider these settings as “default” settings.
General
You can change the default skin for all instances of the plug-in: write the skin file path in the text edit box or click on the button to open a file chooser dialog. If you have several instances of the plug-in opened in your session, you will have to re-open the user interfaces of these plug-ins to see the skin change.

The output data refresh rate can also be customized for all instances of the plug-in. It controls the refresh rate of non-audio data produced by the plug-in (parameters, curves...). It also controls the refresh rate of output MIDI CC messages or output automation data. The higher the refresh rate, the better precision, but also the higher cpu usage (some host applications may also have trouble recording MIDI data at high refresh rates). The default value is 50 Hz.
Global Control Input Settings (MIDI and Automation)
The plug-in offers a couple of settings that affect the way it is controlled by MIDI messages or automation. While the first settings only apply to MIDI control, the "Control Response", "Min" and "Max" settings apply to both automation and MIDI control.
For each parameter you can define a default MIDI channel and CC number. You can then control the plug-in with an external MIDI controller or one of our plug-ins that generate MIDI messages.
The settings below are available for each plug-in parameter.
MIDI Settings:
- Enable MIDI: enable/disable the MIDI control of the parameter.
- Channel: MIDI Channel for the parameter control. If set to 0, the plug-ins will accept Control Change Messages from all MIDI Channels (MIDI Omni mode).
- CC: Control Change Number.
- Learn: click on this button to activate the MIDI learn functionality. When it is activated, you can move your MIDI controller, and the plug-in will automatically detect the control settings .
MIDI and automation settings:
- Response: response curve of the MIDI or automation control: from very fast to slow control.
- Min: minimal value of the parameter when MIDI controlled or automated.
- Max: Maximum value of the parameter when MIDI controlled or automated.
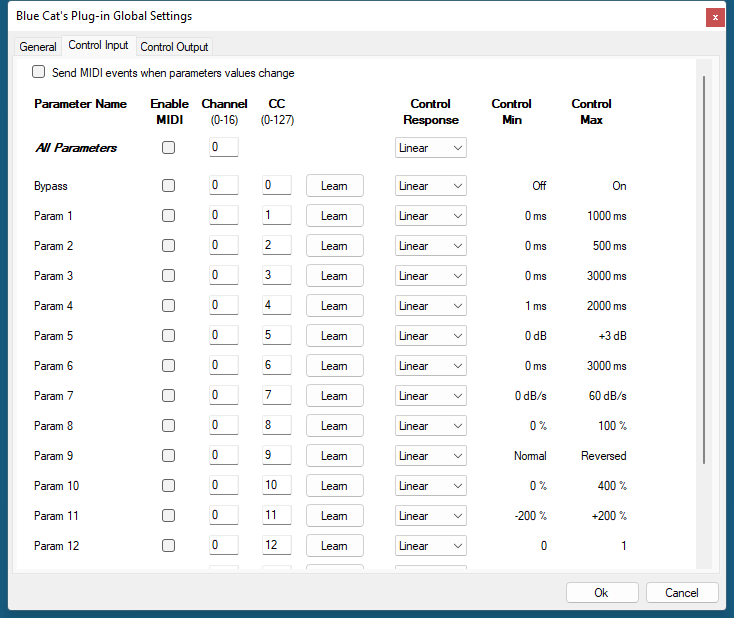
Note: if the Min value is higher than the Max value, the response curve will be reversed: increasing the control value will decrease the parameter value.
Note: if you double click on the parameter text control boxes for the max and min values, a “fine tuning” edit box will appear and let you change the min and max values with more precision:
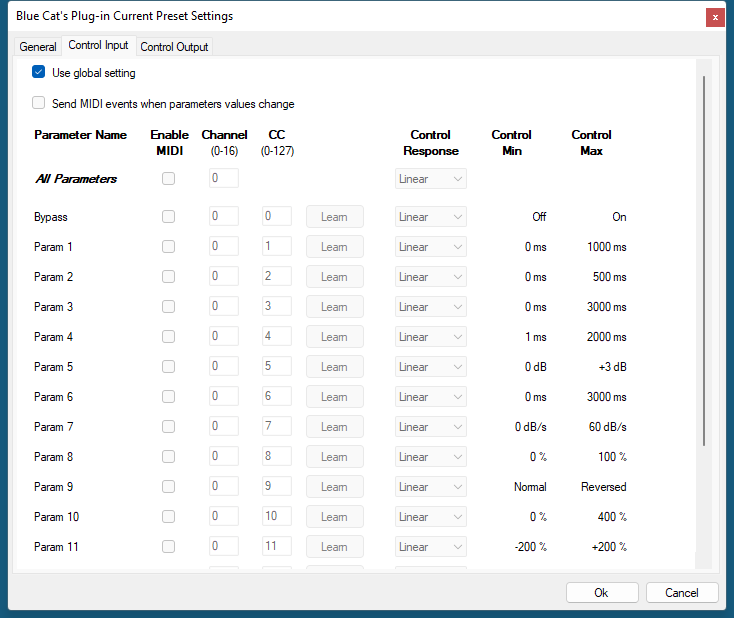
"Send MIDI events when parameters values change": activate this option when using a control surface that accepts MIDI events as input. MIDI messages will be sent to the output of the plug-in when the user change the parameters values in the user interface, to keep the software and the controller in sync. MIDI is only sent for parameters that are activated for MIDI control.
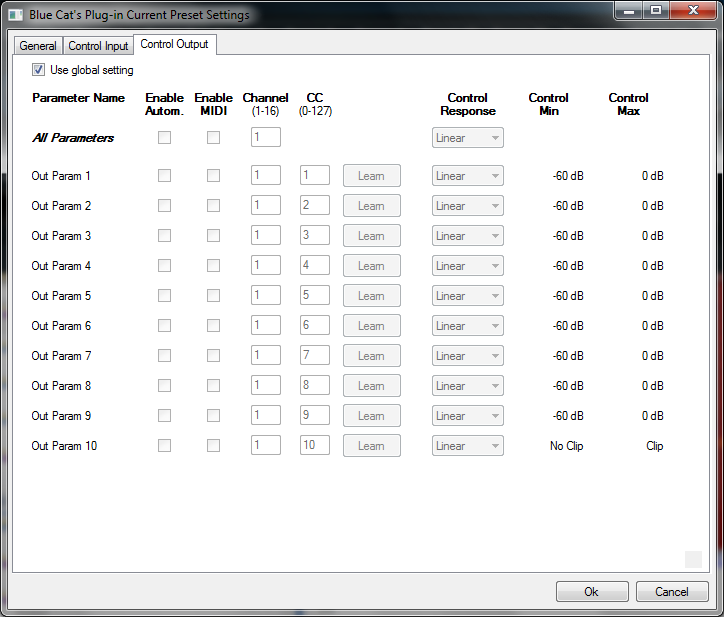
Global Control Output Settings (MIDI and Automation)
You can set the same properties for the output parameters as for the input parameters: in this case, they may trigger MIDI CC messages or generate automation curves when modified. Since it's output, you cannot set the channel to MIDI Omni, so you must choose a channel.
Output parameters can also generate automation curves in most host applications. You can enable automation for any output parameters you are interested in (see the "Enable Autom." checkbox).
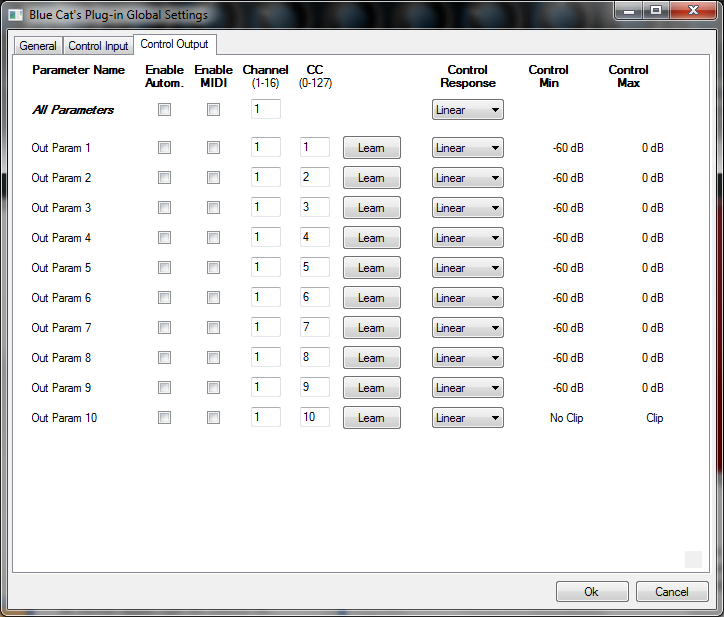
Note: if the Min value is higher than the Max value, the response curve will be reversed: increasing the control value will decrease the parameter value.
Note: if you double click on the parameter text control boxes for the max and min values, a “fine tuning” edit box will appear and let you change the min and max values with more precision:
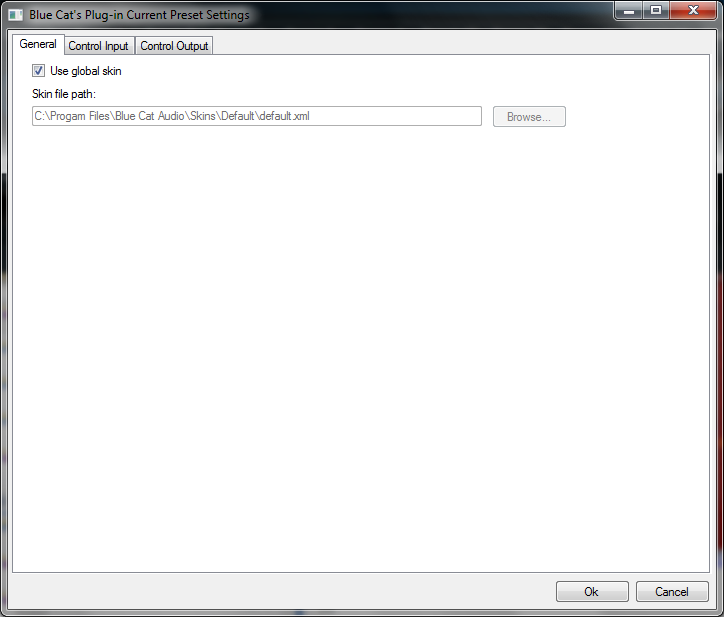
The Current Preset Settings Window
In this window you can change the settings for the current preset of the current instance of the plug-in only.
Preset Skin
You can choose to use the global skin setting or to change the skin for the current preset. This way you can have different skins for different instances of the plug-in in the same session in order to differentiate them.
Preset Control Input Settings (MIDI and Automation)
Use the global settings or override them for the current preset. The parameters are the same as for the global input settings.
Preset Control Output Settings (MIDI and Automation)
Use the global settings or override them for the current preset. The parameters are the same as for the global output settings.
About Skins
Blue Cat's MB-7 Mixer integrates Blue Cat's skinning engine that allows you to customize the user interface. You can download alternate skins for your plug-in at the following address:
If you don't find a skin that fits your need or if you want a custom one, you can choose to create your own skin.
Choosing the Skin
There are two ways to select the skin of your plug-in: you can change the default (or 'global') skin, or change the skin for the current preset only (either in the preset settings page or from the main menu). The global skin applies to all plug-in instances (choose this one if you want to use the skin used by default, regardless of the session or preset), whereas the current preset skin only applies to the current preset of the current plug-in instance (use this one if you want to change only the skin for the current session/preset).
Note: in some host applications, the plug-in window won't resize automatically when you choose a skin with a different size. In this case, just close the window and re-open it: it will be displayed with the right size.
The Skins Menu
The skins menu can be opened from the main menu. It displays the list of skins available for the plug-in as well as commands to manage the skin used by default when no preset skin has been selected:
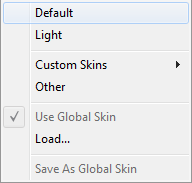
- First Section - Factory Skins: shows the list of factory skins delivered with the plug-in ("Default" and "Light" in this example).
- Second Section - User Skins: shows the list of user skins that have been installed in the Documents Skins folder for the plug-in (see below).
- Use Global Skin: use the global skin for the current preset/session (unloads any custom skin previously selected for the current preset).
- Load: opens a file browser dialog to manually select the skin from the file system.
- Save As Global Skin: use the current preset skin as the global skin (loaded by default if no preset skin has been defined).
Installing User Skins
To select user skins directly from the skins menu, install them in the "Skins" directory available in the plug-in's documents folder:
[Your Documents Folder]/Blue Cat Audio/[Plugin Name]/Skins/
The skin engine will scan this folder for new skins (xml files) and display them in the menu. The skin files should be in the root skins folder or in a subdirectory inside this folder: subdirectories are not scanned recursively.
Other Methods to Select Skins
You can also select the skins in the settings panels available from the main menu:
The global skin (used by default if no preset skin has been selected) can be changed in the global settings pane. The current preset skin can be changed in the preset settings page .
Create a Custom Skin
You can create custom skins for your plug-in in order to adapt it to your exact needs. You can change its look and feel and make it completely integrated in your virtual studio!
Just read the Blue Cat's Skinning Language manual and download the samples for the tutorial on http://www.bluecataudio.com/Skins. You can get ready to create your own skins in a few minutes. You can then share your skins on our website.
More...
This manual only covers the main aspects of Blue Cat's MB-7 Mixer. Our website offers many additional resources for your Blue Cat's MB-7 Mixer plug-in. It is constantly updated, so keep an eye on it!
Updates
As you can see in the history log below, we care about constantly updating our products in order to give you the latest technology available. Please visit our website often to check if Blue Cat's MB-7 Mixer has been updated, or subscribe to our Newsletter to be informed of the latest news about our products.
Note: minor version updates are available from the same location as the original full version download (link received by email upon purchase). The demo version publicly available on our website will not let you register.
You can also follow us on twitter, facebook and instagram for almost real time updates notification, and subscribe to our YouTube channel to watch the latest videos about our software.
Versions History
V3.62 (2025/09/08) |
|
V3.61 (2025/08/12) |
|
V3.6 (2024/09/09) |
|
V3.56 (2024/03/20) |
|
V3.55 (2023/05/17) |
|
V3.5 (2022/11/22) |
|
V3.42 (2022/03/28) |
|
V3.41 (2021/10/19) |
|
V3.4 (2021/05/04) |
New Features & Improvements:
|
V3.33 (2020/10/05) |
New Features & Improvements:
|
V3.32 (2020/01/06) |
New Features & Improvements:
|
V3.31 (2019/07/23) |
|
V3.3 (2019/06/20) |
New features:
|
V3.2 (2018/11/20) |
|
V3.1 (2018/06/18) |
|
V3.0 (2017/02/23) |
|
V2.54 (2016/12/29) |
Warning: because of a bug of the initial VST3 release, this new version may not work with existing sessions that used the VST3 format. See this blog post for more details and how to fix it. |
V2.53 (2016/05/10) |
|
V2.52a (2016/03/04) |
|
V2.52 (2016/03/03) |
|
V2.51 (2015/07/16) |
|
V2.5 (2015/04/29) |
New Features:
|
V2.4 (2014/10/20) |
New Features:
|
V2.3 (2014/07/03) |
New Features:
|
V2.2 (2014/04/23) |
New Features:
|
V2.11 (2013/12/03) |
Plug-ins compatibility improvements:
|
V2.1 (2013/10/25) |
New features:
|
V2.04 (2013/09/30) |
Plug-ins Compatibility Improvements:
|
V2.03 (2013/09/23) |
New Features:
|
V2.02 (2013/09/13) |
New Features:
|
V2.01 (2013/09/10) |
Bug Fixes:
|
V2.0 (2013/09/05) |
New Features:
|
V1.1 (2013/06/27) |
|
V1.1 (2011/08/31) |
|
V1.0 (2011/04/06) |
First release. |
Thanks again for choosing our software!
See you soon on www.bluecataudio.com!