


")


Table Of Content
- Introduction
- Using Blue Cat's Plug'n Script
- Introduction
- The User Interface
- Operation
- Scripting Tutorial
- Angelscript Scripting Reference
- Advanced Scripting Topics
- Native Programming Tutorial
- Native Programming Reference
- Customizing the User Interface
- Adding a User Manual
- Resources
- Standalone Application Basics
- Blue Cat Audio Plug-ins Basics
- Plug-in Settings
- About Skins
- More
Introduction
Blue Cat's Plug'n Script is an audio and MIDI scripting plug-in and application that can be programmed to build custom effects or virtual instruments, without quitting your favorite DAW software.
With this plug-in, you can write your own plug-in or application with very little knowledge about programming. If you do not care about programming, Blue Cat's Plug'n Script can also be used as a regular multi effects processor with existing scripts or to get someone else write this very particular utility you have been searching for years and cannot find anywhere.
If you are an experienced programmer, you will find in Plug'n Script a powerful development environment for audio plug-ins: prototype algorithms quickly, generate a state of the art graphical user interface (GUI) without a single line of code, and export a VST, VST3, AAX, or Audio Unit plug-in or a standalone audio application, right from within your favorite DAW! Creating a plug-in has never been so fast!
This plug-in has been in our lab for several years and has been used to prototype lots of our existing plug-ins. It supports both scripts distributed as source code and pre-compiled binary scripts.
For source scripts, it uses the high performance AngelScript scripting engine, originally developed for video games, with a JIT compiler that helps compiling scripts into machine code for optimal performance. Starting with version 2, the plug-in also supports native (compiled) code and can load binary scripts built from C or C++ (or any language that can export C functions, such as Delphi, Fortran, .Net...), using the same interface as the angelscript version.
The syntax of the AngelScript language is close to Java, C#, C++ or JavaScript, making it very easy to learn. It is also convenient to reuse your scripts into native code, or integrate code snippets found on the web into your script. Also, switching between angelscript and binary versions of the same script is very easy, requiring very few changes.
The plug-in includes dozens of audio and MIDI processing scripts as well as several virtual instruments and utilities to enhance your workflow. They can be used as is, or as examples to get started to write your own scripts. User scripts can be shared in the scripts repository, which also includes the factory scripts and native projects for reference.
To build complex effects chains using multiple scripts, you might be interested in Blue Cat's PatchWork, which can host multiple instances of this plug-in in series or parallel. While writing scripts, you might also want to use our analysis tools to check their effect on the signal.
 for you.")


Typical applications: Audio and MIDI scripting, virtual instruments programming, VST plug-in development, digital signal processing (DSP), Multi-effect processor, algorithm prototyping, audio dsp learning, audio application programming.
System Requirements
MacOS
- An Intel or Apple Silicon processor.
- Mac OS 10.9 or newer.
- For the plug-in, any VST / Audio Unit / AAX compatible application (64-bit) .
- For the standalone application, a Core Audio compatible audio interface.
Windows
- An SSE2-enabled processor (Pentium 4 or newer).
- Microsoft Windows Vista, Windows 7, 8, 10 or 11.
- For the plug-in, any VST / AAX compatible host software (32 or 64 bit).
- For the standalone application, an ASIO, MME or WASAPI compatible audio interface (ASIO recommended).
For more information about supported platforms, see our Knowledge Base.
Demo Limitations:
- 5 instances of the plug-in allowed per session.
- The effect is bypassed for half a second every minute.
- Exported plug-ins and apps display a demo message and will stop processing after 10 minutes.
Installation
The standalone version does not require any host application and can be run without requiring any third party application.
The plug-ins versions cannot be run standalone: they require a host application (see the System Requirements chapter for more information). Depending on which host application you use, you might need to install the plug-ins in different locations.
Before installing one of the plug-in versions, you should close all your host applications.
Windows
Install
All versions of the plug-in provide an installation program. Follow the steps of the wizard to install the software on your machine. During the installation you will be asked where you want the software to be installed. For the VST version, you should install the plug-in inside the VST plug-ins folder used by your host application(s). The default path set in the installer should work for most applications, but you should check your host software documentation to know where it looks for VST plug-ins. For other plug-in types, you should just use the standard path.
Some applications will not automatically rescan the new plug-ins, so you might have to force a refresh of the plug-ins list.
Upgrade
When a new version of the software is released, just launch the new installer: it will update the current installation.
Uninstall
To uninstall the software, simply launch the "Uninstall" program that is available in the start menu or in the configuration panel. It will take care of removing all files from your computer.
Mac
Install
On Mac the plug-ins are available as drive images with an installer. After download, double click on the dmg file to open it. You can then double click on the installer (.pkg file) to install the package.
Note for Mac OS 10.15 Catalina or newer: you may have to right click on the installer and select "Open" instead of double clicking on the file to launch the installation if your computer is not connected to the Internet.
Upgrade
When a new version of the software is released, just launch the new installer: it will update the current installation.
Uninstall
To uninstall the software, simply remove the component(s) from their install location (move them to the trash):
- Standalone applications are installed in the /Applications folder
- AAX plug-ins are installed in the /Library/Application Support/Avid/Audio/Plug-Ins/ folder
- Audio Units (AU) are installed in the /Library/Audio/Plug-Ins/Components/ folder
- RTAS Plug-ins are installed in the /Library/Application Support/Digidesign/Plug-Ins/ folder
- VST plug-ins are installed in the /Library/Audio/Plug-Ins/VST folder
- VST3 plug-ins are installed in the /Library/Audio/Plug-Ins/VST3 folder
If you want to completely remove all settings and configuration files, you can also remove these additional directories that may have been created on your computer:
- ~/Library/Preferences/Blue Cat Audio/[Plug-in name and TYPE], where TYPE is VST, AU, RTAS or AAX: global preferences.
- ~/Library/Preferences/Blue Cat Audio/[Plug-in name]: license information
- ~/Documents/Blue Cat Audio/[Plug-in name]: user data, such as presets, additional skins and user-created plug-in data.
Please be aware that these directories may contain user data that you have created. Remove these directories only if you do not want to reuse this data later.
First Launch
Standalone Application
Once the application has been installed, simply double click on its icon to launch it. On Mac, the application will be located in the 'Applications' folder if using the default install location. On Windows, you will find it in the start menu.
The first time you launch the application, it will ask you if you want to configure the audio interface:
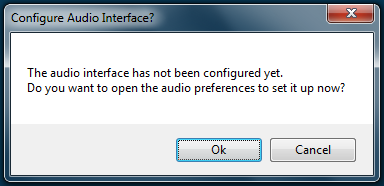
It is recommended to configure the audio interface before using the application, but you can still do it later by clicking on the "Edit/Audio Setup" menu. This opens the Audio/MIDI Preferences window reproduced below:
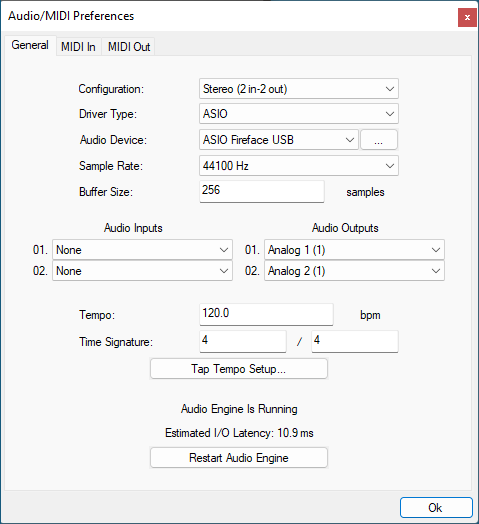
If the default setup displayed in the panel does not correspond to your needs, you can do the following:
- Choose the appropriate I/O configuration, if available.
- On Windows, choose the type of audio driver (ASIO is recommended. If you do not have an ASIO driver, we recommend using the ASIO4All driver).
- Choose the driver to use for audio input and audio output, if available (with ASIO, you can only choose a single driver for both).
- Select the sample rate and buffer size. Increasing the size of the buffer uses less CPU but adds latency.
- Select the audio inputs and outputs to use with the software.
- You can also set the tempo and time signature if relevant.
- Click on "Tap Tempo Setup" if you want to tap tempo with a MIDI controller.
Changes are applied to the application in real time and saved when closing the preferences window. You can see the status of the audio engine at the bottom of the window, as well as the estimated i/o latency (it depends on the sample rate, buffer settings and selected audio interface(s).
If the status of the engine is 'NOT Running', you may need to change the settings: try to increase the buffer size, change the sample rate (it might not be supported by the interface) or select another audio interface.
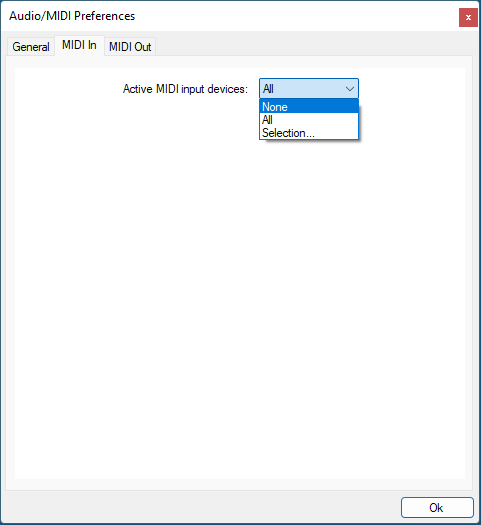
The MIDI In and MIDI Out panes let you select the MIDI devices to be used as input and ouput. You can either use them all, none, or select from a list:
Once the this has been setup, you can close the window and start using the application.
Warning:Please make sure that all MIDI devices are connected and powered on before launching the application as they are scanned upon launch.
Standalone Application: Network Server
It is also possible to use the applications as a "slave" of another application that sends audio and MIDI with the Connector plug-in locally or over the network. To do this you should select the "Network Audio" driver type and "Connector Slave" driver.
Click on the button with 3 dots at the right of the driver name to access the connection settings (see the Connector Manual for more details):
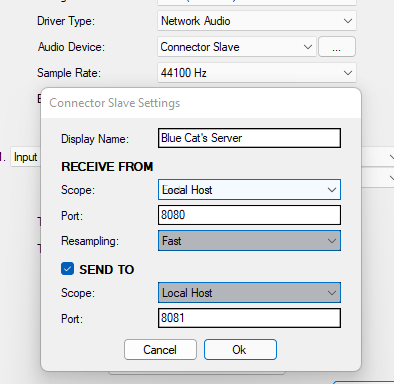
Note: in this mode, the application will not process audio unless some data is sent to it by an instance of the connector plug-in loaded into an active audio application.
Audio Plug-Ins
Blue Cat Audio plug-ins cannot be run standalone, they require a host application (see the System Requirements chapter for more information). Some host applications will require you to scan the plug-ins before they are available in the application.
If the plug-in is not available in the application, please check that it has been installed in the appropriate directory (with no host application running), and that the host application has scanned it.
Using Blue Cat's Plug'n Script
Introduction
The idea behind Blue Cat's Plug'n Script is to provide a simple way to create your own audio or MIDI plug-ins without much knowledge about programming, as long as you have an idea of the algorithms you want to use.
Effect or Instrument
Two versions of the plug-in are included: audio effect or virtual instrument. They both offer similar capabilities (you can write instruments in the effect version too for example), but they will be considered differently by most host applications.
Just use the synth version if your main purpose is to use virtual instruments scripts, and the effect version if you want to process the audio signal or MIDI events as an effect.
Exporting a Plug-In
Plug'n Script is also able to export the current script and its user interface as an independent plug-in in VST, VST3, AAX or Audio Unit format. When you are happy with your script, just export it, add additional content (presets, manual...) and load it in your favorite host as any other plug-in: no runtime required, no dependency on Blue Cat's Plug'n Script.
Note: VST is a trademark and software of Steinberg Media Technologies GmbH. To distribute a VST or VST3 plug-in created with Plug'n Script, you need to sign the VST license agreement with steinberg. See the Steinberg developer page for more information.
Note: The AAX plug-in format is the property of AVID. The exported AAX plug-in requires extra specific signing steps on both Windows and MacOS to be loaded into Pro Tools or Media Composer. You need to be a registered AVID developer to perform these extra steps and be able to finalize the AAX plug-in.
The Principle
Executing a Script
Once a script has been selected, the plug-in will do the following:
- Load the selected script file and its dependencies.
- Compile the script into bytecode (non-native scripts only).
- Compile the bytecode into machine code with the JIT compiler (non-native scripts only).
- Execute the compiled code to process audio or MIDI data in real time.
If an error occurs during any of these steps, it will be reported back to you at the bottom of the plug-in:

The complete error log can be loaded in a text editor by clicking on the error message above.
Warnings may also be reported. A script with warnings will run, but it is strongly recommended to fix them.
Writing a Script
The fastest way to get started is to select an existing script and modify it. The "Save As" feature was designed for this purpose.
The script defines variables (data) and functions that will be used by the plug-in to process incoming audio or MIDI data. The role of a script is to modify incoming data (audio or MIDI). The full interface between the plug-in and scripts is described later in this manual.
With Blue Cat's Plug'n Script, it is possible to create many types of scripts, such as:
- Audio processor: modifies incoming audio data to apply an effect.
- MIDI processor: modifies incoming MIDI data to produce different events at the output of the plug-in.
- Synthesizer / virtual instrument: produces brand new audio data based on incoming MIDI events (usually ignores incoming audio data).
- Audio generator: generates audio waveforms based on script parameters (usually ignores incoming audio and MIDI).
- MIDI events generator: generates new MIDI events based on script parameters (usually ignores incoming audio and MIDI).
Binary or Source / Angelscript or Native?
Starting with version 1.2, the plug-in supports two types of scripts:
"Source" or "text" scripts
These scripts use the angelscript engine: the source code is compiled on the fly by the plug-in using the JIT and executed inside the angelscript virtual machine. These scripts are:
- easier to write and debug, as they are crash-proof and errors are quickly detected by the virtual machine.
- fully portable: the same script can be loaded on all supported platforms (32 or 64-bit Mac and Windows).
- slower to execute than native code.
"Binary" or "native" scripts
The plug-in can also load scripts in the binary form, which are actually shared libraries (a.k.a. "dll") that have been externally compiled using a third party development environment.
These scripts:
- are faster than source scripts (the resulting plug-in is as fast as if it had been entirely written with native code from scratch).
- are usually more difficult to debug, as they are not executed in a sandbox: they have direct access to memory and may crash the software.
- let you use third party native libraries: there is no restriction and no possible conflict, as native dsp scripts are "standalone" shared libraries.
- can be distributed with or without source code: It is possible to distribute only the binary version, without the orginal source code, if you prefer not to disclose your algorithms. But the source can of course be shared with the community if you don't mind!
- have to be compiled separately for each platform (Mac, windows and 32 or 64-bit).
- can be written with any type of language that is compatible with the C language (C#, Fortran, Delphi...).
Our recommendation
If you are not familiar with programming, you should definitely start with angelscript.
Even if you are an experimented C++ developer and want to distribute a native plug-in in the end, it is recommended to first write the plug-in as a text script, and then port it to C/C++ once it has been fully validated:
- It is much faster to write scripts and reload them in the plug-in (no extra compilation step required).
- Finding errors is easier, and the script will not crash.
Once a script runs smoothly, porting it to C/C++ is very fast (just a few minutes), as you can see in our porting guide.
Text Editor
To edit the source scripts, the plug-in does not provide a text editor. It is however easy to integrate with your favorite text editor with syntax highlighting by setting the appropriate application in the preferences, as described later in this manual.
If you do not already have a text editor that provides syntax highlighting, here are a few recommendations:
- Notepad 2 (Windows, free)
- Notepad++ (Windows, free)
- Visual C++ Express (Windows, free)
- XCode (Mac, free)
- Aquamacs (Mac, free)
IDE and Compiler
Binary scripts can be written and compiled using any third party IDE (Integrated Development Environment) capable of building a shared library that exports C functions. You can for example use XCode on Mac and Visual Studio on Windows - but Delphi or Fortran as well as .Net should work too.
Note: while not strictly required, a compiler compatible with the C++11 standard is recommended, as it will simplify switching between angelscript and C++ code, as explained in details later in the manual.
Graphical User Interface ("GUI")
In the (not so) old days, programming the user interface for a plug-in from scratch could take more time than writing the algorithms. This is no longer the case with Blue Cat's Plug'n Script! There are three ways to get a graphical user interface for your dsp script.
1. Generic GUI
The easiest way is to let Plug'n Script generate it for you: a generic user interface with many customization capabilities is provided by the plug-in. Just select the layout, controls and colors and your GUI is ready!

2. Custom Layout
You can also provide a custom layout file with your script, if you want more control over the layout and use several types of controls at the same time.

3. Custom GUI
You want to write your own GUI from scratch, with your own controls and a specific look and feel? no problem: you can write a completely custom skin with your own graphics, using the KUIML GUI description language.
The User Interface
Note: The main toolbar, menus and basic features available with all our plug-ins are detailed in the Blue Cat Audio Plug-ins Basics section.
Overview
The plug-in GUI is divided into three parts: the toolbar, player and the editor. By default, the GUI opens in "play" mode to let you load presets and interact with scripts. You can enter edit mode any time to modify the current script and the user interface by clicking on the edit mode button (the pen on the toolbar):

- The main toolbar, with the presets manager and the main commands.
- The player area: interact with the scripts using the controls provided by the generic or custom GUI.
- Edition area: edit the DSP script and GUI, and export the result as a VST plug-in.
Playground Controls
Scripts will usually offer buttons and knobs to interact with their parameters. You can choose from many styles in the editor:

The LEDs and vu meters are displayed when scripts provide read-only values (measurements, constants or user feedback).
Some scripts may also let you enter strings using text boxes, as shown below. Also, for parameters with discrete values, clicking on the value displayed below the name opens a popup menu for faster selection from a list:

Some scripts come with a user manual (in html or pdf format). In this case, an additional icon with a question mark will appear next to the title:
Click on the button to open the user manual for the current script.
The Status Bar
At the bottom of the user interface you will find the status bar:

The status icon on the left changes if there are warnings or errors in the script, and the latest log message is displayed in the center (click on it to open the full log file).
The workload meter on the right gives an idea of the cpu usage of the script (average and peak values). It measures the realtime workload, which corresponds to the time spent processing an audio buffer compared to its duration. This value may be impacted by other processes / threads / interrupts running on the system. In general the average value gives a good idea of the cpu usage of the DSP script, while the peak value is an indication of potential audio dropouts (if larger than 100% for too long), that may be caused by overall system load (not just the DSP script).
The workload meter becomes orange then red when the peak load grows. Hover the mouse on the meter to see numerical values in a tooltip.
The Editor

The editor provides full access to the various components that define the behavior of the plug-in so that you can create your very own:
- DSP Script: select, edit, save or reload the processing script that actually does the job.
- GUI Options: select the background style, color, decorations and show/hide meters.
- GUI Controls: choose the type of controls, groups and the layout for the generic GUI. You can also disable the custom GUI (for scripts that provide one) if you prefer to use the generic GUI instead.
- Export: opens the export window that lets you export the current state of the plug-in as an independent VST plug-in.
Both the GUI options and GUI controls categories can be locked using the lock icon on the right: GUI styles will remain unchanged when loading presets.
The Script Menu
When clicking on the name of the script in the editor, the following menu appears:

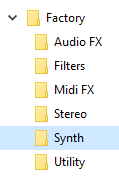
It shows a list of scripts that can be found in two locations: the factory scripts, provided by the plug-in (read-only), and your custom scripts, that are located in the documents folder. Just select one of the scripts listed here to load it into the plug-ins.
Note that for binary (native) scripts are listed as such. Scripts without the (bin) suffix are text scripts that can be edited.
Two additional commands are available at the bottom of the menu:
- Load Script: opens a file browser to load an external script file that has not been saved into the user documents sub-folder.
- Save Script As: copies the current script to another location and select it as current. Use this feature to reuse and modify an existing script (not available for binary scripts).
While it is recommended to keep the scripts in the documents folder (this lets you share plug-in presets with others easily), it may be useful to select existing scripts from other locations for testing purposes.
The Preferences Pane
You can open the preferences pane by clicking on the spanner icon at the top left of the edition pane. In this panel, you can select the applications that can be used to edit the text script or GUI files and open the error log from the user interface of the plug-in:

To change the application, click on its path or on the button at the right and select the appropriate application in the file browser.
The Export Window
The export window let you export the current state of the plug-in as an independent new VST plug-in:
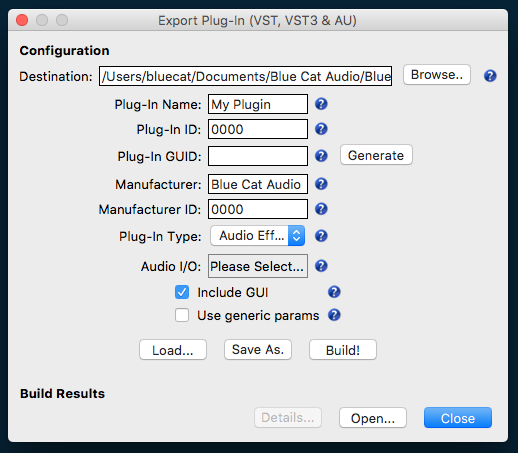
Details about each option are available in a tooltip when hovering the mouse over the help icons.
Once the appropriate metadata and options for the exported plug-in have been set, you can click on the "Build!" button to export the plug-in.
Note: the entire configuration can be saved into a file to reuse it later (see the "Load" and "Save As" buttons).
Browsing Presets
In order to browse both factory and user presets, you can either use the simple presets menu or open the full featured presets browser from the toolbar that remains visible until you close it:
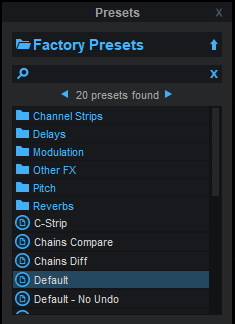
Click on preset files and folders to open them, or use the arrows to navigate between displayed presets. You can navigate upward in the folders tree by clicking on the current folder at the top. Type in the search box to find presets by name (it also searches in folder names). The search is performed recursively in the currently selected folder (displayed at the top).
Search Tips: you can search for multiple terms by separating them with commas. Wildcards are also supported (with * and ? characters), but they are applied to the full path of the preset. For example, to search for all presets containing the word "phase", type *phase* in the search box. To look for these presets only in the factory presets, you can type Factory Presets/*phase*.
The various elements of the user interface (knobs, sliders, buttons...) are simple and intuitive to operate, but more information about how to interact with them is available in the "Plug-ins Basics" chapter of this manual.
Operation
Using Existing Scripts
Even though the plug-in lets you write your own scripts, it is delivered with many factory scripts that you can use for music production or as a starting point for your own programming.
Loading Presets
The best way to load existing scripts is to use the factory presets provided with the plug-ins. It will load the script, appropriate values for its parameters, and GUI settings that we have selected for each script (unless the GUI options have been locked in the edition pane).
Loading Scripts Manually
You can also load your own script, or select a script from the list without loading an full preset:
- Open the edition pane.
- Click on the DSP script file name./
- Select the script in the list, or choose "Load Script" to open a file browser.
This will load and compile the script into the plug-in and show the controls and meters defined by the script: you can then interact with the script as if it were a standard plug-in. Automation and MIDI control are supported for all parameters just like with any other Blue Cat Audio plug-in.
Most factory scripts are delivered in both source and binary forms. For better performance, choose the binary version ("bin"), but if you want to modify the script, you will prefer the source version.
Customizing the GUI
For each script you can customize the GUI (without writing code) using the options provided by the editor. You can then save a new preset with the new GUI and reload it later. You can also lock the GUI options to keep the same look and feel while browsing presets.
Organizing Scripts
Scripts used for the Plug'n Script plug-in are either text files using the .cxx extension or binary files (using the .bin extension on Mac and .x64 or .x86 on windows). We chose the cxx extension for source scripts because the syntax of the AngelScript language is very similar to C++ and most text editors will thus be able to perform syntax highlighting without additional configuration.
User scripts (as opposed to factory scripts) are located in a sub folder of the Documents directory:
[USER DOCUMENTS]/Blue Cat Audio/Blue Cat's Plug'n Script/Scripts/
Scripts can be organized into sub folders, and the directory structure will be reproduced in the scripts menu to keep scripts organized.
Exporting Plug-Ins and Apps
If you have created your own DSP script and want to use it outside of Blue Cat's Plug'n Script or distribute it to third parties who do not own our plug-in, you can export it as an independent VST, VST3, AAX or Audio Unit plug-in, or as a standalone application (see the export button in the editor pane).
Warning: the exported AAX plug-in cannot be used in Pro Tools before you perform the proper extra specific signing steps that are only available to authorized AVID developers. Please contact AVID to become an authorized developer.
Warning: on Mac, exported plug-ins now require an extra code signing step if you want to distribute and load them on any machine with MacOS Catalina or newer without having to disable Apple's security checks. It also requires an Apple Developer Account. For the application, you also have to Notarize it in order to distribute it to other people or it won't open on other computers. More information is available at the end of this chapter.
Copyright notice: you can export the factory scripts provided with Plug'n Script as new VST plug-ins for your own usage, but you are not authorized to distribute them under your name.

As explained later, plug-in name and manufacturer should be selected with care, as it also defines the locations where the plug-in will read or write data onthe system.
Also, as explained in the tooltip, the plug-in ID has to be unique - regardless of the manufacturer. You can try to use the VST plug-in ID registration service provided by Steinberg to get a unique VST ID for your plug-in. A conflict with another plug-in can cause unexpected behavior in multiple host applications.
Note: unlike Plug'n Script that has generic parameters which function change depending on the loaded script, the exported plug-in will have its own parameters exposed to the host (with appropriate name, range and formatting) - unless "use generic parameters" has been selected in the export window.
Export Results: 3 Plug-Ins

Each time you build a new plug-in in the export window, if everything goes well, Plug'n Script will actually export 3 plug-ins per format, regardless of the platform you are currently running: a plug-in for Mac (both 32 and 64-bit), one for 32-bit windows, and a third one for 64-bit windows (except for Audio Unit which is a Mac only format).
Each version will be exported in a different subfolder (Mac, Win-x64 and Win-x86). Yes, you can export a plug-in for Mac while running on Windows!
To build these plug-ins, the software will try to load first a compiled version of the script for the platform ("my_script" with the bin, x86 or x64 extension). If it does not exist, it will use the text script with the cxx extension (my_script.cxx").
Anatomy of Exported Plug-Ins
For Mac, the exported plug-ins are self-contained bundles (directory). It contains the plug-in binaries as well as the other resources (metadata, dsp script, images etc.). The VST can be installed "as is" in the VST Plug-ins folder, VST3 in the VST3 folder and the Audio Unit in the Components folder.
The exported plug-in will use the following folders during operation (with XXX the name of the plug-in format):
- ~/Library/Preferences/[manufacturer name]/[Plug-in name XXX]: global preferences.
- ~/Documents/[manufacturer name]/[Plug-in name]: user data, such as presets, additional skins and user-created plug-in data.
For Windows, the exported plug-ins are dynamic libraries (the plug-ins themselves: .dll for VST or .vst3 for VST3) and a data folder containing the resources. Both should be installed side by side in the same folder. Do not rename them!
The exported plug-in will use the following folders during operation (with XXX the name of the plug-in format):
- [User App Data]/Roaming/[manufacturer name]/[Plug-in name XXX]: global preferences.
- [User Documents]/[manufacturer name]/[Plug-in name]: user data, such as presets, additional skins and user-created plug-in data.
The exported plug-ins can be used as-is. You may want to add factory presets to it, though, as explained below. If your script was provided with a manual (in pdf format), it will be available in the exported plug-in as well.
Adding Factory Presets
Once the plug-in has been exported, you can load it in your favorite host application (check out Blue Cat's PatchWork for example, it is very convenient for this purpose). You can then create and save presets with the preset manager included in the plug-in. They can be added as factory presets to the plug-in by copying them in the appropriate location: create a "Presets" folder in the plug-in data directory and copy the preset files there (sub folders are supported).
- On Windows the plug-in data directory is the folder located next to the plug-in: [plug-in name data].
- On Mac the plug-in data directory is the folder named [plug-in name data] located inside the bundle (use "Show Content" in the finder to open it), under Contents/Resources/
If present, a "Default.preset" file in the root Presets directory will be used for the default state of the plug-in upon load (it can be overriden by the user).
Note: you may want to automate the copy of the presets with a script, as everytime the plug-in is exported, the data directory is cleaned.
Note: on Mac, you should sign the plug-in binary after the factory presets have been added. Code signing signs the entire content of the plug-in, including resources.
System Requirements
Exported plug-ins have the same requirements as the Plug'n Script plug-in (see system requirements).
On Windows, the Visual C++ 2015 redistributable package is also required (on machines where Plug'n Script is not already installed).
Additional Files
Starting with version 3.3, Plug'n Script lets you use additional resources that will be exported together with the dsp and kuiml files into independent plug-ins: you can use custom graphics for the user interface, audio samples or any other file, and they will be exported automatically. If your dsp script is called "my_dsp", all files should be placed in the "my_dsp-data" folder as shown here:

On the dsp side, the path for to this extra folder is available as a string variable called scriptDataPath. And on the GUI (kuiml) side, use the SCRIPT_DATA_PATH build time variable to access the directory. Plug'n Script will ensure that the path is valid in the exported plug-in too. See the "Custom GUI sample" and "Sample Player" samples in the "Other" category for more details.
All right, you are now aware of the capabilities of the software, so it's time to start writing scripts!
Extra Developer Options: config.ini
If you are a developer and are creating a more complex plug-in, you may want to use more parameters than the default allowed by Plug'n Script. It is possible to extend Plug'n Script capabilities with the help of a config.ini file.
WARNING: for product development mode only! If you create sessions and presets with different settings for Plug'n Script, they might not reload properly if the settings are not exactly the same.
Create a config.ini text file (pure text only) in the root directory of the Plug'n Script documents folder ([YOUR DOUMENTS]/Blue Cat Audio/Blue Cat's Plug'n Script/):
The file can contain the following lines (all optional) to modify the maximum number of input or output parameters or strings (there is no limit):
maxInputParamsCount=128
maxOutputParamsCount=128
maxPrivateOutputParamsCount=32
maxInputStringsCount=32
maxOutputStringsCount=64
Note that exported plug-ins have no limit regarding the number of I/O data anyway, and will behave according to the numbers of parameters or strings defined in the script.
Extra Steps For MacOS
For MacOS applications (this does not apply to plug-ins) exported on Windows, if you copy them to MacOS, they will not be executable by default (because of different file systems and execution rights). So once copied on a MacOS filesystem you will have to give the binary appropriate execution rights before launching it, using the following command line (replace path/to/your/app with the right path):
chmod +x /path/to/your/app/Contents/MacOS/*
It may now be executed (you may however have to codesign it first because of runtime restrictions - if exported on a MacOS machine, it can be run on the same machine without extra codesigning or notarization).
As explained earlier, on MacOS a few extra steps are required if you want to distribute exported plug-ins or apps to other people. If you do not perform these steps, neither the exported plug-ins or applications will open on other computers.
Code Signing Plug-ins On Mac
Typical code signing command line on MacOS for plug-ins (requires XCode command line tools, and an Apple developer certificate to be installed in the computer's keychain):
codesign /path/to/your/plugin -s 'Developer ID Application: Your Certificate (XXXXXXXX)' \
 --timestamp --force
App Code Signing & Notarization On Mac
An application requires a few extra steps, to get signed and then notarized on Mac. When Plug'n Script exports an application, it also creates an entitlements file with the same name as the app (appname.entitlements), which lists all access rights required by the app to run. You can use this file to sign your binary:
codesign /path/to/your/app -s 'Developer ID Application: Your Apple Certificate (XXXXXXXX)' \
--timestamp -deep --options runtime --force --entitlements appname.entitlements
Once the binary has been signed properly, you can notarize it for distribution using your Apple developer account. First create a dmg file or a zip file (using the "Compress" command in the finder for example), then execute the following:
xcrun notarytool submit yourapppackage.zip --apple-id yourappleid \
--password yourpassword --team-id YOURTEAMID --wait
#then
xcrun stapler staple -q yourapppackage.zip
Your software is now ready to be distributed to your customers!
Scripting Tutorial
As an introduction, in this chapter we will be writing text scripts using angelscript only. We will look at native versions in the next chapter. But the principles, classes and functions of the API (Application Programming Interface) remain the same for native scripts.
About Angelscript
Angelscript was originally designed for video games, with ease of use and performance in mind, which definitely suits our audio and MIDI processing needs.
From the AngelScript documentation: The script language is based on the well known syntax of C++ and more modern languages such as Java, C#, and D. Anyone with some knowledge of those languages, or other script languages with similar syntax, such as Javascript and ActionScript, should feel right at home with AngelScript. Contrary to most script languages, AngelScript is a strongly typed language, which permits faster execution of the code and smoother interaction with the host application as there will be less need for runtime evaluation of the true type of values.
This means that it is very easy to use the scripting language without really learning it. Compared to other scripting languages such as Javascript, it is also safer because it is strongly typed: less errors may occur during runtime, which is much better for our real time processing purposes. Last but not least, most of the code written with AngelScript can be quickly ported (if not just copied/pasted) to C++, if you need to reuse the algorithms in a native application or plug-in later: this is very useful for prototyping. By the way, switching back and forth between native and angelscript version of the same script is very easy, as you will see later.
Specific Features
One particularity with AngelScript though is the concept of handle, declared with a '@'. For our scripting purposes, you can just consider it as a pointer to an object. The only thing you need to remember here is that the pointer may be null (points to no object), so you need to check its value before using it:
 // Get a handle to an object
object@ myObject=GetObject();

 // check if handle points to an actual object (C++/Java style)
 if(@myObject != null)
 {
      // do something
 }

 // alternative syntax
 if(myObject !is null)
 {
      // do something
 }
In the context of this plug-in, handles can be used for two purposes:
- Passing an optional object to a function (we use it for example for transport information, that may exist or not depending on the host application).
- Keeping a pointer to an object in order to avoid requesting it multiple times, for performance reasons (more on that later).
Also, like in C++, it is possible to overload operators (adding behavior to objects for +,-,* etc.). The syntax is however different: for example, the [] operator (to access array elements) has to be defined as:
Object opIndex(uint i);
You can still access this operator using the usual object[i] syntax in the code calling the class, but in order to define or override this operator, you need to use the opIndex name. See the full list of operators for more information.
Another specific feature that is used in this plug-in is AngelScript's property accessors, which let you define setters and getters for properties of a class like in C#. The only thing you need to know here is that a class defined with get_length() method let you access it directly as a read only property named "length". If the set_length() method is defined too, the "length" property can be also modified.
You may want to read the Angelscript language reference for more details about the scripting language.
Scripts Types
For both native and angelscript, he dsp scripting framework proposes two types of scripts:
- audio sample processing: the script is called for every audio sample to process it. This is the most simple way to perform audio processing without the need to handle buffers and iterate thru samples. It is however limited: it cannot handle MIDI events, and transport information is not directly accessible in the processing routine. This type of script should implement the processSample function, as well as the updateInputParametersfunction that will be called to update internal variables from the input parameters array if any parameter is required.
- block processing: the processBlock function is called by the plug-in for every block of samples (buffer) provided by the host. You will want to use this type of script if specific parameters handling is required or if you want to process MIDI events. If no specific parameter smoothing is required, the updateInputParametersForBlock function will let you update parameters before every block, or you can use the start and end values provided in the processBlock call.
So depending on your needs and you capabilities you will have to choose one of these types of scripts.
Writing your first Audio Script
Let's start with the 'default' script that is loaded when first opening the plug-in. It does not do anything but declare its name:
 string name="Default Script";
 string description="Bypass";
In the scripts menu, click on "Save As..." and save the script with a new name. Then click on the "edit" button to open the script in your preferred editor as defined in the preferences:

As you can see there is not much in here! Let's add a simple processing function that just multiplies the current audio samples by a factor (.5, equivalent to -6 dB). Add the following lines in the script file:
 void  processSample(array<double>& ioSample)
  {
     for(uint channel=0;channel<audioInputsCount;channel++)
     {
       ioSample[channel]*=.5;
    }
 }
Save the file in the editor, and click on the refresh button in the plug-in:

As you can hear, the sound is now quieter by 6dB! You have written and loaded your first dsp script!
Adding parameters
Simple linear gain
Now, wouldn't it be nice to control the gain instead of having it fixed in the script? To do so, you can simply define a gain parameter in the script, as shown below. Since we would like to display the appropriate name in the user interface, we will define both the inputParameters array and the inputParametersNames array with a single element:
 array<string> inputParametersNames={"Gain"};
 array<double> inputParameters(inputParametersNames.length);
And use it in the processing function (the updated value is stored by the plug-in into the first element of the inputParameters array that we have defined):
 void processSample(array<double>& ioSample)
 {
    for(uint channel=0;channel<audioInputsCount;channel++)
    {
       ioSample[channel]*=inputParameters[0];
    }
 }
By default, when no range is specified, parameter values are displayed as [0%-100%] but are passed to the script as values in the [0;1] range. So the script that you have just written will let you control the volume from 0 to 100%. If you refresh the script in the plug-in user interface, a new knob has appeared to let you control the gain:
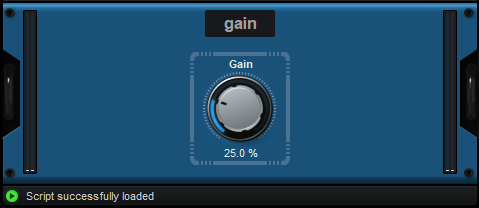
Adding range, unit and more
Now in the real world, you usually want to use more complex parameters. So let's now change the script definition to accept a gain parameters in decibels (dB), ranging from -20 to +20 dB, with a default value of 0 dB:
 array<string> inputParametersNames={"Gain"};
 array<string> inputParametersUnits={"dB"};
 array<double> inputParameters(inputParametersNames.length);
 array<double> inputParametersMin={-20};
 array<double> inputParametersMax={20};
 array<double> inputParametersDefault={0};
We now have to transform incoming input parameter values (decibels) to a value that can be multiplied with audio samples). So we'll add an internal 'gain' variable and an implementation for the updateInputParameters function that updates this variable from our single input parameter. We will also modify the processSample function to use the 'gain' variable instead of the input parameters array:
 /** Define our internal variables.
 *
 */
 double gain=0;

 /** per-sample processing function: called for every sample with updated parameters values.
 *
 */
 void processSample(array<double>& ioSample)
 {
    for(uint channel=0;channel<audioInputsCount;channel++)
    {
       ioSample[channel]*=gain;
    }
 }

 /** update internal parameters from inputParameters array.
 *   called every sample before the processSample method when necessary.
 */
 void updateInputParameters()
 {
    /*using reverse dB formula: gain=10^(gaindB/20)*/
    gain=pow(10,inputParameters[0]/20);
 }
Please note that the updateInputParameters function will be called for every sample while the parameter is being modified, to ensure continuous update of the gain and avoid audible steps. In the example above, we have also added comments (highlighted in green) to the code (the syntax is the same as C++ comments).
Reload the script in the plug-in. The new parameter values are displayed in the user interface, and right clicking on the knob sets it to 0 dB.
Using MIDI events
In order to use MIDI events, it is necessary to use the processBlock function. Let's restart a script from scratch that will filter MIDI events based on their type. You can now close your text editor window with your previous script.
Once again, let's load the 'default' factory script and select "Save As" in the script menu to save it under a new name. Click on the "edit" button to load it. We are now ready to go!
Since we'd like to use the MIDI utilities provided with the plug-in to work with MIDI events, let's include the MIDI utils header file. The path to this file is relative to the current file, so we suppose here that the script you are editing was saved in the root of the "Scripts" folder. If it was saved elsewhere, you may need to change this path:
#include "library/Midi.hxx"
In the processBlock function, we'll simply iterate on incoming MIDI events, and write to the output queue the MIDI events that we are interested in. Let's decide that we want to keep only Note On and Note Off events and drop others:
 void processBlock(BlockData& data)
 {
     for(uint i=0;i<data.inputMidiEvents.length;i++)
     {
         // send only Note On and Off events
         MidiEventType type=MidiEventUtils::getType(data.inputMidiEvents[i]);
         if(type==kMidiNoteOn || type==kMidiNoteOff)
         {
             // forward the event (unchanged)
             data.outputMidiEvents.push(data.inputMidiEvents[i]);
         }
     }
 }
Reload the script in the plug-in: it will now pass to its MIDI output 'note on' and 'note off' events only and dismiss other types of events (in order to use the plug-in as a MIDI effect in your host application, you may need to perform specific routing. If you are an owner of the Blue Cat's PatchWork, you can for example use such a script to filter events sent to a synth loaded in a specific slot).
In this example we do not modify the events but simply filter them. Also, we do not worry about audio samples here, so they will be passed to the output of the plug-in, unchanged.
Audio and MIDI together: writing a simple synth
Using the processBlock function, you can use MIDI events to produce sound. Several examples of simple synthesizers are provided with the plug-in in the factory "Synth" scripts. You may want to start with the 'sin synth' script which is the most simple synthesizer you can write: it is monophonic and produces a simple sine wave. The 'sin synth 2' script adds simple dynamics (attack/release) and pitch smoothing control.
Output Parameters
Like with some of our other plug-ins, you can write here scripts that generate output parameters that can be reused for writing automation or sending MIDI CC events to control other plug-ins. These output parameters can be defined in a similar way as input parameters:
 array<string> outputParametersNames={"Out1","Out2"};
 array<double> outputParameters(outputParametersNames.length);
They can be updated by implementing the computeOutputData function:
 void computeOutputData()
 {
     outputParameters[0]=// TODO...
     outputParameters[1]=// TODO...
 }
You can for example check the 'level meter' script in the " Utility" folder for more details.
Since version 3.6, you can also use privateOutputParameters (same syntax, but with the private prefix) if you do not want your output parameters to be exposed to the host application.
Output Strings
Starting with version 3.2, you can define output strings for dsp scripts. They can be used to exchange text or any other types of data between the dsp and the user interface, as shown in the 'oscilloscope'script.
In order to avoid allocations in the dsp thread, you need to pre-allocate all the strings and make sure that allocation-safe methods are used to convert data to strings.
Input Strings
Starting with version 1.1, it is also possible to define input strings for dsp scripts. It can be used for example to load or save files from the script.
The 'wav file recorder' and 'wav file player' scripts show how to use this feature.
Script State Persistency
The Plug'n Script engine manages input data persistency for you in presets or host sessions. There are however cases when you may want to save extra script state data as well.
Since version 3.6 Plug'n Script provides a script state save and load API that you can implement in your script (see the script reference and the persistent_state.cxx sample for details). it lets you save and restore your data into a string and manages its for you. Just make sure to avoid memory allocations as much as possible during state save and restore to avoid blocking the dsp thread for too long.
Side Chain input and Auxiliary Outputs
Starting with version 1.2, extra audio inputs (effect version) or outputs (synth version) may be available for side chain applications, or to build virtual instruments with auxiliary outputs. Note: these extra inputs and outputs are optional and may not be available or simply not connected in the host application.
The 'side chain a-b' script is an example using the side chain signal.
Next Steps
The plug-in is delivered with many factory scripts that show multiple ways of using the dsp script engine. The best way to get started with writing your own scripts is to load them and open them in the editor to read the code. These scripts embed many comments to help you understand how they were written.
Before modifying the factory scripts, use the "Save As" command in the scripts menu to save them in your own directory, like we did before with the 'default' script.
Once you are familiar with the API, you may also want to go native and port your scripts to native code to make them faster.
Sharing your Scripts and Presets
Once you have written a script you are happy with, you may want to share it with others!
The easiest way is to export the script as an independent VST plug-in that can run on window or mac platforms, as explained earlier in this manual.
But it is also possible to share the script with other users of the plug'n script plug-in: it is as easy as copying the script file (and its dependencies if any) to someone else's documents folder. If your script is using headers from the library, make sure that the relative to the library is the same on the destination machine. If it is not, the include directive in the script will have to be modified.
If you create presets that use custom scripts, please note that you also have to share your scripts together with the presets or they will fail to load.
To share your own scripts and presets on www.bluecataudio.com for end users, please contact us. We will be happy to upload your scripts and show them with a link in our download section.
We also encourage you to share your work with the developers community. We have setup a Plug'n Script code repository on GitHub to gather the scripts and skins. It is also a good place to show your knowledge and learn from others!
Tips and Tricks
Before we let you go write your own scripts, here are a few things for you to keep in mind:
- Scripts should be able to handle any audio I/O configuration, or fail during initialization (use the initialize function that returns a boolean for this). You can see examples of such scripts in the Stereo category of the factory scripts.
- The 'library' folder contains some header files provided with the plug-in to help you write your own scripts. Do not modify these files or create your files in this folder, as they may be updated with the plug-in in the future.
- CPU usage may vary a lot depending on how you write your scripts. Once a script is functional, you may want to read the advanced programming section in this manual and optimize it.
You are now ready to dive into the scripting reference below and write your own scripts!
Scripting Reference
This chapter is about angelscript. Native scripts are covered later in this manual.
AngelScript Version
The plug-in currently uses AngelScript 2.37 together with the BlindMind Studios JIT compiler.
AngelScript Add-ons
The plug-in is using several additional modules provided with the AngelScript engine as script add-ons:
- Math functions (using double precision instead of float), with the addition of the exp() function.
- Script Arrays.
- Strings.
- File.
- Filesystem.
- Datetime.
- Dictionary.
API
The programming interface (variables, functions and classes) defined by the plug-in is described below. All these elements are made available to scripts by the plug-in (angelscript version).
/*
  *  PlugNScript Application Programming Interface
  *  Functions and variables defined by the C++ scripting host
  *  Do not include this file in your scripts: it is provided
  *  for documentation purposes only. Classes and functions are already made available
  *  to scripts by the plug-in.
  *  Created by Blue Cat Audio <services@bluecataudio.com>
  *  Copyright 2011-2017 Blue Cat Audio. All rights reserved.
  *
  */

  /// The number of audio inputs of the dsp filter
  const uint audioInputsCount;
  /// The number of audio outputs of the dsp filter
  const uint audioOutputsCount;
  /// The number of (optional) auxiliary audio inputs of the dsp filter
  const uint auxAudioInputsCount;
  /// The number of (optional) auxiliary audio outputs of the dsp filter
  const uint auxAudioOutputsCount;

  /// The maximum number of samples per block for block processing.
  const int maxBlockSize;
  /// The current sample rate.
  const double sampleRate;

  /// The path to the user documents folder on the file system
  /// (Using '/' separators)
  const string userDocumentsPath;

  /// The path of the current dsp script file on the file system
  /// (Using '/' separators)
  const string scriptFilePath;

  /// The path of the current dsp script data folder in the file system,
  ///  where additional file resources can be stored ("scriptname-data")
  /// (Using '/' separators)
  const string scriptDataPath;

  /** MIDI Event (packet) abstraction.
  *	Contains 4 bytes of data and a timestamp.
  */
  class MidiEvent
  {
    /// MIDI data (4 bytes packet)
    uint8 byte0;
    uint8 byte1;
    uint8 byte2;
    uint8 byte3;
    /// time stamp of the event, as an offset in samples
    /// from the beginning of the current block.
    double timeStamp;
};

  /** List of MIDI Events.
  *
  */
  class MidiQueue
  {
    /// Returns the number of events available in the queue.
    /// Accessed as "length" attribute.
    uint             get_length()const;
    /// Sets the number of events in the queue.
    /// Accessed as "length" attribute.
    void             set_length(uint l);
    /// [] operator: returns the Midi event located at index i in the queue.
    MidiEvent&       opIndex(uint i);
    /// [] operator: returns the Midi event located at index i in the queue.
    const MidiEvent& opIndex(uint i)const;
    /// pushes "evt" at the end of the events queue.
    void             push(const MidiEvent & evt);
  };

  /** Host Transport information.
  *
  */
  class TransportInfo
  {
    /// Returns the current tempo (beats per minute)
    /// Can be accessed directly as "bpm" attribute.
    double  get_bpm()const;
    /// Returns the upper value of the time signature.
    /// Can be accessed directly as "timeSigTop" attribute.
    uint    get_timeSigTop()const;
    /// Returns the lower value of the time signature.
    /// Can be accessed directly as "timeSigBottom" attribute.
    uint    get_timeSigBottom()const;
    /// Returns true when the host application is playing.
    /// Can be accessed directly as "isPlaying" attribute.
    bool    get_isPlaying()const;
    /// Returns true when the transport of the host application is in a loop.
    /// Can be accessed directly as "isLooping" attribute.
    bool    get_isLooping()const;
    /// Returns true when the host application is recording.
    /// Can be accessed directly as "isRecording" attribute.
    bool    get_isRecording()const;
    /// Returns the position in samples of the first sample of the current
    /// buffer since the beginning of the song.
    /// Can be accessed directly as "positionInSamples" attribute.
    int64   get_positionInSamples()const;
    /// returns the position in quarter notes of the first sample of the
    /// current buffer since the beginning of the song.
    /// Can be accessed directly as "positionInQuarterNotes" attribute.
    double  get_positionInQuarterNotes()const;
    /// Returns the position in seconds of the first sample of the current
    /// buffer since the beginning of the song.
    /// Can be accessed directly as "positionInSeconds" attribute.
    double  get_positionInSeconds()const;
    /// Returns the position in quarter notes of the first bar of the current measure.
    /// Can be accessed directly as "currentMeasureDownBeat" attribute.
    double  get_currentMeasureDownBeat()const;
    ///  When looping, returns the position in quarter notes of the beginning of the loop.
    /// Can be accessed directly as "loopStart" attribute.
    double  get_loopStart()const;
    /// When looping, returns the position in quarter notes of the end of the loop.
    /// Can be accessed directly as "loopEnd" attribute.
    double  get_loopEnd()const;
  };

  /** Structure passed to the script for block processing.
  *
  */
  class BlockData
  {
    /// An array containing audio buffers of each audio channel for this block.
    /// You can access sample i of channel ch using samples[ch][i].
    array< array<double> >@ samples;
    ///< The number of audio samples to process for this block.
    uint                    samplesToProcess;
    /// The incoming MIDI events queue.
    const MidiQueue@        inputMidiEvents;
    /// The MIDI events output queue to send MIDI events.
    MidiQueue@              outputMidiEvents;
    /// The input parameters values at the beginning of the block.
    const array<double>@    beginParamValues;
    /// The input parameters values at the ends of the block.
    const array<double>@    endParamValues;
    /// Transport information - may be null if not supported or provided
    /// by the host application.
    const TransportInfo@    transport;
    /// Set to true by host for non-realtime rendering (bouncing etc.)
    /// optional (not supported by all host applications).
    bool offlineRenderingMode;
  };

  /// Utility function that prints the content of a string to the log file.
  void print(const string& in message);

  /// Additional math function that produces a pseudo random number ranging
  /// from min to max
  double rand(double min=0,double max=1)

  /// Additional string functions that can be used to convert data without allocating memory
  /// They have the exact same behavior as their standard counterpart in Angelscript
  void intToString(int64 val, string& ioString,const string &in options = "", uint width = 0);
  void uIntToString(uint64 val, string& ioString,const string &in options = "", uint width = 0);
  void floatToString(double val, string& ioString,const string &in options = "", uint width = 0,
                   uint precision = 0);
Script Reference
The interface used by the plug-in to communicate with the scripts is described below (angelscript version). All elements are optional. Just choose the variables and functions that you need to implement for a particular script.
* Blue Cat PlugNcript Scripting Reference.
* Shows functions and attributes that can be defined by the dsp script.
* Do not include this file in your scripts: it is provided only
* for documentation purposes.
* You can however use it as a starting point to write your own scripts.
* All methods and attributes are optional and can be ignored.
* You can for example write a script with just a single function defined.
* Created by Blue Cat Audio <services@bluecataudio.com>
* Copyright 2011-2019 Blue Cat Audio. All rights reserved.
*
*/
// Script metadata----------------------------------------
/// The name of the script to be displayed in the plug-in.
string name="Script Name";
/// The short description of the script to be displayed in the plug-in.
string description="Script Description";
// Script I/O parameters and strings and associated metadata----------
/// An array of parameters to be used as input for the script.
/// Will be displayed in the user interface of the plug-in and accessible for
/// automation and MIDI control.
array<double> inputParameters(2);
/// Names to be displayed in the plug-in for the input parameters.
array<string> inputParametersNames={"P1","P2"};
/// Units for the corresponding input parameters.
array<string> inputParametersUnits={"dB","%"};
/// Enumeration values for the corresponding input parameters.
/// Array of strings containing semicolon separated values. Use empty strings
/// for non-enum parameters. Require that min and max values are defined.
array<string> inputParametersEnums={"value1;value2",""};
/// Value formatting for the corresponding input parameters.
/// Follows the same rules as floating point values formatting for the C "printf" function
array<string> inputParametersFormats={".0","+.2"};
/// Minimum values for the corresponding input parameters. Default value is 0.
array<double> inputParametersMin={0, 0};
/// Maximum values for the corresponding input parameters. Default value is 1.
array<double> inputParametersMax={10,20};
/// Default values for the corresponding input parameters. Default value is 0.
array<double> inputParametersDefault={5,0};
/// Number of steps for the corresponding input parameters.
/// Default is -1 (continuous control - no steps).
array<int> inputParametersSteps={10,20};
/// An array of strings to be used as input for the script.
/// Will be displayed in the user interface of the plug-in
array<string> inputStrings(2);
/// Names to be displayed in the plug-in for the input strings.
array<string> inputStringsNames={"S1","S2"};
/// An array of parameters to be used as output of the script.
/// Will be displayed in the user interface of the plug-in as meters and accessible
/// to generate automation and MIDI controllers.
array<double> outputParameters(2);
/// Names to be displayed in the plug-in for the output parameters.
array<string> outputParametersNames={"OUT 1"," OUT 2"};
/// Units for the corresponding output parameters.
array<string> outputParametersUnits={"dB","dB"};
/// Enumeration values for the corresponding output parameters.
/// Array of strings containing semicolon separated values. Use empty strings
/// for non-enum parameters. Require that min and max values are defined.
array<string> outputParametersEnums={"value1;value2",""};
/// Value formatting for the corresponding output parameters.
/// Follows the same rules as floating point values formatting for the C "printf" function
array<string> outputParametersFormats={".0","+.2"};
/// Minimum values for the corresponding input parameters. Default value is 0.
array<double> outputParametersMin={0, 0};
/// Maximum values for the corresponding input parameters. Default value is 1.
array<double> outputParametersMax={10,20};
/// Default values for the corresponding input parameters. Default value is 0.
array<double> outputParametersDefault={5,0};
/// An array of parameters to be used as private output of the script (not exposed to the host).
/// Will be displayed in the user interface of the plug-in as meters but NOT accessible
/// to generate automation and MIDI controllers.
array<double> privateOutputParameters(2);
/// Names to be displayed in the plug-in for the privateOutput parameters.
array<string> privateOutputParametersNames = { "OUT 1"," OUT 2" };
/// Units for the corresponding privateOutput parameters.
array<string> privateOutputParametersUnits = { "dB","dB" };
/// Enumeration values for the corresponding privateOutput parameters.
/// Array of strings containing semicolon separated values. Use empty strings
/// for non-enum parameters. Require that min and max values are defined.
array<string> privateOutputParametersEnums = { "value1;value2","" };
/// Value formatting for the corresponding privateOutput parameters.
/// Follows the same rules as floating point values formatting for the C "printf" function
array<string> privateOutputParametersFormats = { ".0","+.2" };
/// Minimum values for the corresponding input parameters. Default value is 0.
array<double> privateOutputParametersMin = { 0, 0 };
/// Maximum values for the corresponding input parameters. Default value is 1.
array<double> privateOutputParametersMax = { 10,20 };
/// Default values for the corresponding input parameters. Default value is 0.
array<double> privateOutputParametersDefault = { 5,0 };
/// An array of strings to be used as output for the script.
/// Will be displayed in the user interface of the plug-in
array<string> outputStrings(2);
/// Names to be displayed in the plug-in for the input strings.
array<string> outputStringsNames={"S1","S2"};
/// Maximum length for the ouput strings (output strings must be pre-allocated
/// to avoid audio dropouts).
array<int> outputStringsMaxLengths={1024,1024};
/** Initialization: called right after the script has been compiled
* and before any other processing occurs.
* Ignored if the initialize function returning a boolean is defined.
*/
void initialize()
{
}
/** Initialization: called right after the script has been compiled
* and before any other processing occurs.
* return false if initialization fails (for example if the number of
* audio channels or the sample rate are not compatible).
* When returning false, it is strongly advised to print a message with
* the "print" function for the end user.
*/
bool initialize()
{
/// write script initialization here
/// and return false if something is not supported (number of channels, sample rate...)
return true;
}
/** Reset the state of the filter.
*
*/
void reset()
{
}
/** Returns the tail size in samples.
* use -1 for infinite (typically for audio or MIDI generators or synths).
* use 0 if the processor does not produce any sound when fed with silence (default).
*/
int getTailSize()
{
return 0;
}
/** Returns the latency added by the script if any, in samples.
* Returns 0 by default.
*/
int getLatency()
{
return 0;
}
/** Per-sample processing function: called for every sample with updated parameters values.
* If defined, the processBlock function is ignored.
* ioSample: an array of current audio samples (one element for each audio channel).
* You can access the current sample of channel 'ch' using ioSample[ch].
*/
void processSample(array<double>& ioSample)
{
}
/** Update internal parameters from inputParameters array when required.
* Called every sample, right before the processSample() method, or every block,
* before the processBlock() method.
* This function will not be called if input parameters have not been modified since last call.
*/
void updateInputParameters()
{
}
/** Per-block processing function: called for every block with updated parameters values.
* Ignored if the processSample() function is defined.
*/
void processBlock(BlockData& data)
{
}
/** Called for every block to update internal parameters from the inputParameters and
* inputStrings arrays that have been updated by the host.
* This function will not be called if input parameters have not been modified since last call,
* and if transport info (tempo and time signature only) are unchanged.
*/
void updateInputParametersForBlock(const TransportInfo@ info)
{
}
/** Update output parameters values array from internal variables.
*
*/
void computeOutputData()
{
}
/** Save script state.
* Return true and the state string pointer (in persistentState), if state changed.
*/
bool saveState(string& persistentState)
{
return false;
}
/** Load script state from state string.
*
*/
void loadState(const string& persistentState)
{
}
/** Return the maximum state string length so that the engine can preallocate its state structures.
* Avoids reallocations in the dsp thread.
*/
uint64 getMaxStateLength()
{
return 0;
}
Advanced Scripting Topics
This chapter described advanced programming topics for angelscript dsp scripts. Native programming is cover in the native programing chapters.
Debugging Scripts
The plug-in does not have an included debugger for scripts. Since the scripts are usually called in a real-time audio thread, this would not be very useful anyway. So here are several alternatives to help you debug your scripts:
Use the print Function
You can quickly dump the content of your script variables with the print function:
 // script data
 double myData;

 // ...
 // dump the content of data to the log
 print("myData=" + myData);
It will be appended to the log file and will be made visible in the user interface of the plug-in (one line displayed at the bottom). However, please be aware that if you call this function in the main processing loop, it may quickly create a huge log file.
Use Output Parameters
For variables that vary a lot over time and require regular updates, you can dump them to output parameters. These parameters will be displayed in the user interface of the plug-in. They can also be recorded as automation lanes in host applications if you want to display them over time.
Use the MIDI Log script
When writing MIDI plug-ins, it can be useful to use the included MIDI Log script as a target plug-in to check the MIDI events produced by your own script in human-readable format. Recording MIDI tracks in a sequencer may help too!
Optimization and Best Practices
The main part of the scripts that is worth optimizing is the portion that is called for every audio sample. This means that you will want to be more cautious about the following pieces:
- The entire processSample function (called every sample).
- The entire updateInputParameters function (called every sample).
- The loops on audio samples in the processBlock function.
Everything else does not have a large influence on CPU usage, so there is no need to spend time on optimizing the scripts there.
Despite the JIT compiler and strong typing, since AngelScript is a sandboxed scripting language, the engine cannot optimize the code in the same way as a C or C++ compiler would do. So here are a few tips to help you optimize your scripts:
- Function Calls: calls to custom script functions cannot be inlined and can be costly. So it is recommended to minimize function calls inside the sample processing loops.
- Arrays: calling the [] operator on an array to access elements is equivalent to a function call and cannot be optimized because of boundaries checking. So you should try to access data in arrays just once and keep the value (or a handle to the value) in a local variable to manipulate it.
- Memory Allocation: In the AngelScript engine, all objects except simple types (such as integers, floats, doubles etc.) are dynamically allocated: there is no stack like in C/C++. If you need variables for temporary data, you should instantiate them at the beginning of the script and avoid creating them in functions called by the plug-in. This avoids allocating memory in time critical tasks, which could cause drop outs.
Native Programming Tutorial
In this chapter we will assume that you have already read the Scripting Tutorial and that you know how to create dsp scripts with angelscript. Writing native scripts is not much more complicated but require a bit more programming knowledge and experience.
About Native (Binary) Scripts
Native or binary scripts are compiled dynamic libraries that export a simple C interface which is very similar to the angelscript interface., using global variables and functions
The binaries have to be compiled specifically for each platform (Mac or Windows - 32 or 64-bit), but the source code can be cross-platform.
Native Scripts on Mac
On Mac, native scripts should be compiled as dynamically loaded shared libraries ('mh_bundle'), with the bin extension. It is recommended to build them as Intel/Apple Silicon universal binary, so that they can be loaded by the plug-in in both Intel and native M1 applications.
Native Scripts on Windows
On Windows, native scripts should be compiled as dlls, with the x64 extension for the 64-bit version and .x86 for the 32-bit version. Thanks to this naming convention, when switching between 32 and 64-bit applications, presets and sessions will be restored accordingly, using the appropriate version of the binary.
Mac/Windows compatibility
In order to ensure presets and sessions compatibility, the same script should be compiled with the appropriate extension (bin,x64 or x86) and the same name on Windows on Mac.
API
Except from a few differences (see next chapter), the dsp API is very similar to the angelscript version. Helper classes are provided so that if you use a C++11 compatible compiler, existing text scripts written with angelscript should almost compile directly (see the porting guide below).
The principle is the same as for text scripts: you only define the global variables and functions of the API that you need, and export their symbols (using the DSP_EXPORT macro). For example, the gain sample:
 // C++ scripting support-----------------------------
 #include "dspapi.h"
 #include "cpphelpers.h"

 DSP_EXPORT uint    audioInputsCount=0;

 /** \file
 *   Apply selected gain to audio input.
 */

 DSP_EXPORT string description="simple volume control";

 DSP_EXPORT array<string> inputParametersNames={"Gain"};
 DSP_EXPORT array<double> inputParameters(inputParametersNames.length);

 double gain=0;

 DSP_EXPORT void processSample(double ioSample[])
 {
    for(uint channel=0;channel<audioInputsCount;channel++)
    {
      ioSample[channel]*=gain;
    }
 }

 DSP_EXPORT void updateInputParameters()
 {
    gain=inputParameters[0];
 }
Note: global variables are not shared among several instances of the same binary script, as each instance of the script is loaded into a separate memory space. If you want to share data among instances, you can use another dynamically loaded library that you load in the initialize function of the script.
Typical Sequence
- The plug-in loads the shared library (binary script) in its own memory space: global variables are created.
- The plug-in initializes global variables.
- The plug-in calls the initialize function.
- The plug-in calls other functions during processing and updates the values of the parameters.
- The plug-in calls the shutdown function.
- The plug-in unloads the shared library.
Differences with Angelscript
Variables definition and initialization
In angelscript, the host-side global variables of the API such as audioInputsCount, sampleRate, audioOutputCount etc. are defined and initialized by the host prior to execution, so they can be used directly when initializing the variables of the script. For native code, it is a bit different:
- variables expected by the script have to be defined and exported with the DSP_EXPORT macro. They act as a placeholder in the code that will be filled by the host.
- these variables remain uninitialized until the initialize function is called.
It means that the other variables and data structures that depend on the number of audio inputs, outputs or the sample rate have to be initialized in the initialize function. They can not be initialized with a global constructor like with angelscript.
Symbols export
With native scripts, public symbols (variables and functions of the API) have to be exported explicitly, with C-style naming. the DSP_EXPORT macro is provided for this purpose:
 DSP_EXPORT string const name="Script Name";
 DSP_EXPORT uint audioInputsCount=0;
 DSP_EXPORT void processBlock(BlockData& data){}
Strings
The API uses only non modifiable C-style strings (zero terminated char*), and the api header defines "string" as char const* so that when using the C++ helpers, existing scripts will compile.
You may however use the std::string class in your scripts (or your own class) instead of old-style C-strings. you just need to make sure that the C-strings made available to the host are kept alive as long as necessary. Several sample scripts show dynamically allocated strings and how they can be handled.
The initialize function
In the native version, only a single initialize function can be defined, and it returns a boolean value, whereas in angelscript you have the choice to define the function with or without a return value.
DSP_EXPORT bool initialize()
The shutdown function
In order to be able to deallocate resources (free memory, close files etc.), a shutdown function is provided. In most cases it is not used (especially if you use C++ with destructors), but when using a straight-C implementation, you will probably need to implement it:
DSP_EXPORT void shutdown()
The processSample function
The signature of the processSample function has been changed to the following:
DSP_EXPORT void processSample(double ioSample[])
Beware that if you are using the C++ array helper, the angelscript signature using an array<double>& will compile properly, but the script will crash at runtime.
Getting Started: Samples
Most factory scripts are available as both angelscript and native processors, with their source code.
For native processors, an XCode project and a Visual Studio solution are provided. You can check their README file for more details about these projects and their structure. You can use them as a starting point for your own native scripts. They are already configured with appropriate build options.
On Mac you can simply duplicate a target to create your own script, and on Windows, just copy and modify an existing Visual Studio project.
Angelscript to Native DSP Porting Guide
Overview
Porting an existing script to native code is as simple as following these steps:
- Copy the cxx file and rename it to cpp or cc.
- Create a copy of any sample project and rename it.
- In the new project, remove the old cpp file and replace it with yours.
- Open the cpp file for edition and follow the porting check list below.
Porting check list
- Add api header includes at the top of the file (dspapi.h and cpphelpers.h).
- Rename existing .hxx library includes to .h.
- Add the declaration of the symbols used by the script, for example "DSP_EXPORT double sampleRate=0;"
- Add the DSP_EXPORT directive to all symbols that should be exported.
- Initialize global variables appropriately, using the DSP_EXPORT bool initialize() for variables that depend on globals.
- Change the void initialize() function definition to DSP_EXPORT bool initialize() if the void version was used.
- Replace @ with *, and calls to handles (.) with calls to pointers (->)
- Strings: either use std::string on your own string class. You can use std::to_string (C++11) to append int or double values to strings.
- Change the signature of the processSample function if used: change array<double>@ to double*.
- Implement the shutdown function to deallocate resources if necessary.
- You may have to add functions definitions before using them (angelscript does not require it).
- Change overloaded operators to their appropriate C++ counterpart (for example, opEquals should be changed to operator ==)
- Change class to struct or make data/methods public as it is not the default in C++ as opposed to angelscript.
Troubleshooting
Common issues and their solutions:
- Parameters do no show? Check that parameters array is exposed using the DSP_EXPORT macro, and check variables names.
- Functions not called? Check functions naming and DSP_EXPORT directive.
- Crash when accessing ioSample[]? Change the processSample function signature using double* instead of array<double>.
- Missing symbols when using print function? Check that the host and hostPrint symbols have been declared in the script as follows: DSP_EXPORT void* host=null; DSP_EXPORT HostPrintFunc* hostPrint=null;
- Script compiles fine but fails when loaded? Check that initialize returns a boolean value (not void).
Debugging
To debug the native scripts, you can attach the debugger to the process hosting the Plug' n Script plug-in and set break points in the script. It is not different from debugging a standard shared library.
Native Programming Reference
API
The basic data structures for the API are defined in the include/dspapi.h header file (See the code repository). It is compatible with most C and C++ compilers.
There is no dependency on extra libraies, just a header file defining C structures layout. When used with C++ extra inline methods are provided for compatibility with existing angelscript code. Also, typedefs are provided for common integer and floating point numbers used in angelscript.
  /** Blue Cat PlugNScript dsp api header file.
   *  Contains all definitions required for DSP scripting in C or C++.
   *  Copyright (c) 2015-2017 Blue Cat Audio. All rights reserved.
   */

  #ifndef _dspapi_h
  #define _dspapi_h

  // handling "bool" definition for C compilers
  #ifndef __cplusplus
  #if(!defined(_MSC_VER) || _MSC_VER >= 1900)
  #include <stdbool.h> // using the C99 definition of bool
  #else
  #define bool char // for binary compatibility with C++
  #define true 1
  #define false 0
  #endif
  #endif

  // Visual Studio does not support the inline keyword in C before VS2015
  #if(!defined(_MSC_VER) || _MSCVER>=1900 || defined(__cplusplus))
  #define INLINE_API inline
  #else
  #define INLINE_API
  #endif

  // basic types definitions for angelscript compatibility-----------------
  typedef char const*     string;
  typedef unsigned int    uint;
  typedef signed char     int8;
  typedef unsigned char   uint8;
  #ifdef _MSC_VER // Visual Studio
  typedef _int64          int64;
  typedef unsigned _int64 uint64;
  #else // GCC compatible compiler assumed
  #include <stdint.h>
  typedef int64_t         int64;
  typedef uint64_t        uint64;
  #endif

  #define null 0

  /** MIDI Event (packet) abstraction.
   *	Contains 4 bytes of data and a timestamp.
   */
  struct MidiEvent
  {
      /// MIDI data (4 bytes packet)
      uint8 byte0;
      uint8 byte1;
      uint8 byte2;
      uint8 byte3;
      /// time stamp of the event, as an offset in samples
      /// from the beginning of the current block.
      double timeStamp;


  #ifdef __cplusplus // a default costructor is provided for C++
      MidiEvent():byte0(0),byte1(0),byte2(0),byte3(0),timeStamp(0){}
  #endif
  };

  struct MidiQueue;

  /// push function type definition for C implementation
  typedef void (MidiQueuePushEventFunc)(struct MidiQueue* queue,const struct MidiEvent* evt);

  /** List of MIDI Events.
   *
   */
  struct MidiQueue
  {
      /// Midi Events array
      struct MidiEvent* events;

      /// The number of events available in the queue. Never change this value
      /// Adding events should only be done using the fPush function (C) or push method (C++)
      uint             length;

      /// pushes an event at the end of the events queue.
      MidiQueuePushEventFunc*   pushEvent;


      // extra C++ inline methods for angelscript compatibility
  #ifdef __cplusplus
      /// pushes "evt" at the end of the events queue.
      inline void push(const MidiEvent & evt)
      {
          if(pushEvent!=null)
              pushEvent(this,&evt);
      }

      /// random access operator to access events directly (angelscript compatibility)
      inline const MidiEvent& operator [](uint i)const
      {
          return events[i];
      }

      /// random access operator to access events directly (angelscript compatibility)
      inline MidiEvent& operator [](uint i)
      {
          return events[i];
      }
  #endif
  };

  /** Host Transport information.
   *
   */
  struct TransportInfo
  {
      /// Returns the current tempo (beats per minute)
      /// Can be accessed directly as "bpm" attribute.
      double  bpm;
      /// Returns the upper value of the time signature.
      /// Can be accessed directly as "timeSigTop" attribute.
      uint    timeSigTop;
      /// Returns the lower value of the time signature.
      /// Can be accessed directly as "timeSigBottom" attribute.
      uint    timeSigBottom;
      /// Returns true when the host application is playing.
      /// Can be accessed directly as "isPlaying" attribute.
      bool    isPlaying;
      /// Returns true when the transport of the host application is in a loop.
      /// Can be accessed directly as "isLooping" attribute.
      bool    isLooping;
      /// Returns true when the host application is recording.
      /// Can be accessed directly as "isRecording" attribute.
      bool    isRecording;
      /// Returns the position in samples of the first sample of the current
      /// buffer since the beginning of the song.
      /// Can be accessed directly as "positionInSamples" attribute.
      int64   positionInSamples;
      /// returns the position in quarter notes of the first sample of the
      /// current buffer since the beginning of the song.
      /// Can be accessed directly as "positionInQuarterNotes" attribute.
      double  positionInQuarterNotes;
      /// Returns the position in seconds of the first sample of the current
      /// buffer since the beginning of the song.
      /// Can be accessed directly as "positionInSeconds" attribute.
      double  positionInSeconds;
      /// Returns the position in quarter notes of the first bar of the current measure.
      /// Can be accessed directly as "currentMeasureDownBeat" attribute.
      double  currentMeasureDownBeat;
      ///  When looping, returns the position in quarter notes of the beginning of the loop.
      /// Can be accessed directly as "loopStart" attribute.
      double  loopStart;
      /// When looping, returns the position in quarter notes of the end of the loop.
      /// Can be accessed directly as "loopEnd" attribute.
      double  loopEnd;
  };

  #ifdef __cplusplus
  #define MidiQueueRef MidiQueue&
  #else
  #define MidiQueueRef MidiQueue*
  #endif

  /** Structure passed to the script for block processing.
   *
   */
  struct BlockData
  {
      /// An array containing audio buffers of each audio channel for this block.
      /// You can access sample i of channel ch using samples[ch][i].
      double**                    samples;
      /// The number of audio samples to process for this block.
      uint                        samplesToProcess;
      /// The incoming MIDI events queue.
      const struct MidiQueueRef   inputMidiEvents;
      /// The MIDI events output queue to send MIDI events.
      struct MidiQueueRef         outputMidiEvents;
      /// The input parameters values at the beginning of the block.
      const double*               beginParamValues;
      /// The input parameters values at the ends of the block.
      const double*               endParamValues;
      /// Transport information - may be null if not supported or not provided
      /// by the host application.
      const struct TransportInfo* transport;
      /// Set to true by host for non-realtime rendering (bouncing etc.)
      /// optional (not supported by all host applications).
      bool offlineRenderingMode;
      };

  // C API definition
  #ifdef __cplusplus
  #define EXTERN_C extern "C"
  #else
  #define EXTERN_C
  #endif

  #ifdef _MSC_VER
  #define DSP_EXPORT EXTERN_C __declspec(dllexport)
  #else
  #define DSP_EXPORT EXTERN_C __attribute__ ((visibility("default")))
  #endif

  typedef void (HostPrintFunc)(void* hostImpl,const char* message);

  DSP_EXPORT void*          host;
  DSP_EXPORT HostPrintFunc* hostPrint;

  // for angelscript compatibility
  static INLINE_API void print(const char* message)
  {
      // be paranoid
      if(hostPrint!=null && host!=null)
          hostPrint(host,message);
  }

  #endif
C++ Script Reference
A C++11-compatible script API is described below, as defined in the script_reference.cpp sample (See the code repository).
if you are using an older C++ compiler that does not support the new C++11 initializer lists, compatible data structures can be defined in two steps instead of a single one, as shown for the inputParametersNames variable below.
The cpphelpers header file provides C++ helper classes that let you define data structures and functions with a syntax that is very similar to the angelscript version. If you prefer straight-C implementation, you can use the C definition instead.
#include "cpphelpers.h"
// expected from host (Warning: appropriate values are filled right before calling
// the initialize() function - do not use before)
DSP_EXPORT uint audioInputsCount=0;
DSP_EXPORT uint audioOutputsCount=0;
DSP_EXPORT uint auxAudioInputsCount=0;
DSP_EXPORT uint auxAudioOutputsCount=0;
DSP_EXPORT int maxBlockSize=0;
DSP_EXPORT double sampleRate=0;
DSP_EXPORT string userDocumentsPath=null;
DSP_EXPORT string scriptFilePath=null;
DSP_EXPORT string scriptDataPath=null;
DSP_EXPORT void* host=null;
DSP_EXPORT HostPrintFunc* hostPrint=null;
// Script metadata----------------------------------------
/// The name of the script to be displayed in the plug-in.
DSP_EXPORT string const name="Script Name";
/// The short description of the script to be displayed in the plug-in.
DSP_EXPORT string description="Script Description";
// Script I/O parameters and strings and associated metadata----------
/// An array of parameters to be used as input for the script.
/// Will be displayed in the user interface of the plug-in and accessible for
/// automation and MIDI control.
DSP_EXPORT array<double> inputParameters(2);
/// Names to be displayed in the plug-in for the input parameters.
string names[]={"P1","P2"};
DSP_EXPORT array<string> inputParametersNames(names);
/// Units for the corresponding input parameters.
DSP_EXPORT array<string> inputParametersUnits{"dB","%"};
/// Enumeration values for the corresponding input parameters.
/// Array of strings containing semicolon separated values. Use empty strings
/// for non-enum parameters. Require that min and max values are defined.
DSP_EXPORT array<string> inputParametersEnums={"value1;value2",""};
/// Value formatting for the corresponding input parameters.
/// Follows the same rules as floating point values formatting for the C "printf" function
DSP_EXPORT array<string> inputParametersFormats={".0","+.2"};
/// Minimum values for the corresponding input parameters. Default value is 0.
DSP_EXPORT array<double> inputParametersMin={0, 0};
/// Maximum values for the corresponding input parameters. Default value is 1.
DSP_EXPORT array<double> inputParametersMax={10,20};
/// Default values for the corresponding input parameters. Default value is 0.
DSP_EXPORT array<double> inputParametersDefault={5,0};
/// Number of steps for the corresponding input parameters.
/// Default is -1 (continuous control - no steps).
DSP_EXPORT array<int> inputParametersSteps={10,20};
/// An array of strings to be used as input for the script.
/// Will be displayed in the user interface of the plug-in
DSP_EXPORT array<string> inputStrings(2);
/// Names to be displayed in the plug-in for the input strings.
DSP_EXPORT array<string> inputStringsNames={"S1","S2"};
/// An array of parameters to be used as output of the script.
/// Will be displayed in the user interface of the plug-in as meters and accessible
/// to generate automation and MIDI controllers.
DSP_EXPORT array<double> outputParameters(2);
/// Names to be displayed in the plug-in for the output parameters.
DSP_EXPORT array<string> outputParametersNames={"OUT 1"," OUT 2"};
/// Units for the corresponding input parameters.
DSP_EXPORT array<string> outputParametersUnits={"dB","dB"};
/// Enumeration values for the corresponding input parameters.
/// Array of strings containing semicolon separated values. Use empty strings
/// for non-enum parameters. Require that min and max values are defined.
DSP_EXPORT array<string> outputParametersEnums={"value1;value2",""};
/// Value formatting for the corresponding output parameters.
/// Follows the same rules as floating point values formatting for the C "printf" function
DSP_EXPORT array<string> outputParametersFormats={".0","+.2"};
/// Minimum values for the corresponding input parameters. Default value is 0.
DSP_EXPORT array<double> outputParametersMin={0, 0};
/// Maximum values for the corresponding input parameters. Default value is 1.
DSP_EXPORT array<double> outputParametersMax={10,20};
/// Default values for the corresponding input parameters. Default value is 0.
DSP_EXPORT array<double> outputParametersDefault={5,0};
/// An array of parameters to be used as private output of the script (not exposed to the host).
/// Will be displayed in the user interface of the plug-in as meters, but NOT accessible
/// to generate automation and MIDI controllers.
DSP_EXPORT array<double> privateOutputParameters(2);
/// Names to be displayed in the plug-in for the privateOutput parameters.
DSP_EXPORT array<string> privateOutputParametersNames = { "OUT 1"," OUT 2" };
/// Units for the corresponding input parameters.
DSP_EXPORT array<string> privateOutputParametersUnits = { "dB","dB" };
/// Enumeration values for the corresponding input parameters.
/// Array of strings containing semicolon separated values. Use empty strings
/// for non-enum parameters. Require that min and max values are defined.
DSP_EXPORT array<string> privateOutputParametersEnums = { "value1;value2","" };
/// Value formatting for the corresponding privateOutput parameters.
/// Follows the same rules as floating point values formatting for the C "printf" function
DSP_EXPORT array<string> privateOutputParametersFormats = { ".0","+.2" };
/// Minimum values for the corresponding input parameters. Default value is 0.
DSP_EXPORT array<double> privateOutputParametersMin = { 0, 0 };
/// Maximum values for the corresponding input parameters. Default value is 1.
DSP_EXPORT array<double> privateOutputParametersMax = { 10,20 };
/// Default values for the corresponding input parameters. Default value is 0.
DSP_EXPORT array<double> privateOutputParametersDefault = { 5,0 };
/// An array of strings to be used as output for the script.
/// Will be displayed in the user interface of the plug-in
DSP_EXPORT array<string> outputStrings(2);
/// Names to be displayed in the plug-in for the input strings.
DSP_EXPORT array<string> outputStringsNames={"S1","S2"};
/// Maximum length for the ouput strings (output strings must be pre-allocated
/// to avoid audio dropouts).
DSP_EXPORT array<int> outputStringsMaxLengths={1024,1024};
/** Initialization: called right after the script has been compiled
* and before any other processing occurs.
* return false if initialization fails (for example if the number of
* audio channels or the sample rate are not compatible).
* When returning false, it is strongly advised to print a message with
* the "print" function for the end user.
*/
DSP_EXPORT bool initialize()
{
/// write script initialization here
/// and return false if something is not supported (number of channels, sample rate...)
return true;
}
/** Reset the state of the filter.
*
*/
DSP_EXPORT void reset()
{
}
/** Returns the tail size in samples.
* use -1 for infinite (typically for audio or MIDI generators or synths).
* use 0 if the processor does not produce any sound when fed with silence (default).
*/
DSP_EXPORT int getTailSize()
{
return 0;
}
/** Returns the latency added by the script if any, in samples.
* Returns 0 by default.
*/
DSP_EXPORT int getLatency()
{
return 0;
}
/** Per-sample processing function: called for every sample with updated parameters values.
* If defined, the processBlock function is ignored.
* ioSample: an array of current audio samples (one element for each audio channel).
* You can access the current sample of channel 'ch' using ioSample[ch].
*/
DSP_EXPORT void processSample(double ioSample[])
{
}
/** Update internal parameters from inputParameters array when required.
* Called every sample, right before the processSample() method, or every block,
* before the processBlock() method.
* This function will not be called if input parameters have not been modified since last call.
*/
DSP_EXPORT void updateInputParameters()
{
}
/** Per-block processing function: called for every block with updated parameters values.
* Ignored if the processSample() function is defined.
*/
DSP_EXPORT void processBlock(BlockData& data)
{
}
/** Called for every block to update internal parameters from the inputParameters and
* inputStrings arrays that have been updated by the host.
* This function will not be called if input parameters have not been modified since last call,
* and if transport info (tempo and time signature only) are unchanged.
*/
DSP_EXPORT void updateInputParametersForBlock(const TransportInfo* info)
{
}
/** Update output parameters values array from internal variables.
*
*/
DSP_EXPORT void computeOutputData()
{
}
/** Cleanup on shutdown: release all resources (allocated memory, files, system handles...).
*
*/
DSP_EXPORT void shutdown()
{
}
/** Save script state.
* Return true and the state string pointer (in persistentState), if state changed.
*/
DSP_EXPORT bool saveState(string& persistentState)
{
return false;
}
/** Load script state from state string.
*
*/
DSP_EXPORT void loadState(const string& persistentState)
{
}
/** Return the maximum state string length so that the engine can preallocate its state structures.
* Avoids reallocations in the dsp thread.
*/
DSP_EXPORT uint64 getMaxStateLength()
{
return 0;
}
C Script Reference
In order to build native scripts in straight C, the following API definition can be used, as shown in the script_reference.c sample. The provided chelpers header file define the simple C structures that are expected by the host.
#include "chelpers.h"
// expected from host (Warning: appropriate values are filled right before calling
// the initialize() function - do not use before)
DSP_EXPORT uint audioInputsCount=0;
DSP_EXPORT uint audioOutputsCount=0;
DSP_EXPORT uint auxAudioInputsCount=0;
DSP_EXPORT uint auxAudioOutputsCount=0;
DSP_EXPORT int maxBlockSize=0;
DSP_EXPORT double sampleRate=0;
DSP_EXPORT string userDocumentsPath=null;
DSP_EXPORT string scriptFilePath=null;
DSP_EXPORT string scriptDataPath=null;
DSP_EXPORT void* host=null;
DSP_EXPORT HostPrintFunc* hostPrint=null;
// Script metadata----------------------------------------
/// The name of the script to be displayed in the plug-in.
DSP_EXPORT string const name="Script Name";
/// The short description of the script to be displayed in the plug-in.
DSP_EXPORT string description="Script Description";
// Script I/O parameters and strings and associated metadata----------
/// An array of parameters to be used as input for the script.
/// Will be displayed in the user interface of the plug-in and accessible for
/// automation and MIDI control.
double _inputParameters[2];
DSP_EXPORT struct CDoubleArray inputParameters={_inputParameters,2};
/// Names to be displayed in the plug-in for the input parameters.
const char* _inputParametersNames[]={"P1","P2"};
DSP_EXPORT struct CStringArray inputParametersNames={_inputParametersNames,2};
/// Units for the corresponding input parameters.
const char* _inputParametersUnits[]={"%","dB"};
DSP_EXPORT struct CStringArray inputParametersUnits={_inputParametersUnits,2};
/// Enumeration values for the corresponding input parameters.
/// Array of strings containing semicolon separated values. Use empty strings
/// for non-enum parameters. Require that min and max values are defined.
const char* _inputParametersEnums[]={"value1;value2",""};
DSP_EXPORT struct CStringArray inputParametersEnums={_inputParametersEnums,2};
/// Value formatting for the corresponding input parameters.
/// Follows the same rules as floating point values formatting for the C "printf" function
const char* _inputParametersFormats[]={".0","+.2"};
DSP_EXPORT struct CStringArray inputParametersFormats={_inputParametersFormats,2};
/// Minimum values for the corresponding input parameters. Default value is 0.
double _inputParametersMin[]={0,0};
DSP_EXPORT struct CDoubleArray inputParametersMin={_inputParametersMin, 2};
/// Maximum values for the corresponding input parameters. Default value is 1.
double _inputParametersMax[]={10,20};
DSP_EXPORT struct CDoubleArray inputParametersMax={_inputParametersMax, 2};
/// Default values for the corresponding input parameters. Default value is 0.
double _inputParametersDefault[]={5,0};
DSP_EXPORT struct CDoubleArray inputParametersDefault={_inputParametersDefault, 2};
/// Number of steps for the corresponding input parameters.
/// Default is -1 (continuous control - no steps).
int _inputParametersSteps[]={5,0};
DSP_EXPORT struct CIntArray inputParametersSteps={_inputParametersSteps, 2};
/// An array of strings to be used as input for the script.
/// Will be displayed in the user interface of the plug-in
const char* _inputStrings[]={"",""};
DSP_EXPORT struct CStringArray inputStrings={_inputStrings,2};
/// Names to be displayed in the plug-in for the input strings.
const char* _inputStringsNames[]={"S1","S2"};
DSP_EXPORT struct CStringArray inputStringsNames={_inputStringsNames,2};
/// An array of parameters to be used as output of the script.
/// Will be displayed in the user interface of the plug-in as meters and accessible
/// to generate automation and MIDI controllers.
double _outputParameters[]={0,0};
DSP_EXPORT struct CDoubleArray outputParameters={_outputParameters, 2};
/// Names to be displayed in the plug-in for the output parameters.
const char* _outputParametersNames[]={"OUT 1"," OUT 2"};
DSP_EXPORT struct CStringArray outputParametersNames={_outputParametersNames,2};
/// Units for the corresponding input parameters.
const char* _outputParametersUnits[]={"dB"," dB"};
DSP_EXPORT struct CStringArray outputParametersUnits={_outputParametersUnits,2};
/// Enumeration values for the corresponding input parameters.
/// Array of strings containing semicolon separated values. Use empty strings
/// for non-enum parameters. Require that min and max values are defined.
const char* _outputParametersEnums[]={"value1;value2",""};
DSP_EXPORT struct CStringArray outputParametersEnums={_outputParametersEnums,2};
/// Value formatting for the corresponding output parameters.
/// Follows the same rules as floating point values formatting for the C "printf" function
const char* _outputParametersFormats[]={".0","+.2"};
DSP_EXPORT struct CStringArray outputParametersFormats={_outputParametersFormats,2};
/// Minimum values for the corresponding input parameters. Default value is 0.
double _outputParametersMin[]={0,0};
DSP_EXPORT struct CDoubleArray outputParametersMin={_outputParametersMin, 2};
/// Maximum values for the corresponding input parameters. Default value is 1.
double _outputParametersMax[]={10,20};
DSP_EXPORT struct CDoubleArray outputParametersMax={_outputParametersMax, 2};
/// Default values for the corresponding input parameters. Default value is 0.
double _outputParametersDefault[]={5,0};
DSP_EXPORT struct CDoubleArray outputParametersDefault={_outputParametersDefault, 2};
/// An array of parameters to be used as private output of the script (not exposed to the host).
/// Will be displayed in the user interface of the plug-in as meters, but NOT accessible
/// to generate automation and MIDI controllers.
double _privateOutputParameters[] = { 0,0 };
DSP_EXPORT struct CDoubleArray privateOutputParameters = { _privateOutputParameters, 2 };
/// Names to be displayed in the plug-in for the privateOutput parameters.
const char* _privateOutputParametersNames[] = { "OUT 1"," OUT 2" };
DSP_EXPORT struct CStringArray privateOutputParametersNames = { _privateOutputParametersNames,2 };
/// Units for the corresponding input parameters.
const char* _privateOutputParametersUnits[] = { "dB"," dB" };
DSP_EXPORT struct CStringArray privateOutputParametersUnits = { _privateOutputParametersUnits,2 };
/// Enumeration values for the corresponding input parameters.
/// Array of strings containing semicolon separated values. Use empty strings
/// for non-enum parameters. Require that min and max values are defined.
const char* _privateOutputParametersEnums[] = { "value1;value2","" };
DSP_EXPORT struct CStringArray privateOutputParametersEnums = { _privateOutputParametersEnums,2 };
/// Value formatting for the corresponding privateOutput parameters.
/// Follows the same rules as floating point values formatting for the C "printf" function
const char* _privateOutputParametersFormats[] = { ".0","+.2" };
DSP_EXPORT struct CStringArray privateOutputParametersFormats = { _privateOutputParametersFormats,2 };
/// Minimum values for the corresponding input parameters. Default value is 0.
double _privateOutputParametersMin[] = { 0,0 };
DSP_EXPORT struct CDoubleArray privateOutputParametersMin = { _privateOutputParametersMin, 2 };
/// Maximum values for the corresponding input parameters. Default value is 1.
double _privateOutputParametersMax[] = { 10,20 };
DSP_EXPORT struct CDoubleArray privateOutputParametersMax = { _privateOutputParametersMax, 2 };
/// Default values for the corresponding input parameters. Default value is 0.
double _privateOutputParametersDefault[] = { 5,0 };
DSP_EXPORT struct CDoubleArray privateOutputParametersDefault = { _privateOutputParametersDefault, 2 };
/// An array of strings to be used as output for the script.
/// Will be displayed in the user interface of the plug-in
const char* _outputStrings[]={"",""};
DSP_EXPORT struct CStringArray outputStrings={_outputStrings,2};
/// Names to be displayed in the plug-in for the input strings.
const char* _outputStringsNames[]={"S1","S2"};
DSP_EXPORT struct CStringArray outputStringsNames={_outputStringsNames,2};
/// Maximum length for the ouput strings (output strings must be pre-allocated
/// to avoid audio dropouts).
int _outputStringsMaxLengths[]={1024,1024};
DSP_EXPORT struct CIntArray outputStringsMaxLengths={_outputStringsMaxLengths,2};
/** Initialization: called right after the script has been compiled
* and before any other processing occurs.
* return false if initialization fails (for example if the number of
* audio channels or the sample rate are not compatible).
* When returning false, it is strongly advised to print a message with
* the "print" function for the end user.
*/
DSP_EXPORT bool initialize()
{
/// write script initialization here
/// and return false if something is not supported (number of channels, sample rate...)
return true;
}
/** Reset the state of the filter.
*
*/
DSP_EXPORT void reset()
{
}
/** Returns the tail size in samples.
* use -1 for infinite (typically for audio or MIDI generators or synths).
* use 0 if the processor does not produce any sound when fed with silence (default).
*/
DSP_EXPORT int getTailSize()
{
return 0;
}
/** Returns the latency added by the script if any, in samples.
* Returns 0 by default.
*/
DSP_EXPORT int getLatency()
{
return 0;
}
/** Per-sample processing function: called for every sample with updated parameters values.
* If defined, the processBlock function is ignored.
* ioSample: an array of current audio samples (one element for each audio channel).
* You can access the current sample of channel 'ch' using ioSample[ch].
*/
DSP_EXPORT void processSample(double ioSample[])
{
}
/** Update internal parameters from inputParameters array when required.
* Called every sample, right before the processSample() method, or every block,
* before the processBlock() method.
* This function will not be called if input parameters have not been modified since last call.
*/
DSP_EXPORT void updateInputParameters()
{
}
/** Per-block processing function: called for every block with updated parameters values.
* Ignored if the processSample() function is defined.
*/
DSP_EXPORT void processBlock(struct BlockData* data)
{
}
/** Called for every block to update internal parameters from the inputParameters and
* inputStrings arrays that have been updated by the host.
* This function will not be called if input parameters have not been modified since last call,
* and if transport info (tempo and time signature only) are unchanged.
*/
DSP_EXPORT void updateInputParametersForBlock(const struct TransportInfo* info)
{
}
/** Update output parameters values array from internal variables.
*
*/
DSP_EXPORT void computeOutputData()
{
}
/** Cleanup on shutdown: release all resources (allocated memory, files, system handles...).
*
*/
DSP_EXPORT void shutdown()
{
}
/** Save script state.
* Return true and the state string pointer (in persistentState), if state changed.
*/
DSP_EXPORT bool saveState(string* persistentState)
{
return false;
}
/** Load script state from state string.
*
*/
DSP_EXPORT void loadState(const string* persistentState)
{
}
/** Return the maximum state string length so that the engine can preallocate its state structures.
* Avoids reallocations in the dsp thread.
*/
DSP_EXPORT uint64 getMaxStateLength()
{
return 0;
}
Customizing the User Interface
As explained in the introduction, there are three ways to customize the user interface of the plug-in for your own scripts. Custom user interfaces will also be exported with the script when generating a VST plug-in. In fact there are actually four ways for exported VST plug-in, as you will see below.
1. Customizing the generic GUI with the editor
In most cases, you will not need to write a single line of code for the user interface of the plug-in: just choose from the multiple options available in the editor to craft a custom GUI for your plug-in:

2. Writing a custom layout
If you need more control over the layout, or if you want to mix several types of controls together, you can write a simple XML "sub-skin" that will be loaded with the script. Custom layout is also supported for exported plug-ins.
Using this option, you will write a KUIML file that fills the following area:

Everything else in the user interface remains unchanged and can still be customized in the editor. In order to change other aspects of the GUI, you can write a custom skin instead, as explained later.
Naming and location
As you can see with the provided factory scripts, in order for Plug'n Script to associate this GUI file to the dsp script, it should be have the same name, but with the "kuiml" extension:

Once the file has been created, hit the refresh button to load it instead of the generic GUI generated by the plug-in.
Syntax
The file is just a skin file using the KUIML language, with one limitation: all custom graphic files or included kuiml and script files must be placed in the script data folder (SCRIPTNAME-data) and accessed using the SCRIPT_DATA_FOLDER variable, as shown in the "Other/Custom GUI Sample" sample.
This guarantees that your script and its GUI can be loaded by Plug'n Script anywhere without additional dependencies and can be exported properly as an independent plug-in.
Your sub-skin has access to the parameters defined by your script as well as additional general parameters provided by the plug-in. And because Plug'n Script can dynamically load different scripts with different parameters, you should not use the DSP parameters directly (dsp.inputXXX / dsp.outputXXX) for your skin but use the custom parameters that will change their properties upon script loading:
  <!-- ************** OBJECTS **************-->
  <!-- Custom script input parameters (use these for your controls)-->
  <PNS_BLUE_FLAT_KNOB param_id="custom_param0"/>
  <PNS_BLUE_FLAT_KNOB param_id="custom_param1"/>
  <!-- ... -->

  <!-- Custom script output parameters (use these for your meters)-->
  <PNS_RED_LED param_id="custom_out_param0"/>
  <PNS_RED_LED param_id="custom_out_param1"/>

  <!-- Action to open the log file-->
  <INVISIBLE_ACTION_BUTTON action_id="OpenLogFile"/>

  <!-- ************** MACROS **************-->
  <!-- script input strings macros that redirects to raw dsp strings -->
  <TEXT_EDIT_BOX string_id="$script_input_string0$"/>
  <TEXT_EDIT_BOX string_id="$script_input_string1$"/>
  <!-- ... -->

  <!-- bypass parameter (macro that redirects to dsp.input0 -->
  <PNS_CLASSIC_SWITCH param_id="$bypass$"/>

  <!-- script input parameters macros that redirects to raw dsp input parameters
    (use for DSP param settings buttons)-->
  <PNS_DSP_PARAM_SETTINGS_BUTTON param_id="$script_input0$"/>
  <PNS_DSP_PARAM_SETTINGS_BUTTON param_id="$script_input1$"/>
  <!-- ... -->

  <!-- script output parameters macros that redirects to raw dsp output parameters
    (use for DSP param settings buttons)-->
  <PNS_DSP_PARAM_SETTINGS_BUTTON param_id="$script_output0$"/>
  <PNS_DSP_PARAM_SETTINGS_BUTTON param_id="$script_output1$"/>

  <!-- script data path folder macro to locate the path to custom graphics and
    additional files for the skin -->
  <INCLUDE file="$SCRIPT_DATA_PATH$/include.inc"/>
  <!-- ... -->
Included components
Plug'n Script already includes a large library of components with custom graphics that you can use in your KUIML file.
Knobs:
  <!-- *********** LIGHT BACKGROUND ***********  -->
  <!-- sliver and gold knobs -->
  <PNS_GOLD_KNOB base_type="IMAGE_PARAM_KNOB"/>
  <PNS_GOLD_KNOB_SYM base_type="PNS_GOLD_KNOB"/>
  <PNS_SILVER_KNOB base_type="IMAGE_PARAM_KNOB"/>
  <PNS_SILVER_KNOB_SYM base_type="PNS_SILVER_KNOB"/>

  <!-- Chicken head knobs -->
  <PNS_BLACK_CHICKEN_KNOB base_type="IMAGE_PARAM_KNOB"/>
  <PNS_BLACK_CHICKEN_KNOB_SYM base_type="PNS_BLACK_CHICKEN_KNOB"/>
  <PNS_WHITE_CHICKEN_KNOB base_type="IMAGE_PARAM_KNOB"/>
  <PNS_WHITE_CHICKEN_KNOB_SYM base_type="PNS_WHITE_CHICKEN_KNOB"/>
  <PNS_CREAM_CHICKEN_KNOB base_type="IMAGE_PARAM_KNOB"/>
  <PNS_CREAM_CHICKEN_KNOB_SYM base_type="PNS_CREAM_CHICKEN_KNOB"/>

  <!-- Skirted knobs -->
  <PNS_BLACK_SKIRTED_KNOB base_type="IMAGE_PARAM_KNOB"/>
  <PNS_BLACK_SKIRTED_KNOB_SYM base_type="PNS_BLACK_SKIRTED_KNOB"/>

  <!-- Vintage knobs -->
  <PNS_BLACK_VINTAGE_KNOB base_type="IMAGE_PARAM_KNOB"/>
  <PNS_BLACK_VINTAGE_KNOB_SYM base_type="PNS_BLACK_VINTAGE_KNOB"/>

  <!-- *********** DARK BACKGROUND ************* -->
  <!-- sliver and gold knobs -->
  <PNS_GOLD_B_KNOB base_type="IMAGE_PARAM_KNOB"/>
  <PNS_GOLD_B_KNOB_SYM base_type="PNS_GOLD_B_KNOB"/>
  <PNS_SILVER_B_KNOB base_type="IMAGE_PARAM_KNOB"/>
  <PNS_SILVER_B_KNOB_SYM base_type="PNS_SILVER_B_KNOB"/>

  <!-- Chicken head knobs -->
  <PNS_BLACK_CHICKEN_B_KNOB base_type="IMAGE_PARAM_KNOB"/>
  <PNS_BLACK_CHICKEN_B_KNOB_SYM base_type="PNS_BLACK_CHICKEN_B_KNOB"/>
  <PNS_WHITE_CHICKEN_B_KNOB base_type="IMAGE_PARAM_KNOB"/>
  <PNS_WHITE_CHICKEN_B_KNOB_SYM base_type="PNS_WHITE_CHICKEN_B_KNOB"/>
  <PNS_CREAM_CHICKEN_B_KNOB base_type="IMAGE_PARAM_KNOB"/>
  <PNS_CREAM_CHICKEN_B_KNOB_SYM base_type="PNS_CREAM_CHICKEN_B_KNOB"/>
  <!-- Vintage knobs -->
  <PNS_BLACK_VINTAGE_B_KNOB base_type="IMAGE_PARAM_KNOB"/>
  <PNS_BLACK_VINTAGE_B_KNOB_SYM base_type="PNS_BLACK_VINTAGE_B_KNOB"/>

  <!-- Skirted knobs -->
  <PNS_BLACK_SKIRTED_B_KNOB base_type="IMAGE_PARAM_KNOB"/>
  <PNS_BLACK_SKIRTED_B_KNOB_SYM base_type="PNS_BLACK_SKIRTED_B_KNOB"/>

  <!-- ************ NEUTRAL *************  -->
  <PNS_BLACK_STOVE_KNOB base_type="IMAGE_PARAM_KNOB"/>
  <PNS_BLACK_STOVE_KNOB_SYM base_type="PNS_BLACK_STOVE_KNOB"/>
  <PNS_WHITE_STOVE_KNOB base_type="IMAGE_PARAM_KNOB"/>
  <PNS_WHITE_STOVE_KNOB_SYM base_type="PNS_WHITE_STOVE_KNOB"/>
  <PNS_ORANGE_STOVE_KNOB base_type="IMAGE_PARAM_KNOB"/>
  <PNS_ORANGE_STOVE_KNOB_SYM base_type="PNS_ORANGE_STOVE_KNOB"/>
  <PNS_BLACKORANGE_STOVE_KNOB base_type="IMAGE_PARAM_KNOB"/>
  <PNS_BLACKORANGE_STOVE_KNOB_SYM base_type="PNS_BLACKORANGE_STOVE_KNOB"/>
  <PNS_BLUE_FLAT_KNOB base_type="IMAGE_PARAM_KNOB"/>
  <PNS_BLUE_FLAT_KNOB_SYM base_type="IMAGE_PARAM_KNOB"/>
  <PNS_GREY_FLAT_KNOB base_type="IMAGE_PARAM_KNOB"/>
  <PNS_GREY_FLAT_KNOB_SYM base_type="IMAGE_PARAM_KNOB"/>
  <PNS_ORANGE_FLAT_KNOB base_type="IMAGE_PARAM_KNOB"/>
  <PNS_ORANGE_FLAT_KNOB_SYM base_type="IMAGE_PARAM_KNOB"/>
  <PNS_YELLOW_FLAT_KNOB base_type="IMAGE_PARAM_KNOB"/>
  <PNS_YELLOW_FLAT_KNOB_SYM base_type="IMAGE_PARAM_KNOB"/>
  <PNS_GREEN_FLAT_KNOB base_type="IMAGE_PARAM_KNOB"/>
  <PNS_GREEN_FLAT_KNOB_SYM base_type="IMAGE_PARAM_KNOB"/>
  <PNS_RED_FLAT_KNOB base_type="IMAGE_PARAM_KNOB"/>
  <PNS_RED_FLAT_KNOB_SYM base_type="IMAGE_PARAM_KNOB"/>

  <!-- ************ FROM BCA DEFAULT THEME *************  -->
  <PNS_SILVER_BLUE_MODERN_KNOB base_type="THEME_KNOB_CHANNEL1"/>
  <PNS_SILVER_BLUE_MODERN_KNOB_SYM base_type="THEME_KNOB_CHANNEL1_SYM"/>
  <PNS_SILVER_PINK_MODERN_KNOB base_type="THEME_KNOB_CHANNEL2"/>
  <PNS_SILVER_PINK_MODERN_KNOB_SYM base_type="THEME_KNOB_CHANNEL2_SYM"/>
  <PNS_BLACK_BLUE_MODERN_KNOB base_type="THEME_ALT_KNOB_CHANNEL1"/>
  <PNS_BLACK_BLUE_MODERN_KNOB_SYM base_type="THEME_ALT_KNOB_CHANNEL1_SYM"/>
  <PNS_BLACK_PINK_MODERN_KNOB base_type="THEME_ALT_KNOB_CHANNEL2"/>
  <PNS_BLACK_PINK_MODERN_KNOB_SYM base_type="THEME_ALT_KNOB_CHANNEL2_SYM"/>
Meters:
  <PNS_SMALL_RED_LED base_type="IMAGE_PARAM_METER"/>
  <PNS_RED_LED base_type="IMAGE_PARAM_METER"/>
  <PNS_BLUE_LED base_type="IMAGE_PARAM_METER"/>
  <PNS_GREEN_LED base_type="IMAGE_PARAM_METER"/>
  <PNS_ORANGE_LED base_type="IMAGE_PARAM_METER"/>
  <PNS_ANALOG_VU base_type="IMAGE_PARAM_METER"/>
  <PNS_ANALOG_VU_SQUARE base_type="IMAGE_PARAM_METER"/>
  <PNS_ANALOG_VU_30 base_type="IMAGE_PARAM_METER"/>
  <PNS_ANALOG_VU_60 base_type="IMAGE_PARAM_METER"/>
Groups:
  <PNS_DASHED_GROUP_BOX base_type="IMAGE_GROUP_BOX"/>
  <PNS_PLAIN_GROUP_BOX base_type="IMAGE_GROUP_BOX"/>
  <PNS_FILLED_GROUP_BOX base_type="IMAGE_GROUP_BOX" opacity="50%"/>
  <PNS_LCD_GROUP_BOX base_type="THEME_GRAPH_BOX"/>
Switches & images:
<PNS_JOYSTICK base_type="XYZ_IMAGE_PARAM_JOYSTICK"/>
  <PNS_VINTAGE_SWITCH base_type="IMAGE_PARAM_BUTTON"/>
  <PNS_CLASSIC_SWITCH  base_type="IMAGE_PARAM_BUTTON"/>
  <PNS_VSELECT_SWITCH  base_type="IMAGE_PARAM_BUTTON"/>
  <PNS_HSELECT_SWITCH  base_type="IMAGE_PARAM_BUTTON"/>
  <PNS_DROPDOWN_ARROW  base_type="IMAGE"/>
  <!-- Use only with DSP raw parameters: opens MIDI & automation control
  settings window -->
  <PNS_DSP_PARAM_SETTINGS_BUTTON base_type="IMAGE_PARAM_BUTTON"/>
Note: the PNS_DSP_PARAM_SETTINGS_BUTTON component is just a small arrow that lets the user access the automation and MIDI control properties of the parameter. As you will see in the factory kuiml files, it is usually displayed below controls - but these are optional, as the user can access the full list of parameters in the preset settings.
Examples
For a script that has two parameters, we can write the following skin, displaying two knobs in a row:
  <SKIN>
    <ROW spacing="5">
      <PNS_BLUE_FLAT_KNOB param_id="custom_param0"/>
      <PNS_RED_FLAT_KNOB param_id="custom_param1"/>
    </ROW>
  </SKIN>

You can then add titles, parameter values etc. very quickly:
  <SKIN>
    <ROW spacing="5">
      <COLUMN>
        <TEXT value="P1" font_size="13" font_weight="bold"/>
        <PNS_BLUE_FLAT_KNOB param_id="custom_param0"/>
        <PARAM_TEXT param_id="custom_param0" width="50"/>
      </COLUMN>
      <COLUMN>
        <TEXT value="P2" font_size="13" font_weight="bold"/>
        <PNS_RED_FLAT_KNOB param_id="custom_param1"/>
        <PARAM_TEXT param_id="custom_param1" width="50"/>
      </COLUMN>
    </ROW>
  </SKIN>

Note: if you do not want have the kuiml engine do the layout for you, you can write absolute pixel-positions inside of a layer stack element. Here is an example with a 3 parameters script:
  <SKIN>
    <LAYER_STACK width="300" height="200" font_size="15">
      <PNS_BLUE_FLAT_KNOB param_id="custom_param0" h_position="10" v_position="0"/>
      <PNS_RED_FLAT_KNOB param_id="custom_param1" h_position="130" v_position="50"/>
      <PNS_ORANGE_FLAT_KNOB param_id="custom_param2" h_position="240" v_position="100"/>
      <TEXT value="I prefer pixel positions!" h_position="10" v_position="170"/>
    </LAYER_STACK>
  </SKIN>

But as the skin becomes more and more complex, and if you want to change controls and fonts (with different sizes) easily, it is recommended to use kuiml layout instead!
Custom Graphics
To use custom graphics, it is recommended to place them in the $SCRIPT_DATA_FOLDER$ directory ("SCRIPTNAME-data") so that they are properly copied when when exporting a plug-in from a script.
It is however still possible to change the graphics resources associated with the standard controls after export: they are located in the plug-in data folder, under the Skins/Controls directory. Just be aware that file names and locations may change in future releases. Also, you can use different sizes for the graphics of each control, but this will affect the layout of your plug-in.
3. Writing a custom GUI for exported plug-ins
In many cases you can use the previous options to obtain a more than decent graphical user interface for your plug-in without much effort. And it can be exported as an independent plug-in as well!
In some cases, you may however want to build a completely custom user interface for your exported plug-ins, with its own look and feel. GUIs for exported plug-ins are written with the KUIML language, like for any Blue Cat Audio plug-in. And you have full access to the plug-in data model without any limitation.
Note: while it is possible to write custom skins for your scripts inside Plug'n Script, it is not recommended: due to the dynamic nature of the plug-in (parameters changing anytime a new script is loaded), it is a bit more complex.
Procedure
When exporting the plug-in, you can choose not to export the GUI. It will create a plug-in without any skin, but you can still add your own after the export.
Warning: do not add your files to the exported plug-in directly in the export directory, as they will be removed if you re-export the plug-in.
After the plug-in has been exported, create a file named "default.xml" in the "Skins" directory that should have been created under the plug-in data folder.
Note: you can actually create several skins for your plug-in, the user will be able to select his favorite from the plug-in menu if you display it.
Open the file and start writing your skin! To check it out, load the plug-in in a host application.
Getting started with KUIML
You can check our introduction to the GUI language as well as our simple skinning tutorial to get started with writing the GUI. Once you are familiar with the basics, a quick look at the language reference will give you all the details you need to use the components of the KUIML language.
Also, feel free to contact us and check out our forum for further assistance.
3. Choosing NO GUI upon export
As explained earlier, when exporting the plug-in, you can also choose to export it without a GUI. If you do not add a skin to it later on, the plug-in will display the default GUI of the host applications that support "GUI-less" plug-ins.
Adding a User Manual
It is also possible (and strongly recommended) to add a user manual to the dsp script. It will be made available to the end user in the title bar, with an additional question mark icon (see the chapter about user interface for more details).
Both pdf and html manuals are supported for scripts loaded into Plug'n Script (whereas only pdf is supported for exported plug-ins). Simply distribute the script with an html or pdf file in the same directory as the script, with the appropriate naming convention: the manual should have the same name as the script file, with the .html or .pdf extension. For example: myscript.cxx and myscript.pdf.
If no manual is provided, the help icon will not be visible in Plug'n Script or in the exported plug-in.
Note: exported plug-ins currently support pdf manuals only.
Resources
If you are new to dsp and programming, or if you just want to learn more, you will find below a few resources that you may find interesting:
Programming
- The AngelScript Language: reference for AngelScript programming.
- The Plug'n Script Repository: source code repository on GitHub to share dsp scripts with the community.
Signal Processing
- music-dsp.org: the ultimate mailing list about digital signal processing. You will also find there many links and an interesting source code archive.
- The DSP and Plug-in Development forum on kvraudio: a good forum to discuss dsp and plug-in development in general.
MIDI
- midi.org: the MIDI Manufacturers association. Several resources and tutorials about MIDI.
- MIDI 1.0: The full MIDI standard specification.
Also, be sure to check our Forum regularly and post there if you have any question.
Standalone Application Basics
Main Features
The standalone application will let you process audio data coming from the inputs of the audio interface and stream it to its output, in real time, without the need for a third party host application. The application also receives MIDI events from all MIDI input interfaces available on the machine, without any particular configuration required.
The core features of the application are the same as the plug-ins versions, except that the application can run on its own.
It is worth noting that user presets are shared between the standalone application and the plug-ins versions, so that presets can be reused between standlone and plug-in sessions.
Application Preferences
The audio/MIDI setup for the application is decribed in details in the first launch chapter.
The configuration window above can be displayed using the Edit/Audio Setup menu item. More information about the various fields can be found in the first launch chapter.
Application Menu
The application menu gives you access to the following commands:
- Edit/Undo: undo last change.
- Edit/Redo: redo last undone change.
- Edit/Audio Setup: open the preferences window.
Keyboard Shortcuts
To speed up operation, several keyboard shortcuts are available in the standalone application:
On Windows
- CTRL+Z: undo.
- Shift CTRL+Z: redo.
- CTRL+P: open the preferences window.
- ALT+F4: quit the application.
On Mac
- CMD+Z: undo.
- Shift CMD+Z: redo.
- CMD+, or CMD+P: open the preferences window.
- CMD+Q: quit the application.
Troubleshooting
No Sound
if you cannot hear anything coming out of the software, you need to check the audio configuration: open the preferences window (Edit Menu / Audio Setup command), and check that the audio engine is running. If it is not running, you may need to select another audio interface or change the buffer and sample rate settings. If it is running, you may want to select another audio interface or differnt audio inputs and outputs.
Cracks and Pops
If you can hear unwanted "cracks" and "pops" during the performance, you may be experiencing audio dropouts, because the application is using too much CPU. You can try to increase the buffer size in the preferences window to reduce CPU usage, and close other applications that are currently running.
Blue Cat Audio Plug-Ins Basics
This chapter describes the basic features that are common to all our plug-ins. If you are already familiar with our products, you can skip this part.
User Interface Basics
About Skins
Like all Blue Cat Audio plug-ins, Blue Cat's Plug'n Script uses a skinnable user interface. It means that the appearance and behavior of the user interface can be entirely customized.
Especially with third party skins, the experience may be quite different from the one offered by the default skins that we provide. However, our plug-ins and our skinning engine have several standard features that will be available whatever your favorite skin.
More information about custom skins can be found in the skins section.
The Main Toolbar
In most skins, an optional toolbar at the top of the user interface gives you access to the main options and settings of the plug-in:

Smooth Bypass
On the left, the power button can be used to smoothly bypass the plug-in.
Presets Area
At the center of the toolbar, you can see the current preset area (the "Default Settings" box). It displays the name of the current preset, with a "*" at the end if it has been modified since loaded.
The arrows on the left and right let you navigate thru the (factory and user) presets available for the plug-in.
Clicking on the preset name opens the presets menu which lets you manage the presets of the plug-in.
Using the knob on the bottom right of this area, you can reduce the opacity of the window, and make it transparent (the actual result may depend on the host application). Additional messages may appear in the area next to this knob, depending on the plug-in.
Some plug-ins may also propose you to manually select the audio I/O inside the plug-in (bottom left of the presets area), regardless of the host configuration. It can be useful for example to save CPU by selecting mono to stereo configurations (instead of full stereo sometimes chosen by default by the host), or add extra channels to manage side chain internally, when the host does not provides any side chain input. Please note that this does not change the number of I/O seen by the host application.
Commands
The icons in the toolbar give you access the to the following commands that are detailed in the next paragraph:
| Icon | Name | Function |
|---|---|---|
|
|
Menu | Open the main menu |
|
|
Control Settings | Display the controls settings menu (to manage automation and MIDI control, as described here). |
|
|
Undo | Undo |
|
|
Redo | Redo |
|
|
Manual | User Manual |
|
|
About | About |
|
|
Zoom | Scale the user interface (from 70% to 200%). When loaded in a Blue Cat Audio plug-in host, you can also choose to follow the host's zoom, so that the plug-in gets automatically scaled when the host changes its own zoom factor. The resulting scale factor is the combination of the host and plug-in zooms. |
The Main Menu
The main menu is available from the main toolbar, or if you right click anywhere on the background of the plug-in:
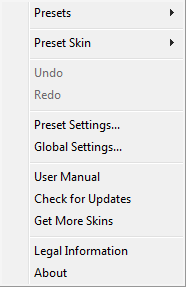
- Presets: opens the presets menu to manage presets.
- Preset Skin: opens the skins menu to choose the skin for the current preset and manage alternative skins for the software.
- Undo/Redo: undo or redo the latest modifications. This includes all changes made to the current preset settings such as MIDI or automation preferences.
- Presets Settings: open the presets settings window. It lets you change the skin, MIDI and automation settings for the current preset.
- Global Settings: open the global settings window. It lets you change the skin, MIDI and automation settings that are used by default in all instances of the plug-in (if not overridden by the current preset).
- User Manual: open this user manual.
- Check for Updates: opens up our website to let you check if any update for this software is available.
- Get More Skins: get more skins for this software.
- Legal Information: browse licensing and misc legal documents.
- About: displays the “about” dialog box.
Controls
Examples
Here are a few examples of typical controls you will encounter in the user interface of our plug-ins:
| slider | slider | knob | button | Text control |
|
|
 |
 |
|
|
Interacting with Controls
You can interact with the controls of the plug-in interface either with the mouse or the keyboard.
Setting the keyboard focus on a control (so that it responds to key strokes) may be automatic (when you pass the mouse over it it gets focus) or manual (you have to click on the control to set the focus on it). Note that all host applications behave differently regarding keyboard handling. In some applications you may not be able to use all keys described later in this manual to interact with our plug-ins. It is usually made obvious to you to know the active surfaces of the skin (the places where you can click with the mouse): the mouse cursor usually changes when you can do something on a control. In the default skins delivered with the plug-in, the cursor changes to a small hand or an arrow to tell you when your mouse is over an active control.
Mouse
Various mouse movements will let you interact with the controls:
| Mouse Interaction | Action |
|---|---|
| Left Click | Acquire focus and start dragging or push (button) |
| Left Click + Alt Key | Set the value to default |
| Left Double Click |
Acquire focus and launch the “fine
tuning” edit box (except button):
 |
| Right Click | Set the value to default |
| Mouse Wheel | Increment or decrement the position (focus required) |
| Mouse Drag | Change the control position depending on mouse movement (except button) |
Keyboard
All control widgets support the following keys (note that some of them are caught by the host and thus never forwarded to the control. For example in Steinberg Cubase SX you cannot use the arrow keys to control the plug-in):
Keys Common to All Controls
| Key | Action |
|---|---|
| Up Arrow | Small increment of the position (up or right) |
| Down Arrow | Small increment of the position (down or left) |
| Left Arrow | Same as Down Arrow |
| Right Arrow | Same as Up Arrow |
| Page Up | Large increment of the position (up or right) |
| Page Down | Large decrement of the position (down or left) |
| + | Small increment of the value of the control |
| - | Small decrement of the value of the control |
| d | Set to default value (same as mouse right click) |
| e |
Opens the 'fine tuning' window to precisely
set the parameter:
|
| SHIFT | When the key is down, the fine tuning mode is on, and you can modify the value with better precision when moving the mouse, the mouse wheel or using the keyboard. Just release the key to get back to the normal mode. |
Keys Specific to Buttons
| Key | Action |
|---|---|
| Enter | Pushes the button |
Presets
To get started with the plug-in and discover its capabilities, a couple of factory presets are provided. You can also save your own presets and recall them later for other projects. Our plug-ins propose a full-featured preset manager to let you save, browse, organize and recall its presets.
The Presets Menu
The presets menu can be opened from the main menu or the main toolbar. It displays the list of presets available for the plug-in as well as commands to load, save or organize presets:
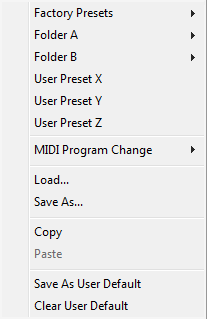
- Factory Presets: shows the list of factory presets delivered with the plug-in.
- "Folder A" to "User Preset Z": user presets and categories.
- MIDI Program Change: activate MIDI Program Change support (see below).
- Load: load preset from file.
- Save: save current state to last loaded user preset.
- Save As: save current preset to a file.
- Copy copy preset to the system clipboard.
- Paste paste preset from the system clipboard, if available.
- Save As User Default: save the current state as the default preset. This preset is used every time a new instance of the plug-in is created.
- Clear User Default: reset the default preset to its factory state: this makes the plug-in forgets the custom settings you might have saved as a default preset.
More about Presets
There are two types of presets: factory presets (read only) that are provided with the plug-in, and user presets that can be created and stored by the user.
The user presets are stored in a subdirectory of the documents folders of your profile ("Documents" on Mac, and "My Documents" on Windows): Blue Cat Audio/[Plug-in Name]/Presets. Each preset is stored as an individual file. You can create folders and subfolders in the Presets directory to classify your presets, as shown in the example below:
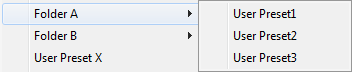
If you save a preset named "Default" in the root Presets directory, it will override the factory default preset (that's what "Save As Default" does). To restore the factory default preset, you can just remove this file or use the "Reset Default" command.
MIDI Program Change
It is possible to load presets remotely using MIDI "Bank Select" and "Program Change" messages. To enable this feature, select a MIDI channel to receive the events from in the MIDI Program Change menu item from the presets menu:
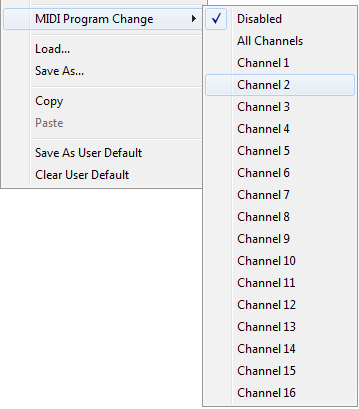
This setting is saved for each plug-in istance with your session but not in presets (except for the default preset, using the "Save as User Default command"). Once activated, the plug-in menu will display the bank number followed by the preset number for each preset:
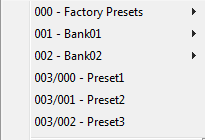
Every root folder is considered as a new bank, starting with the factory presets (bank 0). Program and bank numbers may change while you add folders and presets, so you should be careful when naming them if bank and program numbers matter to you. It is recommended to use folders to make this task simpler. As a side note, sub folders do not define additional banks (all presets contained in sub folders are associated with the current bank.
As specified by MIDI, bank select messages are not used until a program is actually selected.
MIDI Implementation note: the software supports all types of Bank Select methods. You can use either MIDI CC 0 or MIDI CC 32 to select banks. If both are used simultaneously, they are combined together so that you can use more banks (in this case CC0 is LSB and CC32 is MSB, and actual bank number is 128*CC0+CC32).
MIDI and Automation Control
Blue Cat's Plug'n Script can also be remotely controlled via MIDI using MIDI CC ("Control Change") messages or automation curves, if your host application supports it. It is possible to customize the channel, control numbers, range and response curve used for each parameter in the settings panel available from the main menu (see the Plug-in Settings chapter for more details).
MIDI and Automation Settings Menu
The main menu
Most skins also provide the ability to change MIDI and automation settings directly in the main user interface. Clicking on the control settings icon in the main toolbar opens the following menu:
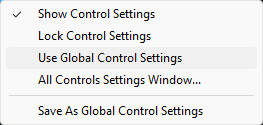
- Show Control Settings: show direct access to individual control settings for each parameter in the user interface (see next paragraph).
- Lock Control Settings: lock the current controls settings for MIDI and automation so that they remain unchanged when loading presets.
- Use Global Control Settings: ignore the current MIDI/automation settings and use the global settings instead.
- Control Settings Window: display the control settings window, to change control settings for all parameters.
- Save As Global Control Settings: save the current settings as global settings (used by default, when no specific MIDI/Automation setting has been set for the cuirrent preset).
Individual Control Settings
When this feature is activated using the "Show Control Settings" item in the MIDI and Automation Settings menu, dropdown menu buttons appears next to the main controls displayed by the plug-in:
Clicking on this button shows the MIDI/Automation settings menu:
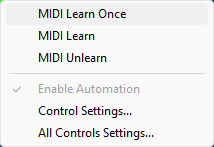
- MIDI Learn Once: launches MIDI learn mode with auto-stop for the control: touch your MIDI controller and the control will learn from it the MIDI channel and control number.The learn mode will stop automatically upon first message received.
- MIDI Learn: launches MIDI learn mode for the control: touch your MIDI controller and the control will learn from it the MIDI channel and CControl Number. To end the learn mode, reopen this menu and deselect the option. Note: the various types of supported MIDI messages will behave differently with MIDI learn, as explained here.
- MIDI Unlearn: deactivates MIDI control for this parameter.
- Control Settings: launches the advanced settings panel described below. This controls the settings for the current preset.
- All Control Settings: display the control settings window, with access to all parameters.
Advanced MIDI and Automation Settings
You can completely customize the way the plug-in is controlled by automation and MIDI. For a global view of all parameters at a time, you can use the Plug-in Settings window for the current preset which is available from the main menu.
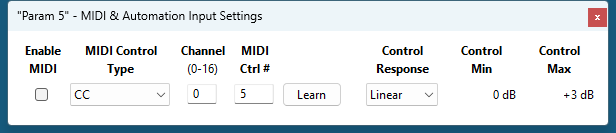
MIDI Settings:
- Enable MIDI: enable/disable the MIDI control of the parameter.
- Channel: MIDI Channel for the parameter control. If set to 0, the plug-ins will accept Control Change Messages from all MIDI Channels (MIDI Omni mode).
- Control Type: Select the type of control (MIDI CC, Note On/Off, NRPN, 14-bit MIDI CC... See full list with details below).
- Ctrl Number: Control Number (CC number, Note number, NRPN number etc.).
- Learn: click on this button to activate the MIDI learn functionality. When it is activated, you can move your MIDI controller, and the plug-in will automatically detect the control settings (details below) .
MIDI and automation settings:
- Response: response curve of the MIDI or automation control: from very fast to slow control.
- Min: minimal value of the parameter when MIDI controlled or automated.
- Max: Maximum value of the parameter when MIDI controlled or automated.
Note: if the Min value is higher than the Max value, the response curve will be reversed: increasing the control value will decrease the parameter value.
Note: if you double click on the parameter text control boxes for the max and min values, a “fine tuning” edit box will appear and let you change the min and max values with more precision:
MIDI Control Types
Our plug-ins now support multiple types of MIDI events to control parameters, in addition to traditional MIDI CC (Control Change) messages:

| Ctrl Type | Description | Ctrl # Range | Value Range | Precision | Comment |
|---|---|---|---|---|---|
| CC | Single MIDI Control Change messages | 0-127 | 0-127 | 7-bit | Low resolution but most widely supported control type. |
| CC 14-bit | Combines two MIDI Control Change messages to achieve better precision | 0-31 | 0-16383 | 14-bit | The two message are CC numbers with an offset of 32. For example for 14-bit CC #0, it is using both CC#0 (MSB) and CC#32 (LSB) to define the full 14-bit value. |
| NRPN | Non Registered Parameters | 0-16383 | 0-16383 | 14-bit | Uses MIDI CC# 6, 38, 98 and 99 (and optional 96-97 for increments) behind the scenes. |
| Note Velocity | Uses the velocity of MIDI Note On events as control value. | 0-127 | 0-127 | 7-bit | Control number is the MIDI note number. Note Off events are ignored. |
| Note On/Off | Set parameter to min upon Note off and max upon Note On | 0-127 | 0-127 | 7-bit | Control number is the MIDI note number. |
| Note | Uses the velocity of MIDI note events as control value, Note Off events considered as min value. | 0-127 | 0-127 | 7-bit | Control number is the MIDI note number. When the note key is released, minimum value is set. |
| Aftertouch | Also known as Poly Pressure. | 0-127 | 0-127 | 7-bit | Control number is the MIDI note number used for aftertouch. |
| Pitch Bend | Pitch Wheel Change event | 0-16383 | None | 14-bit | Control number is not used, the value is global for the selected MIDI Channel. |
| Channel Pressure | Also known as Channel Aftertouch. | 0-127 | None | 7-bit | Control number is not used, the value is global for the selected MIDI Channel. |
MIDI Control Types & MIDI Learn
The various types of supported MIDI events may behave a bit differently regarding MIDI learn, since it is not always possible to make the distiction between them. For all of them except NRPN, if you have selected the type of control that you are expecting, moving the control on the MIDI controller will be enough to learn.
However if another type is selected, only the control types marked as "auto" below will be detected automatically. The default MIDI control type is MIDI CC.
| Ctrl Type | MIDI Learn | Details |
|---|---|---|
| CC | Auto | Move a MIDI CC knob on a controller and it will be detected automatically. |
| CC 14-bit | If Selected | Will be detected if 14-bit CC is selected, or it will default to MIDI CC. |
| NRPN | No | No MIDI Learn available. Control number has to be set manually. |
| Note Velocity | Auto | Hit a note and it will be detected automatically. |
| Note On/Off | If Selected | Hit a note, and it will be detected if this type of control is selected, or it will default to Note Velocity. |
| Note | If Selected | Hit a note, and it will be detected if this type of control is selected, or it will default to Note Velocity. |
| Aftertouch | Auto | Is automatically detected unless the keyboard also supports Channel Pressure. |
| Pitch Bend | Auto | Move the Pitch Wheel and the channel number is automatically detected. |
| Channel Pressure | Auto | Is automatically detected unless the keyboard also supports aftertouch. |
MIDI and Automation Output
Blue Cat's Plug'n Script can also generate MIDI CC Events or automation curves thanks to its output parameters.
You have access to the same settings for the output parameters as for input parameters using the dropdown menu, except that you can also enable or disable automation.
The output parameters MIDI and Automation Menu:
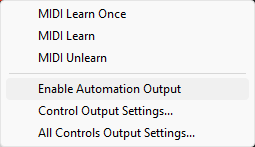
The advanced output parameters MIDI and Automation settings window:

More
Check our online tutorial for more screenshots and more examples of our plug-ins user interfaces.
Blue Cat's Plug'n Script Parameters
All parameters described below can be automated and controlled via MIDI if your host application supports it. You can precisely define this behavior in the settings panels described later in this manual.
Input
The input parameters of this plug-in are the following:
| Name | Unit | Description | Comment |
|---|---|---|---|
| General | |||
| Bypass |
|
Bypass the effect. |
|
| Reload Script |
|
Value changes trigger the reload the current script. |
|
| Enable Meters |
|
Enable or disable audio level meters. |
|
| 5 Reserved Parameters |
|
5 reserved parameters for future usage. Do not use. |
|
| For each script input parameter (index: i) - 48 parameters | |||
| Param i | % | Input parameter number i for the script (actual range is [0-100%], whatever the internal range selected in the script). |
|
Output
The output parameters of this plug-in are the following:
| Name | Unit | Description | Comment |
|---|---|---|---|
| For each script output parameter (index: i) - 32 parameters | |||
| Param i | % | Output parameter number i for the script (actual range is [0-100%], whatever the internal range selected in the script). |
|
Plug-in Settings
In addition to the controls offered in the main user interface, Blue Cat's Plug'n Script has various settings that let you fine tune the behavior of the plug-in. You can choose to change these settings either for the current preset or globally for all instances of the plug-in.
The Global Settings Window
The settings available in this window apply to all instances of the plug-in, for all presets, if not overridden in the presets settings. Consider these settings as “default” settings.
General
You can change the default skin for all instances of the plug-in: write the skin file path in the text edit box or click on the button to open a file chooser dialog. If you have several instances of the plug-in opened in your session, you will have to re-open the user interfaces of these plug-ins to see the skin change.
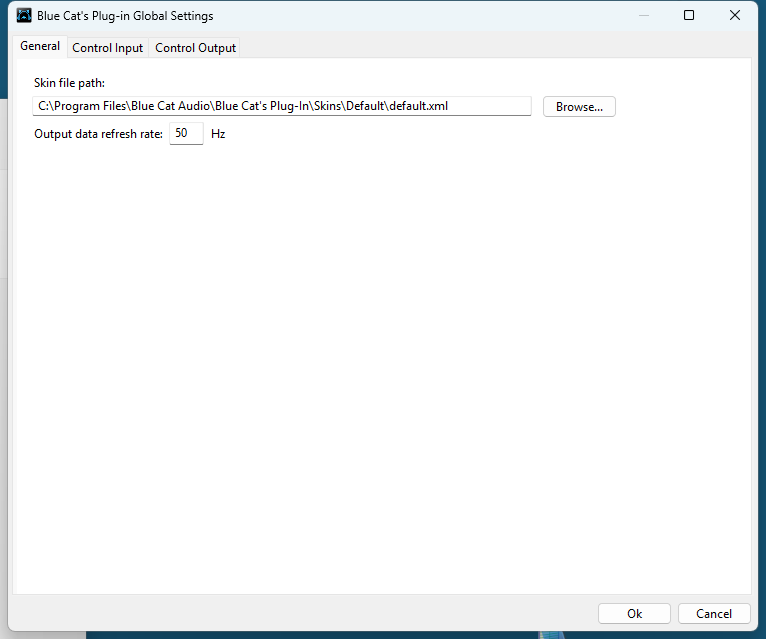
The output data refresh rate can also be customized for all instances of the plug-in. It controls the refresh rate of non-audio data produced by the plug-in (parameters, curves...). It also controls the refresh rate of output MIDI CC messages or output automation data. The higher the refresh rate, the better precision, but also the higher cpu usage (some host applications may also have trouble recording MIDI data at high refresh rates). The default value is 50 Hz.
Global Control Input Settings (MIDI and Automation)
The plug-in offers a couple of settings that affect the way it is controlled by MIDI messages or automation. While the first settings only apply to MIDI control, the "Control Response", "Min" and "Max" settings apply to both automation and MIDI control.
For each parameter you can define a default MIDI channel and CC number. You can then control the plug-in with an external MIDI controller or one of our plug-ins that generate MIDI messages.
The settings below are available for each plug-in parameter.
MIDI Settings:
- Enable MIDI: enable/disable the MIDI control of the parameter.
- Channel: MIDI Channel for the parameter control. If set to 0, the plug-ins will accept Control Change Messages from all MIDI Channels (MIDI Omni mode).
- Control Type: Select the type of control (MIDI CC, Note On/Off, NRPN, 14-bit MIDI CC... See full list with details below).
- Ctrl Number: Control Number (CC number, Note number, NRPN number etc.).
- Learn: click on this button to activate the MIDI learn functionality. When it is activated, you can move your MIDI controller, and the plug-in will automatically detect the control settings (details here) .
MIDI and automation settings:
- Response: response curve of the MIDI or automation control: from very fast to slow control.
- Min: minimal value of the parameter when MIDI controlled or automated.
- Max: Maximum value of the parameter when MIDI controlled or automated.
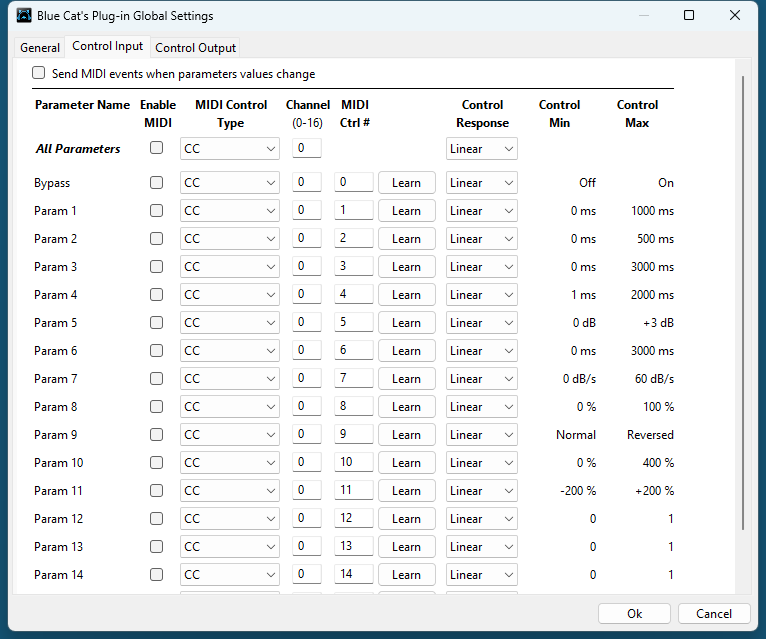
Note: if the Min value is higher than the Max value, the response curve will be reversed: increasing the control value will decrease the parameter value.
Note: if you double click on the parameter text control boxes for the max and min values, a “fine tuning” edit box will appear and let you change the min and max values with more precision:
"Send MIDI events when parameters values change": activate this option when using a control surface that accepts MIDI events as input. MIDI messages will be sent to the output of the plug-in when the user change the parameters values in the user interface, to keep the software and the controller in sync. MIDI is only sent for parameters that are activated for MIDI control.
Global Control Output Settings (MIDI and Automation)
You can set the same properties for the output parameters as for the input parameters: in this case, they may trigger MIDI CC messages or generate automation curves when modified. Since it's output, you cannot set the channel to MIDI Omni, so you must choose a channel.
Output parameters can also generate automation curves in most host applications. You can enable automation for any output parameters you are interested in (see the "Enable Autom." checkbox).
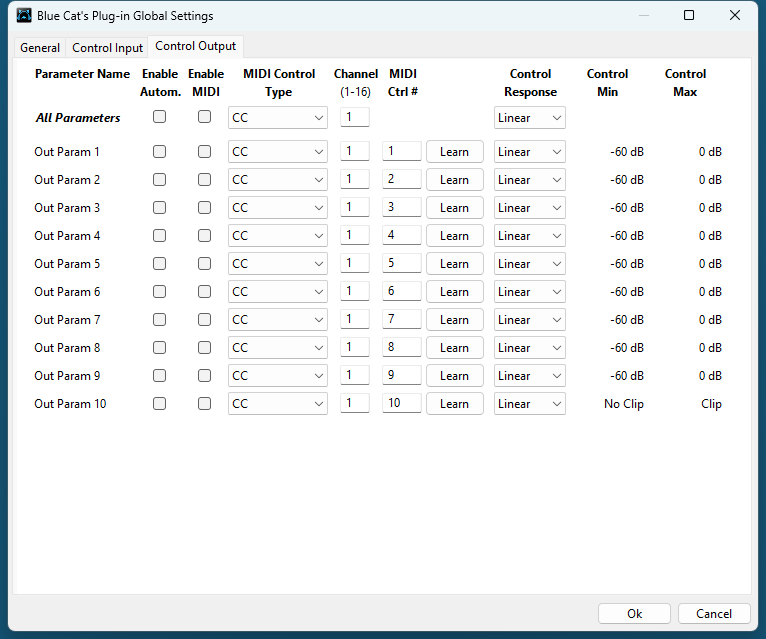
Note: if the Min value is higher than the Max value, the response curve will be reversed: increasing the control value will decrease the parameter value.
Note: if you double click on the parameter text control boxes for the max and min values, a “fine tuning” edit box will appear and let you change the min and max values with more precision:
The Current Preset Settings Window
In this window you can change the settings for the current preset of the current instance of the plug-in only.
Preset Skin
You can choose to use the global skin setting or to change the skin for the current preset. This way you can have different skins for different instances of the plug-in in the same session in order to differentiate them.
Preset Control Input Settings (MIDI and Automation)
Use the global settings or override them for the current preset. The parameters are the same as for the global input settings.
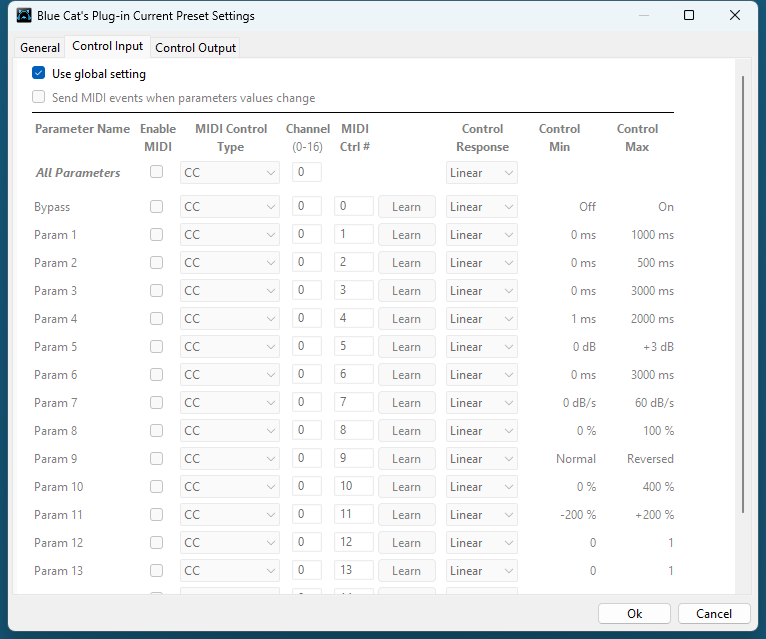
Preset Control Output Settings (MIDI and Automation)
Use the global settings or override them for the current preset. The parameters are the same as for the global output settings.
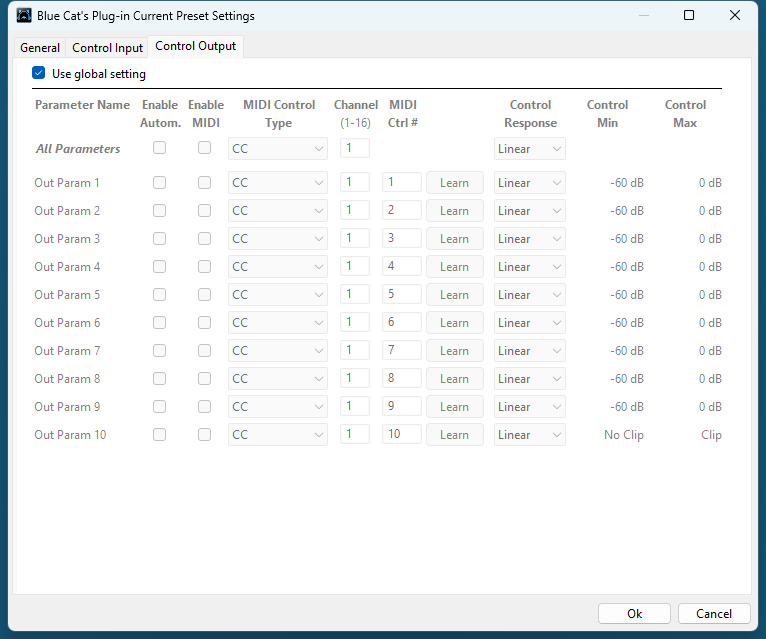
About Skins
Blue Cat's Plug'n Script integrates Blue Cat's skinning engine that allows you to customize the user interface. You can download alternate skins for your plug-in at the following address:
If you don't find a skin that fits your need or if you want a custom one, you can choose to create your own skin.
Choosing the Skin
There are two ways to select the skin of your plug-in: you can change the default (or 'global') skin, or change the skin for the current preset only (either in the preset settings page or from the main menu). The global skin applies to all plug-in instances (choose this one if you want to use the skin used by default, regardless of the session or preset), whereas the current preset skin only applies to the current preset of the current plug-in instance (use this one if you want to change only the skin for the current session/preset).
Note: in some host applications, the plug-in window won't resize automatically when you choose a skin with a different size. In this case, just close the window and re-open it: it will be displayed with the right size.
The Skins Menu
The skins menu can be opened from the main menu. It displays the list of skins available for the plug-in as well as commands to manage the skin used by default when no preset skin has been selected:
- First Section - Factory Skins: shows the list of factory skins delivered with the plug-in ("Default" and "Light" in this example).
- Second Section - User Skins: shows the list of user skins that have been installed in the Documents Skins folder for the plug-in (see below).
- Use Global Skin: use the global skin for the current preset/session (unloads any custom skin previously selected for the current preset).
- Load: opens a file browser dialog to manually select the skin from the file system.
- Save As Global Skin: use the current preset skin as the global skin (loaded by default if no preset skin has been defined).
Installing User Skins
To select user skins directly from the skins menu, install them in the "Skins" directory available in the plug-in's documents folder:
[Your Documents Folder]/Blue Cat Audio/[Plugin Name]/Skins/
The skin engine will scan this folder for new skins (xml files) and display them in the menu. The skin files should be in the root skins folder or in a subdirectory inside this folder: subdirectories are not scanned recursively.
Other Methods to Select Skins
You can also select the skins in the settings panels available from the main menu:
The global skin (used by default if no preset skin has been selected) can be changed in the global settings pane. The current preset skin can be changed in the preset settings page .
Create a Custom Skin
You can create custom skins for your plug-in in order to adapt it to your exact needs. You can change its look and feel and make it completely integrated in your virtual studio!
Just read the Blue Cat's Skinning Language manual and download the samples for the tutorial on http://www.bluecataudio.com/Skins. You can get ready to create your own skins in a few minutes. You can then share your skins on our website.
More...
This manual only covers the main aspects of Blue Cat's Plug'n Script. Our website offers many additional resources for your Blue Cat's Plug'n Script plug-in. It is constantly updated, so keep an eye on it!
Updates
As you can see in the history log below, we care about constantly updating our products in order to give you the latest technology available. Please visit our website often to check if Blue Cat's Plug'n Script has been updated, or subscribe to our Newsletter to be informed of the latest news about our products.
Note: minor version updates are available from the same location as the original full version download (link received by email upon purchase). The demo version publicly available on our website will not let you register.
You can also follow us on twitter, facebook and instagram for almost real time updates notification, and subscribe to our YouTube channel to watch the latest videos about our software.
Versions History
V3.61 (2026/04/29) |
|
V3.6 (2026/03/03) |
Scripting / Audio DSP
|
V3.52 (2025/09/08) |
|
V3.51 (2025/08/12) |
|
V3.5 (2025/05/06) |
|
V3.4 (2024/09/09) |
|
V3.34 (2024/05/14) |
|
V3.33 (2022/12/12) |
|
V3.32 (2022/06/23) |
|
V3.31 (2021/02/16) |
|
V3.3 (2020/06/15) |
|
V3.2 (2019/08/30) |
|
V3.1 (2018/11/30) |
|
V3.01 (2017/10/19) |
|
V3.0 (2017/10/17) |
|
V2.1a (2016/03/04) |
|
V2.1 (2016/03/03) |
|
V2.0 (2015/11/25) |
|
V1.1 (2014/10/01) |
|
V1.0 (2014/09/18) |
First release. |
Thanks again for choosing our software!
See you soon on www.bluecataudio.com!