I have been struggling lately with constant audio dropouts on our main Windows PC (a monster machine running Windows 11 with a 12th gen Intel core i9 CPU and an NVIDIA GeForce RTX video card – also used for video editing).
A true nightmare making any real time audio performance impossible on this machine for weeks!
It took some time to figure it out, but here is a trick that may help you solve such audio dropouts, even when DPC latency issues with faulty drivers cannot be solved!
To learn more about DPC latency, you may want to read our Windows PC Optimization article.
By the way DPC stands for Deferred Procedure Calls (Wikipedia definition).
NVIDIA Driver DPC Latency Problem
After applying the same optimization tricks as for all our audio laptops (yes it works for desktop PCs too, even though it is usually not necessary), audio performance was still very poor, even with rather large buffer settings.
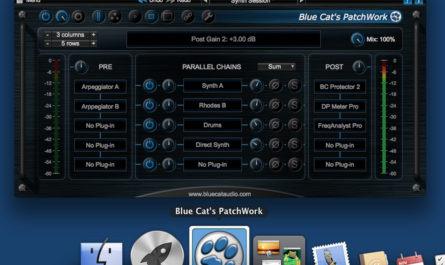
CPU usage was not the problem though, as the CPU meter in our standalone applications was really quiet:
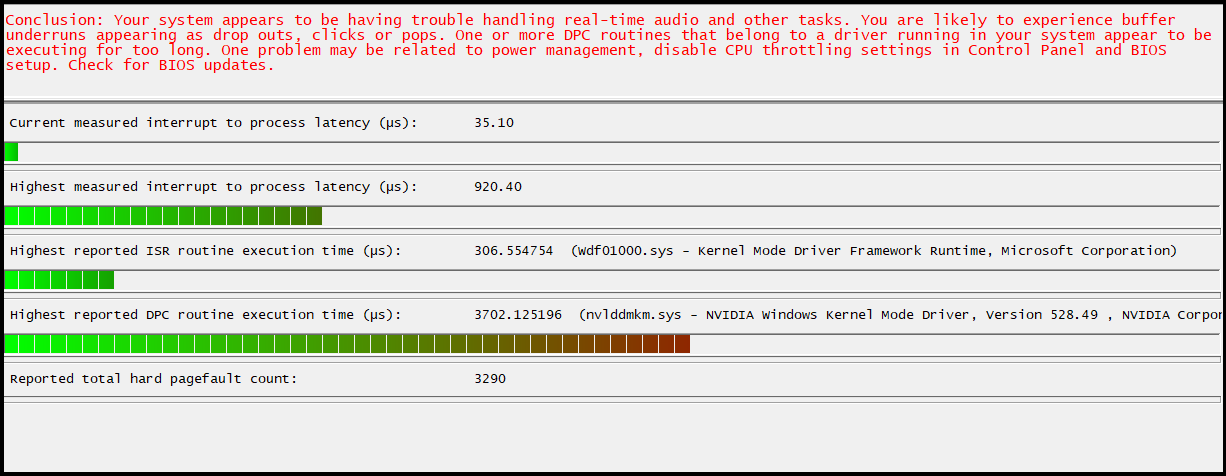
So of course, the first thing that comes to mind in this case is DPC latency issues… An the culprit indeed seems to be the NVIDIA video driver, as shown by the Latency Mon report below:
Almost 4ms of DPC latency is huge, and it means dropping audio buffers every time this delay happens! If interrupts from other drivers take too much time to execute, they may indeed prevent the audio driver from doing its work in time, as explained with more details in our Windows PC Optimization article.
After further investigation on the Internet, this issue has been happening to many people lately, and it may have been caused by the combination of recent Windows updates and issues with NVIDIA drivers, which of course you cannot disable!
Anyway, after trying every possible tweak described in this forum thread, one trick finally solved the problem, and I guess it may be applicable to other cases when DPC latency keeps being an issue for audio dropouts, and the faulty driver cannot be disabled.
The Trick
The idea is to force the audio driver and the driver causing DPC latency issues to work on different CPU cores, so that the audio driver is not blocked by the faulty driver that takes time to execute.
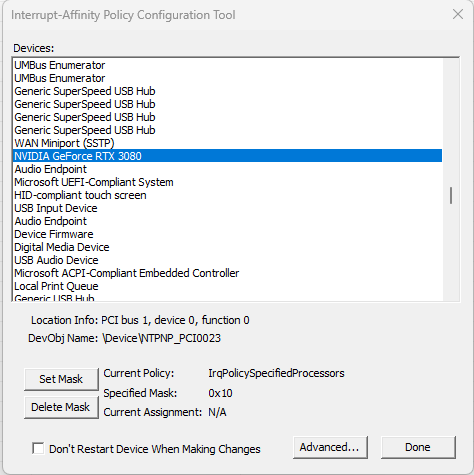
To do that, you can edit the interrupt affinity setting for the drivers. You can either go thru the Windows registry manually (good luck!) or use the Microsoft Interrupt-Affinity tool:
In this particular case, the GeForce driver’s affinity has been set to Core #4, while the audio driver has been set to core #16.
Warning: the NVIDIA driver resets this affinity property when updated (and sometimes when rebooting), so you might have to do this again from time to time. The Interrupt Affinity tool also seems to throw odd errors from time to time while editing the registry for this particular driver, but it does not seem to affect the result.
The Result
It works! No more dropouts, even at extremely low latencies and high CPU usage!
The DPC latency issue with the NVIDIA driver remains, BUT it is now not a problem anymore for the audio driver that can do its work (on CPU #16) while the other CPU core (#4) is busy working for the graphics card (nvlddmkm.sys driver), as you an see on the Latency Mon utility screenshot below:
I guess this is applicable to any other driver that may cause such DPC latency issues and that cannot be disabled (it has to respect the core affinity settings though – some drivers may override the behavior and not take the affinity into account). So if you have a laptop that has never been capable of real time audio due to DPC latency issues, you may to to try this out!
Back to music now… Enjoy, and feel free to report your successes of failures with this trick!




Thanks for this! I m experiencing this issue top and I’ll try your tips! Just one question can you be more specific in commands to use while using interrupt affinity tool? I mean how to assign different drivers to a different core in case of ASIO drivers and Nvidia drivers! Thanks in advance and have a Great day
Experiment with the Interrupt-Affinity tool to set the best result for your specific computer.
That’s just crazy! Why normal people have to deal with this!
Thanks for sharing!
That’s definitely a good question! 🙂
Both Intel and AMD put their hardware really fast into the consumer market without adequate testing it first. Using UEFI their drivers overclock the consumer’s system by default (see AMD precision Boost overdrive as an example or memory XMP settings) Using telemetrics the analyze the crash reports after a driver crashing and also “normal” driver behavior like drivers not responding all with the help of AI algorithms. We consumers experience the odd behavior of our hardware but are being let in the dark about the cause of it. Long story short: If you want a stable system buy a server. Also high end office systems are more stable because of the use of “professional” chipsets that won’t allow overclocking (by default)
Or by a gaming motherboard and everything else but FIRST (before installing windows) disable all overclocking in the bios and NEVER download driver optimized for gaming afterwards but use the drivers windows provides. Folks should refurbish old systems instead of buying new. That’s the only way to signal that the new systems might be fast but at the same time it’s instable hardware; Trash not worth paying a dime for because of all the time it takes to keep it running.
Great article, I was struggling with this as well.
Glad to help!
Of you have no single clue what you are mumbling about, maybe leave posting it on internet for somebody else. 4 second dpc latency would cause you unusable processing times not even talking about ANYTHING realtime. By selecting GPU interrupt filter policy spread out to all CPUs will cause more problems than fix cause of uneven load through cores from other processes, different proximity to memory controller etc. Etc. Who the hell buys 3080 for realtime audio applications anyway??? Best to just use integrated graphics or just uninstall the GPU or driver, you can also find low latency driver if you really need it. Wouldn’t trust you plugging a monitor into a wall socket though, stay away from toys for big boys.
Well, you may want to read the article once again. That’s 4 milliseconds, not seconds, or the computer would indeed be unusable for anything :-). Here the GPU is actually assigned to a single core, not spread onto all cores, so that it is working on its own dedicated core and does not interrupt real time tasks. You may want to use a computer with a decent GPU for real time audio for many reasons. Here the workstation is used to do both video and audio, so that’s needed. And it runs very well now.
Just set interrupt filter to CPU closest to memory controller and the one that is free, also you can limit cycles with MSI mode tool to 1 to reduce CPU time to minimum and adjust priority to your liking
Thanks for the tip. We are not talking about multiple CPUs here but a single multicore CPU, so maybe I am misunderstanding, but I don’t think this is relevant.
Great article, however when I try to do this on a new Asus G16, it does not save the states, telling me the registry will not allow it. I’ve tried multiple times with both the x64 and x86 version of the tool.
I disabled hyper threading first, I am guessing that there is some kind of security measure in place? Do you know any way of getting around this?
Did you run the tool as an administrator? Also if you close and then re-open the tool, are the settings really reset? I remember seeing a couple of error messages but when re-opening the app you could see that the settings were actually saved.
Hello,
You can also chose to force nVidia driver to low latency mode which worked for me:
=> launch nVidia control panel
=> chose to set it for all in Global tab or for your DAW in Program tab
=> select “low latency mode” and set it to “ultra”
=> apply and close, that’s it!
Hope it helps…
Thanks for the heads up! Is this a new option in the driver? I don’t remember seeing this setting in the past.
I don’t know really. I discovered that when I tried to understand why my brand new big powered PC had a worse latency than my old one! There is also another tuning I then discovered in the nVidia driver, it’s about power limitation of the GPU which can sometimes had very bad effects on latency….
FYI After Pulling my hair out for weeks on a brand new 56 core W9 Xeon with HDX and TB3 Audio cutting out, this right here is what did it, 100% obscure comment should be pinned somewhere. Thanks
SOLVED for a similar configuration:
Operating system Windows 10, recently installed on a motherboard ASRock P67 Pro3 (bought and used since 2011), coupled with an Nvidia GTX 1660 graphic card, and Envy24 as audio controller.
=> DCP_violation were happening each time some video (with sound) was played, which did not happen on my Windows 8.1 OS.
What didn’t work:
updating the drivers, modifying some option from Nvidia control panel.
Only when I divided the audio/graphic works between my multicores CPU (Intel i7 2600K), with the help of the Microsoft Interrupt-Affinity tool, was the problem finally solved 😀
Thanks a lot, guys !
… But man, I wonder what is the terrific change which happened in Windows 10 OS and the NVidia driver, that could lead to such a problem… I was not too far to consider buying another motherboard if it didn’t work ;(
Yes that’s indeed a crazy situation! Glad that the article helped!
NEW SOLVING, and new informations !
First, the solution provided here does work and improve greatly the use of the computer, but I found some recurring problems : still BSOD happening when, by example, I was using a web navigator to watch some Youtube videos. No problem when only using VLC to listen to music, but when audio and video were playing, those BSOD appeared sometimes, somtimes not.
(Mozilla Firefox was used, I didn’t try much with other web navigators.)
As I was ranting about Microsoft’s software as well as Nvidia’s hardware, I came across this issue, reported on Microsoft’s WSL github repository: « Hangs and BSOD after enabling Windows Feature “Virtual Machine Platform” ».
=> Link is: https://github.com/microsoft/WSL/issues/6793
… The ROOT CAUSE of that problem, the bane of my computer’s existence, was nothing else but the enabling of the “Virtual Machine Platform” Windows feature. Yes.
And, since I wanted to do some virtualization with my computer, I remembered having enabled both “Virtual Machine Platform” AND “Windows Hypervisor Platform”… And once I disabled them, all my system became stabilized again.
I was speechless.
I don’t know why, but in my case, the Hyper-V features were causing the whole BSOD rampage.
So, if I summarize to this point:
When you have a Windows 10 OS, with a Nvidia graphic card (does having AMD gpu not trigger anything ?), if you enable “Virtual Machine Platform” and “Windows Hypervisor Platform” Windows’s features, then there is the possibility for you to catch BSOD when cpu/gpu are called to play audio and/or graphics.
Hope this helps.
Wow, I was just about to do a complete reset of my system. Massive audio dropouts, and the culprit was nvidia driver. Not about to remove my GPU!
I’ve been optimising PCs re audio for so many years but had never heard of this solution. Thanks so much for making this guide.
Glas that it helped! This method is indeed quite efficient but not very well documented!
Sadly, this did nothing for my Dolby Atmos audio dropping out / going robotic when alt tabbing / switching tabs on my browser. This issue started when I upgraded to a 4090 FE.
I think Ive spent over 60 hours the past week and a half trying to figure this out. I really thought this was goig to finaly solve it. Kind of disapointed. I dont know what else to do.
The guys that did maintenece last time and helped me install the GTX 1660 Super said that they can do a clean install of wondows 11 but I doubt it will make a difference.
Latency is not necessarily bad. If I hear if its very faint now and then. But my fear is that because Latancymon gets to those red warnings it will freeze my computer again and give me BSOD once more.. Havent had one the past couple of days because I keep restarting everytime I make a new adjustment to try and fix it.
I dont know what to do anymore.
I couldn’t use this fix, because Threadripper isn’t supported by the Latency Monitoring tool. I had to debug it the old fashioned way.
My particular problem may be different to the original post, although the symptoms were the same (audio dropouts when setting Windows to Atmos, but fine on 7.1 or lower).
The solution was to upgrade the HDMI cable to both a shorter, and higher quality option. I’d tried numerous other things, none of which worked.
If anyone’s interested, I chose a 5m Active Fiber 8K certified HDMI2.1 cable from Cable Matters. Since I made the switch, performance has been flawless.
I hope this helps someone!
Thanks for the tip! HDMI cables are indeed known to cause problems randomly too!
My pleasure Bluecat, although BAD news is that after a flawless weekend of audio, problems returned on Monday.
The GOOD news though is that this helped point me to another solution (I’m keeping the new cable btw, it’s really well made).
The answer was that yep, it was the weekend, and yep, I wasn’t doing work stuff, I was gaming. So, why is it playing audio whilst gaming wasn’t a problem?
The answer was staring me in the face : Clock speeds.
The GPU downclocks at idle, which is its normal state during a work day. Audio playing full of gaps.
On a weekend, gaming, the clocks are always high and audio was perfect.
The REAL workaround is therefore most likely related to cable quality AND the memory clock of the GPU.
I’ve set my memory clocks so that they don’t drop all the way down to minimum. Instead of 405MHz, they’re now running at 810MHz. This adds about 4W of power consumption and 1 degree of temperature to the GPU itself.
Depending on the GPU, the numbers and ranges may differ so some experimentation is likely needed if anyone’s reading this with the same problem, but the method’s pretty simple :
— Determine compatible clock speeds
Open an admin command prompt and type this command:
nvidia-smi -q -d SUPPORTED_CLOCKS >GPUClockSpeeds.txt
This’ll give you a long list of memory MHz speeds, and within each of those, a range of compatible GPU clock speeds. Ignore the batch of timings at the bottom of the list – those are the slowest downclocks which we don’t want as they cause the problem. For me, next group up is the batch for 810MHz.
Make a note of the memory clock batch number (810 in this case). This is your minimum memory clock.
Now make a note of the minimum gpu clock speed within that batch (it’ll be at the bottom. For me it’s 210).
So that’s your minimums. Now for the maximums.
Go to the top of the list for the fastest supported values. For me this is a memory clock of 10501MHz and a Graphics clock of 3240MHz.
Now you’ve got enough for these commands (which if you like you can also put into a BAT file and run as part of your startup routine).
nvidia-smi -lgc 210,3240
nvidia-smi -lmc 810,10501
This will allow the GPU to ramp up clock speeds when it thinks it needs it, but it’ll stop it downclocking below the threshold required to supply steady signal through the HDMI.
Hope this is helpful!
Sorry, should have mentioned that the
nvidia-smi -q -d SUPPORTED_CLOCKS >GPUClockSpeeds.txt
… command will output to the file GPUClockSpeeds.txt which you’ll need to review in Notepad. You can also review the list on the command window just by omitting the > redirection and using :
nvidia-smi -q -d SUPPORTED_CLOCKS
I don’t know if this thread is closed but I’m very curious about this topic having experienced crazy latency issues myself on a Ryzen 7 5700G system. In my case the AMD graphics driver also was the culprit though I haven’t verified that with the latency monitor I found thanks to this blog. I my case things the latency I experienced was mouse and video playback lagging when using the IGPU. The whole system seemed to lag EXECPT my audio, audio kept playing without interruption or distortion using an ASIO driver from Creative. But the mouse lag made using virtual knobs in production software close to impossible. I delve deep in the problem and I came to the conclusion that the newer graphic cards have an enormous impact on the availability of the system as a whole I suspect because of the enormous bandwidth they use when communicating with the processor. That and the fact that in case of AMD there’s a layer around the processor cores that dictates how the peripherals can communicate with the processor. Anyway in my case the only solution was shutting down the IGPU completely and install a DGPU. It’s a design problem that I’m sure of. Both Nvidia and AMD seem not able to produce a software framework that is able to keep the framerate of games steady. Just think about that for a while. All that graphics data has to go through different layers before appearing on screen. It’s a mess and as usual no one thinks about how to keep the audio streams in a steady precisely clocked bitstream. My advise would be to put a low end graphics card in your machine and use a dedicated system for video editing. I’m sure that solves the problem completely. By the way what (brand) (ASIO?) audio driver can’t work with this Nvidia card?
Disabling the GPU causing problems can indeed sometimes fix it. In the case described in this article, any audio driver would have the same problem, as the issue is caused by the GPU driver using too much time during an interrupt, hence forcing the audio driver (be it ASIO or native Windows type) to wait for too long before being able to get its audio stream.
Thank you so much!! I had problems with my iFi DAC and after adjusting different cores for both nvidia and my dac it solved the issue for now.
Great! Glad that it helped!