
Have you ever wished that you could use all your virtual instruments libraries for your keyboards or all these incredible virtual amps from your studio for your guitar or bass on stage?
Make your wish come true, then: most laptops are now powerful enough, and with lightweight host applications such as PatchWork and Axiom, you can load many instrument or effect plug-ins and recall them instantly. Just play them on stage!
Latency / Dropout Issues
So you already have a powerful Windows laptop, plenty of plug-ins, a great host application and you cannot get them to play live properly without getting dropouts (“pops”and “clicks”) all the time, unless the latency is ridiculously high? And the CPU usage is not even a problem?
By default, recent Windows laptops are definitely not configured for low latency audio – they are designed for office work / web browsing and saving batteries. In this tutorial we’ll show you how to optimize your Windows laptop or tablet in order to make it usable for real-time audio.
Using this method on a first generation Surface Book laptop, we were able to reduce the latency from (mediocre) 256 samples with occasional drop-outs (bad!), down to 48 samples without any single drop-out!
Getting Started: The Basics
We’ll consider that you already have a dedicated audio interface (preferably USB-powered to avoid ground loops and save a few cables…) with up to date drivers, designed for low latency (do not even consider using the on-board audio interface, NO!). Here are a few basic tips to get started with a clean machine:
1. Don’t Pull the Plug!
![]() First, you should never ever think about going onstage with a laptop on batteries. Ever: One, you don’t want to run out of power while playing (do you?), and two, your laptop cannot be used at full performance while running on batteries. So, plug it in!
First, you should never ever think about going onstage with a laptop on batteries. Ever: One, you don’t want to run out of power while playing (do you?), and two, your laptop cannot be used at full performance while running on batteries. So, plug it in!
2. Clean It Up
 If you can, use a laptop that is dedicated to live usage, with only the components/applications that you need for this usage.
Otherwise, create a dedicated account for real time audio, and make sure that you get rid of most (if not all) applications at startup (A Skype call during your guitar solo?). Uninstall anything that you do not need (did you know for example that Google Chrome has an application that may check for updates anytime and kill the performance?)
Also, unplug all hardware that you won’t need during the show, including USB hubs of all sorts, dongles etc. You don’t want them to interfere with your performance: you need all available resources for audio!
3. Disable All Network Connections
 Use “Flight Mode” if there is one, or disable WiFi and unplug Ethernet cables: without any network available, your computer is less likely to trigger a system or application update, receive a call etc. Bluetooth should also be disabled as it may receive unwanted connections from phones or other computers…
Disconnected from the Internet or any other network, you are now in a safer place!
4. Disable Real Time Antivirus Protection
 Now that there is no risk to get a virus from the network, you can disable the real time protection of the antivirus software.
If you don’t, it may (it will!) completely kill the performance of your machine while you really need it. It is possible to automate this using the command line, as we will see later.
Warning: while the antivirus is off, do not plug any third party storage device to your laptop, as it may be infected!
5. Choose the Appropriate Application
 Do not plan to use full featured DAW software on stage, unless you really have to!
Pickup a lightweight and simple, straightforward application (such as PatchWork or Axiom): it will use less computer resources and be much easier to manipulate while performing (save your brain resources too!).
6. Make Sure The Audio Interface Is Not Used By the System
 Open the Windows audio preferences and disable the external audio interface that you intend to use for the performance: you do not want the system to share it with your real time audio application, and you probably do not want to get Windows popup sounds into your speakers either!
7.Reboot Before The Show
Rebooting the computer before a show will help you make sure that you start from a clean configuration with no application running in the background. Do not do it at the last minute though: who knows what may happen…
Ready to go? Let’s now dive into the main tricks that will make your computer a power-horse for real time audio!
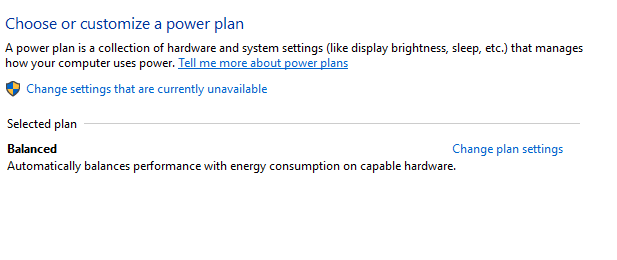
Restoring the High Performance Power Plan
 You may have noticed that on most (if not all) Windows 10 laptops, there is no “High Performance” power plan anymore (if you have it, you can skip this paragraph and go to the next step).
You only get the choice for “Balanced” or other battery-saving options, which is pretty bad for our purposes, as you will not able to run your laptop at full speed:
The good news is that you can get it back:
- Run the registry Editor (type regedit in the start menu).
- Navigate to the following registry key: HKEY_LOCAL_MACHINE\SYSTEM\CurrentControlSet\Control\Power
- Change the value for the CsEnabled key from 1 (enabled) to 0 (disabled).
- Restart the computer.
This disables the Connected Standby mode (a.k.a Modern Standby) and gives you access to the High Performance power plan:
 Note: we will re-enable “Connected StandBy” later, don’t worry (I would not advise keeping a laptop without the ability to go to sleep mode properly: it would kill the battery and could damage the device).
Tweaking the High Performance Power Plan
Now that it’s available, let’s change the options of the high performance plan to optimize it for low latency audio (you can also create a new power plan if you prefer not to change the default High Performance plan).
Obviously, you do no want anything to be turned off while performing, so choose “never” when plugged-in:
 You should then open the advanced power settings and modify the following (for the “plugged in” configuration only – remember, we’ll be plugged-in while performing):
– set both min and max processor speed to 100%.
– disable sleep/suspend mode for usb, drive, network etc.
Your power plan should now be fully optimized to run the laptop at full speed! Now we need to restore the standby mode and yet keep the ability to switch to high performance mode…
I Want It All: High Performance AND Connected Standby
 Unless the laptop is never used for anything else than performing on stage, you will need to make sure that it can go into sleep mode, and you will want to switch between High Performance and Balanced power plans quickly. Here is a trick to be able to get the best of both worlds:
As soon as Connected Standby is re-enabled, the High Performance power plan will disappear and Windows will not list it anywhere… It seems to be gone for good – and yet it will still be available, using the command line! So while it is still here, let’s find out its unique identifier:
- Open a command line console (type “cmd” in the start menu)
- Launch the following command line to list all power plans: powercfg /l

Copy the identifiers of the balanced and high performance power plans in a safe place. You will be able to switch to the High Performance plan using the following command line later (replace with your identifier if different):
powercfg /s 8c5e7fda-e8bf-4a96-9a85-a6e23a8c635c
You can now restore the Connected StandBy mode:
- Run the registry Editor (type regedit in the start menu).
- Navigate to the following registry key: HKEY_LOCAL_MACHINE\SYSTEM\CurrentControlSet\Control\Power
- Change the value for the CsEnabled key from 0 disabled) to 1 (enabled).
- Restart the computer.
As you can see in the power options, your power plan has disappeared. You can verify that typing the command line above restores and activates it! You can now easily switch to High Performance mode with a simple command line!
Tip: to make things easier, create two text files with the powercfg command line above (one of them using the identifier for the balanced mode), and save them as .bat files. Clicking on either of them will bring back the appropriate configuration for office or live usage.
Solving DPC Latency Issues: Disabling Drivers
 So your processor should now be able to run at full speed, without any power interruptions. But we are not done yet: you probably still have drop-outs when running your favorite audio application at very low latency settings, don’t you?
This is usually due to (too many) drivers interrupting the processor while your application is doing its critical audio processing work, so we will have to disable useless drivers to make sure we have all resources for audio. We’ll start manually and then we will show a method to automate the process entirely (you don’t want to spend 2 hours setting up your laptop before a show, do you?).
By the way DPC stands for Deferred Procedure Calls (Wikipedia definition).
 To check this out, download the free Latency Mon application, and run it while your laptop is in High Performance mode (keep it running for a few minutes). You will probably get a warning that your computer may not be suitable for real time audio. And even if you don’t, you will still probably have issues, so save the figures shown by the app and do not skip this step!
Chasing for faulty / not optimized drivers can take a lot of time as you do not get the details of each driver taking time to execute, and since you want the best performance anyway, it is wiser to just disable all the drivers that are not required!

To do so, open up the device manager and check all the devices in the list.
Good candidates for DPC latency issues are: on-board audio (you don’t need it, remember?), graphics cards (use the built-in GPU instead if you can), network adapters, bluetooth drivers, built-in webcams etc. Disable them all!
Note: do not disable system devices or devices that you do not know: you might just prevent the computer from running properly!
You can then run the LatencyMon application once again and see if the situation has improved. On some laptops, you will keep getting high DPC latency because of the ACPI driver. This is one of the most common issues and it is related to power saving. If you are still getting very high DPC latency after disabling all the devices that you do not need, you may also have to disable the ACPI battery control driver(s):
![]()
This will prevent Windows from monitoring the battery, but since we are plugged-in during the performance, it is not a problem.
[2023 Update] Still having DPC latency issues after disabling all possible drivers? Don’t worry! It seems that it is still possible to get rid of audio dropouts with DPC latency issues, as explained in this article!
Performance Test
You can now try to run your audio application at low latency and see if it works better (it should)!
If you are still getting occasional dropouts while the CPU does not reach its limits (above 80% on a single core is usually pretty bad – you might be using too much CPU in this case), you can run the LatencyMon application while running audio in order to get more details about the problem. It will hopefully give you an idea of what is causing the occasional glitches.
Please note that some particular laptops may not be suitable AT ALL for low latency audio due to design issues (a good example is the 2018 Dell XPS 15 that still has DPC latency problems, even after several firmware updates). In this case, disabling all peripherals will not be enough.
Automating Drivers Management
Re-enabling/disabling the drivers manually is a pain. You can automate this task, if you need to switch between mobile laptop vs High performance configurations.
This can be done with a free Microsoft utility called devcon. It is available as part of Microsoft’s drivers development kit, but you can also install it alone too.
Once it is installed in the system directory, you can use it to switch on/off any driver with a single command line. First, look for the hardware ids of the devices that you have disabled (right click in the device manager and click on “properties”):
 To enable this particular driver from the command line (you may need to run the command line as an administrator), type:
devcon enable "*PNP0C0A"
And to disable it again:
devcon disable "*PNP0C0A"
Going thru all the devices, you can then create two .bat files: one to enable all drivers, and the other one to disable them.
Wrapping Up
You should now have a clean plugged-in laptop, running in high performance mode, with all unnecessary drivers disabled, and the corresponding list of driver ids, as well as the identifiers for both balanced and high performance power modes.
 To switch in a single click between the standard mobile/office mode and the low-latency/plugged-in high performance modes, just create two batch files (.bat text files), and run the one you want as an administrator (right click / choose “Run as Administrator), when you want to switch.
In the examples below, made for a first generation Microsoft Surface Book laptop (do not use them as is without your own identifiers!), the first line changes the power plan, and the last one disables and re-enable the antivirus software.
Low latency Batch File
powercfg /s 8c5e7fda-e8bf-4a96-9a85-a6e23a8c635c

devcon disable "USB\VID_1286&PID_204C"
devcon disable "USB\VID_1286&PID_204C&REV_3201"
devcon disable "VIDEO\INT3470"
devcon disable "PCI\VEN_10DE&DEV_134B&CC_0302"
devcon disable "PCI\VEN_11AB&DEV_2B38&CC_0200"
devcon disable "USB\VID_045E&PID_07C6"
devcon disable "INTELAUDIO\FUNC_01&VEN_8086&DEV_2809&SUBSYS_80860101"
devcon disable "INTELAUDIO\FUNC_01&VEN_10EC&DEV_0298&SUBSYS_10EC1072"
devcon disable "*PNP0C0A"

powershell.exe "Set-MpPreference -DisableRealTimeMonitoring $true"
Office mode batch file
powercfg /s 381b4222-f694-41f0-9685-ff5bb260df2e

devcon enable "USB\VID_1286&PID_204C"
devcon enable "USB\VID_1286&PID_204C&REV_3201"
devcon enable "VIDEO\INT3470"
devcon enable "PCI\VEN_10DE&DEV_134B&CC_0302"
devcon enable "PCI\VEN_11AB&DEV_2B38&CC_0200"
devcon enable "USB\VID_045E&PID_07C6"
devcon enable "INTELAUDIO\FUNC_01&VEN_8086&DEV_2809&SUBSYS_80860101"
devcon enable "INTELAUDIO\FUNC_01&VEN_10EC&DEV_0298&SUBSYS_10EC1072"
devcon enable "*PNP0C0A"

powershell.exe "Set-MpPreference -DisableRealTimeMonitoring $false"
Final Tips
Do not let your laptop run in high performance mode forever! It is strongly advised to use the methods described above to switch back to a “normal” configuration once the performance is over: otherwise your laptop may suffer from overheating, and it will drain the battery, as it will not be able to go into sleep mode.
While on stage, do not run at the lowest possible latency. If you were able to reduce the latency thanks to these tips, increase it a little bit again, to stay on the safe side! And a few milliseconds of latency is not much: it is just like moving away from the speakers, you will get used to it!
Enjoy!


Thats a great article, lots of good tips in a single place. Thanks!
Thanks!
Thanks. This was a great article with lots of really useful tips. Any chance the experts at BCA could do another article on optimizing the macOS platform for peak audio performance?
We’ll indeed try to cover the topic in an upcoming article, but we have not gone thru big latency issues on Mac so far (apart from software update interruptions), so we have much less to share!
Do you have any recommendations for Windows laptops that perform live audio well out of the box? I’m kind of awestruck that my new high spec business laptop has issues with my Traktor controller. Thank you for all these helpful tips but it’s a bit rich that I have to get into such power-user level tweaks on a $2000+ laptop. Frankly, this makes me think audio soft/hardware companies like Native Instruments should post technical requirements that capture latency requirments or simply state that Windows systems are not suitable because drop-outs should not be tolerated.
Windows systems work very well with audio, but there are a few laptops that may indeed have issues due to bad drivers design. We do not have specific recommendations (and laptop models keep changing anyway), but most laptops should be fine if you disable the peripherals that are not needed while doing audio. I think some companies sell laptops that are certified for audio ‘out of the box”, but we have not tried.
Cheers, although I’m not so sure. I’ve been using a 2012 laptop for DJing for years that I paired back to handle audio fine, but it was a lot of work to get it to that state. So I finally splurged and got a new high performance laptop. It simply doesn’t feel right that I still hve to perform all these tweaks to get it to work properly. Oh well, thanks for your tips… it’ll take some time and but I think I’ll be happy with the result.
Yes that’s a pity that most laptops are not ready for real time audio out of the box… but it’s good news that there are solutions in most cases 🙂
Great info! Thanks. This will also come in handy for Win desktops.
It can indeed be used to optimize desktop computes as well. There are however usually fewer problems than on laptops.
Low latency only linux usable.
Windows works pretty well too, once it has been properly configured – just like Linux, actually 🙂
Great! Thanks
Great summary of what can be adjusted and how to change it back and forth for optimal laptop use. Too bad Microsoft does not support this type of “switch” within the OS natively.
Can you explain the final tip:
“While on stage, do not run at the lowest possible latency”
Thanks,
Well, the idea is to keep some headroom, just in case something goes wrong… Once you have validated the smallest possible buffer size that seems not to cause dropouts, use a larger value if possible.
This is a very useful guide, thank you!
However, the part about the disabling Modern Stanby via the CsEnabled registry key is now out of date. That registry key no longer exists in new versions of Windows 10, and has no effect even if you add it manually.
The good news is that it seems it’s no longer necessary. I disabled Modern Standby (S0 Standby) in my BIOS, rebooted, and Windows 10 was automatically using S3 Standby again without any fuss of fanfare. All of the advanced power management options were once again available in the Power Plan settings.
I did not have to reinstall Windows, or mess with the registry or any other settings to disable Modern Standby, all I had to do was switch it off in the BIOS.
Thanks for the heads up. It’s odd because we used the trick two weeks ago on a brand new PC and it still worked. Anyway, it does not seem to be necessary to get there, as the high performance power plan id seems to be universal and works on all machines that we have tested so far.
Using an HP zBook G5 x360, which when I chose it 3 years ago seemed like a nice move from mac hardware and OS which I had been using for live and studio audio (pro recording, composition, live electronics) previously. The curve getting audio performing at a level anywhere near comparable (glitch-free, multi-application audio and MIDI, smooth hot-plugging, and quiet operation) has been steep, and I thank you for providing such clear and useful information, which is certainly a big help, even though I do agree that the amount of tweaking compared to Mac out-of-the-box performance is a little frustrating. I’m writing with hope for help on one last trouble spot! The fans on my x360 are maddenly sensitively calibrated, running quickly up to a loud 100% in the low 50’s, even though the laptop could easily run a little hotter without issues. I turned off turbo and got the processor /i7 8850/ running at fixed speed (2.6 GHz), and finally after undervolting was disallowed about a year ago turned to Notebook Fan Control, a nice open source project on GitHub, which allowed me to set up several fan control schemes. HP sadly does not provide this like some other Manufacturers so probably down the road I will need to find a more flexible BIOS and hardware setup. Nonetheless, the fan control *works* but with a strange effect of slightly affecting ACPI.sys latencies. Mostly not a problem in real-world use, but with a heavy CPU load in MaxMSP it translates to glitches, even in the usually rock-solid WDM-KS exclusive use of 2 outputs on my Fireface UCX audio interface. I am stuck between insane fan noise (which neither in studio nor in live recording nor on-stage is OK) or risk possible glitches even at reasonable buffer sizes of 512 samples. I haven’t been able to get a response on the forum for the Notebook Fan Control software, I guess my issue is too specialised/tweaky, as in most gaming/office/web situations it would probably not disturb. Any thoughts? I’ve looked for other fan control options with no success. HP is useless. I would be happy turning the fans permanently on at 60% which is almost inaudible, without any further back-and-forth. That should work. Any other suggestions? Desperate in Berlin, ready to buy a new Macbook Pro again.
That’s a tricky issue, indeed! Have you tried to use an external (quiet) fan instead (some notebook stands do provide fans that can help reduce the temperature without too much noise)? It may help reduce the temperature and avoid the internal noisy fans to trigger without having to use a software hack.