

[2024 Update]: Check out the Fader Hub software that now makes connected jamming even easier!
Playing Music Together Online? In Real Time?!?
Playing we other people was the initial reason why I started developing the Connector plug-in. During the pandemic lockdown back in 2020: I wanted to keep playing music with friends while being stuck at home and wondered about the feasibility of real time low latency audio sharing across remote locations.
But without a proper high-bandwidth Internet connection at the time, it was not workable. So I only used this tool as a local network streaming plug-in between workstations, and to share audio & MIDI between apps on the same computer, which is already very useful.
Optic fiber connection however eventually made it to my home and to the office, so I have been experimenting online jams with Connector a couple of times. And to my own amazement, it works really well, as you can see in the videos below, where I jammed in real time with a piano player friend who lives 400 km away!
It was so much fun that I thought I should share the information, and write a short tutorial to explain how to connect things together to play online with another musician!
How It Works
The idea is to use whatever software (DAW) you are used to to making music with on both sides of the Internet, and connect them together thru the master bus with the Connector plug-in: it will send your production over the Internet to someone else and receive back audio from him/her and mix it together, just like if you were playing together in the same room. (Note: the software you use has to be able to load third party plug-ins in VST. VST3, AAX or Audio Unit format).
You can use either a Mac or Windows PC, and software can be different on both sides (in the videos above, I was using a Windows PC running an old version of Cakewalk Sonar, and my friend was running Ableton Live on a Mac).
With a good fiber connection you can usually play together with very low latency (as if you were in the same room, a few meters apart), with a pristine sound (no audio compression is happening in Connector).
Of course the latency will increase with distance (the speed of light is not infinite!), and you may sometimes drop a few audio packets if the connection has too much jitter. But overall it proved to be very comfortable for me and felt as if we were playing together in the same room!
Step 1: Network Connection
First step is to connect your audio computer to the Internet:
- Make sure that your audio machine is connected to the internet thru a cable connection such as Ethernet (NO WIFI ALLOWED – Broadband over Powerline (BPL) won’t work well either).
- Make sure that you close all apps using internet bandwidth on the audio machine (web browser, updaters etc.).
- Disable the firewall on the machine (if any): it usually has a large impact on real time network performance and will usually prevent connections. It is safe as long as you do not open connections to the outside and your box is properly configured to avoid incoming traffic.
- Make sure that no one else is doing heavy traffic over the Internet connection at the same time.
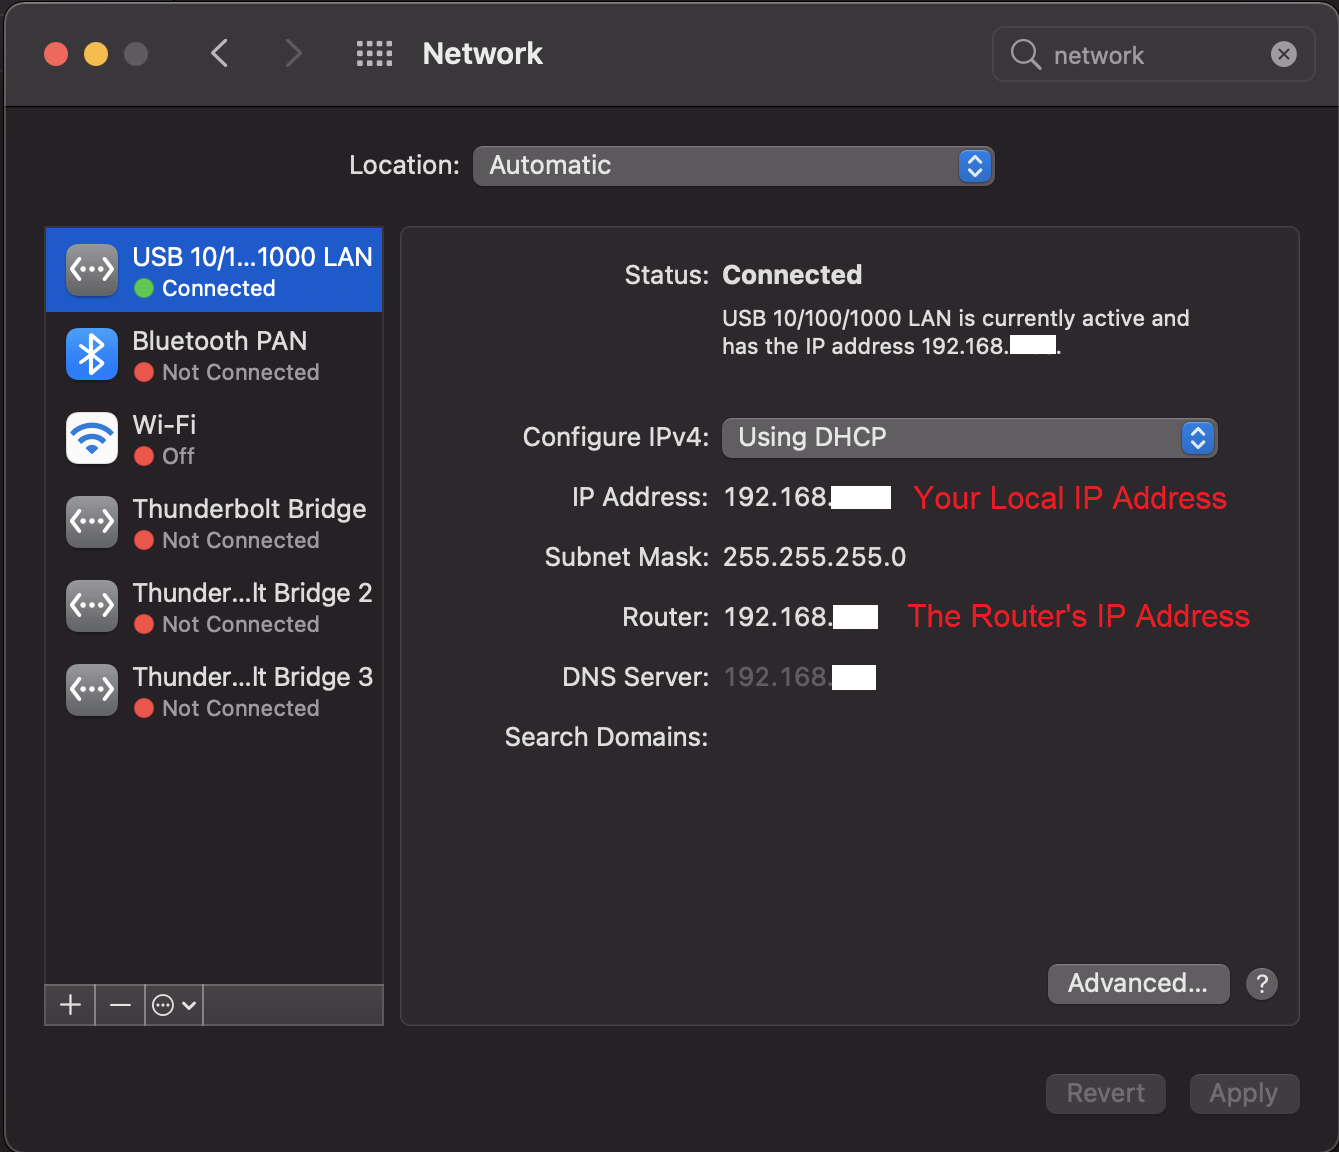
- Know the local IP address of your audio machine. You can find it in the network & internet settings of your Mac or PC pretty easily. Let’s say here it is 192.168.1.12 (yours is different!)
Step 2: Configuring The Internet Router/Box
Note: a wireless mobile Internet connection will not work. You probably need an optic fiber connection to get things working properly.
[Update: starting with Connector 1.2, this step can be skipped if your Internet router supports the Universal Plug’n Play Internet Gateway protocol (UPnP IG). Simply activate “UPnP Redirect” in the Connector receiver, and it should both configure the box for you and display the public IP address that the sender should use automatically:
You may still have to do the configuration manually as explained below in case of failure.]
In order for your friend to send audio or MIDI to your machine, you need to make your machine visible from the outside, opening a port on your internet router, and forwarding it to your audio computer. It may sound frightening, but it is a very common practice if you play video games or have an home appliance to connect to from the outside, and it usually only takes a few clicks!
- Connect to your Internet box/router (you usually just have to type the router’s IP address in the web browser, or maybe you have an app on your phone for it – see with your Internet provider for the details).
- Once connected to the router, find the NAT/PAT rules editor. There is usually a tab called NAT, PAT, Transmission, or Port Forwarding somewhere.
- Choose a port to open from the outside (some box may limit the number of ports available for your own usage, so you may have to try several numbers until it works). Let’s say we use port 16900.
- Choose the TCP protocol (or “ALL” if no other choice).
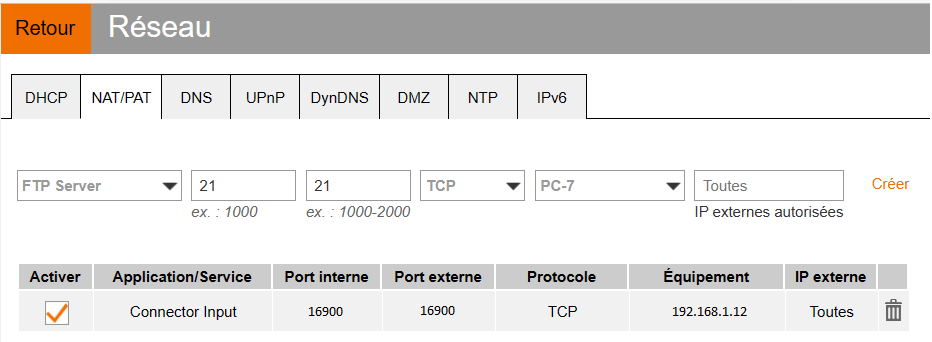
- Enter the local IP address of your audio machine (or its name, it depends on the router) as the destination (with the same port number, it will make things easier!). In our example the IP address was 192.168.1.12. The box will redirect all traffic sent to this port to your audio machine.
All incoming traffic on port 16900 should now be sent to your audio machine (local IP address 192.168.1.12 in our example):
At this stage you will also want to know the public IP address of your box, as it will be required by the other musician to send you the audio stream. The public IP address can usually be found on your Internet box’s configuration interface, or you can find it with many websites (search for “find my IP address” on Google to get it):

Step 3: Connect with Connector
Once the ports have been opened on both sides, and you both know the public IP address of the other, it is time to actually connect and play!
- Insert the Connector plug-in on the master bus of the DAW you are using for the session.
- Set the name of the instance (it will be easier to identify yourself).
- Set Connector to send to and receive from Network.
- Choose set the receiving port (16900 in our example). Activate “Drift Comp”.
- Set the destination IP address in the send section (the other musician’s public IP address).
- Choose the sending port (port configured on your friend’s destination machine). It can be the same as the receiving port if you wish, no worries.
At this stage, if you have both properly configured the connection, Connector should show that it is connected to the other side (but it might disconnect quite a bit). To avoid disconnections and dropouts, increase the buffer size in the “Receiver” section until no more dropouts occur.
Play some music (make sure that you are sending audio to the master where Connector has been instantiated), and check that you can both hear each other. There might be quite a bit of latency at this stage (or not, if you are lucky), but we can optimize that!

Step 4: Optimizing The Latency
Here are a few tips to optimize the latency and yet keep a stable connection without too many audio dropouts.
There is no guarantee, though, as the quality of the connection may vary a lot, even over time! It depends on both providers, the routers between the machines, the internet traffic…
- Make sure you are both using the same sampling rate and buffer size in your DAWs audio settings. It is not mandatory but will make the optimization of the connection much easier. Let’s say that your DAW buffer size is 128.
- Set the receiving buffer size in your Connector to a multiple of your DAW’s buffer size, and increase it until the drop outs seem to stop. In our example, we’ll start with 256, then increase to 384, 512, 768, 1024 etc. In this example 768 seemed to work best, but had to be increased a little bit later to get better stability.
- If you are still getting occasional dropouts, you can now set the packet size in the send options. Again, it should be a multiple of the DAW’s buffer size to be optimal. “auto” uses whatever frames the DAW sends to the plug-in, so we’ll start with 256 (2×128). Increasing this size reduces the bandwidth used by the audio connection, as it sends bigger packets, less often. So it can make the connection more stable over time, but can make you lose more packets in case of high jitter.
- Note: when setting the send buffer size manually, you will now want that the receiving buffer size on the other end is a multiple of it. So let’s say our friend used to have 768 (=6×128) on the receiver’s side, but we chose 512 as the send packet size. He’ll have to increase his buffer size to 1024 (=512) to optimize the buffering.
- Note: usually you will end up using same settings on both sides of the connection (if you are using the same DAW settings), but not necessarily, as Internet connections are most of the time asymmetric.
- Drift compensation: since both machines are using different audio interfaces, their clocks have no chance to be in sync, so it is better to active Connector’s built-in drift compensation mechanism. If the internet connection has a lot of jitter however, it may not work properly and make things worse than without the compensation. So you may want to experiment with or without, if you are having issues.
It’s now time to play! You may occasionally get some audio drop outs even with large buffer sizes. It really depends on the Internet connection between both locations, and how it is used (avoid streaming movies or playing video games while doing your audio session!).
Tips & More
- Even if you do not sing, you will probably want to connect a microphone to your DAW to discuss/sync up over the low latency connection, instead of using a phone (much higher latency). You can always mute it when not needed.
- You will probably want to see each other with video, as it makes the jam more friendly! You can use any video chatting service such as WhatsApp, Facetime, Zoom, Skype or whatever… It is however probably a good idea to use another machine than the main audio machine for the call, and even better if you have another Internet connection (typically a smartphone using its own wireless data connection), to leave as much headroom as possible for the low latency audio connection. Do not forget to mute the microphone on the app if already speaking over the low latency connection!
- Use headphones, or you will get echoes and feedback pretty quickly. I was able to play on studio monitors though, but my microphone is very sensitive and did not have much gain. I don’t play loud either :-).
- You can probably connect & play with more musicians at once, with several instances of Connector on separate busses, but I have not had the opportunity to try it yet. Please note that you will need a different port on your router and audio machine for each connection.
Voilà! I hope you will find this tutorial useful and that you will have a great experience playing with others over the Internet! Feel free to report back your successes or failures in the forum or on social media: we would be glad to hear from you!

I dont try your plugin yet but the work you did and how you describe it is very pleasant, thanks for sharing !
Thanks!
I purchased the connector and every time I go to open it after I downloaded it, it wants me to download it again. HELP!!!!!!
Can you contact support and thru the help desk and provide more details about the issue (such as the exact message)? https://www.bluecataudio.com/Support/HelpDesk/