
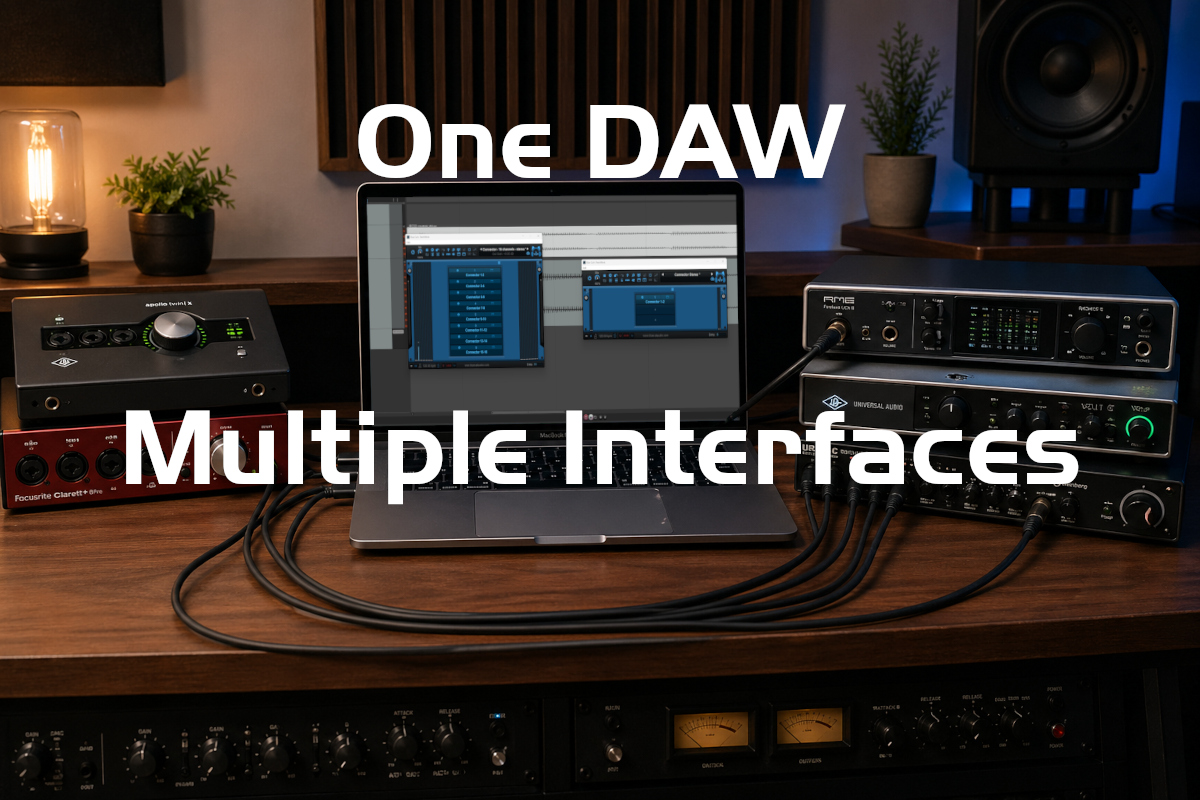
We often own multiple audio interfaces that may be used for various purposes (mobile recording / studio recording / podcasting…). However, modern Digital Audio Workstation software (DAW) usually cannot use more than only one at once. How frustrating when you’d like to expand your audio I/O and you have all these extra useless interfaces collecting dust under your desk!
Did you know that you can actually use multiple audio interfaces in the same DAW simultaneously, even when connected to different computers? Let’s see how, with PatchWork and Connector!
Note: on Mac you are supposed to be able to aggregate audio interfaces together into a single virtual one with Core Audio, but since there is no built-in drift compensation, it does not work if interfaces are not all synchronized with a wordclock signal or any other mean. It is most often useless!
Note: some audio interfaces may propose a way to aggregate several instances of the same model together and use them all thru a single driver, but if you own several models from several brands, it is not an option.
Three Audio Interfaces / One DAW
In this example we’ll be using 3 audio interfaces within a single DAW (Reaper). But this works with any number of interfaces, in most applications. The only difference is how audio routing is done, and that may require to create some extra tracks / aux busses. Please refer to your favorite application’s manual for details.
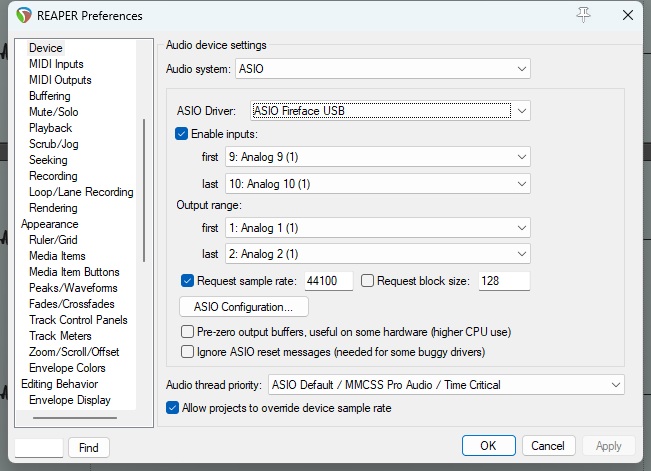
One of the interfaces will be used directly in Reaper, selecting its audio driver in the preferences:
The other two will be used thru two instances of the PatchWork application (but you could use any other application that can load plug-ins), and connected to Reaper via the Connector plug-in.
Setting Up Extra Audio Interfaces
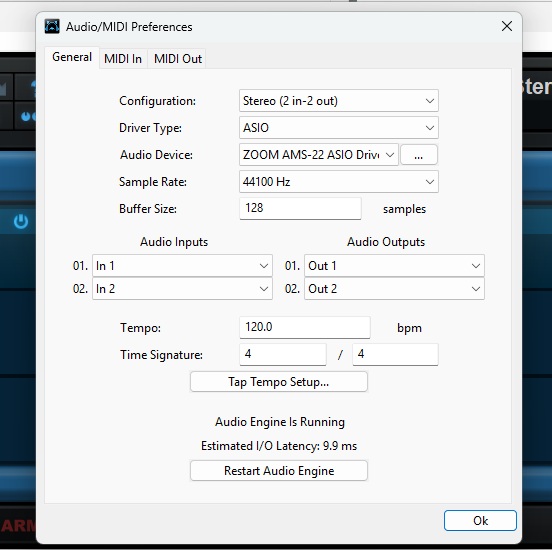
The first audio interface has already been setup in the DAW. To use the other ones, we’ll be launching the PatchWork application twice. Each instance uses a different audio interface (you can set it up in the audio preferences):
Note: if you are on Mac, you cannot launch an application twice from the Finder. To load more instances of the same app at the same time, simply launch it from the command line.
In our example, one of the audio interfaces has 16 audio I/O and the other one only 2 audio I/O, and we want to use them all from within our DAW. So we’ll setup PatchWork accordingly each time.
You can use different sample rates and buffer sizes for all audio interfaces, but it makes the whole setup a bit more complicated. So to keep things simple here, we’ll be using 44100 samples/sec everywhere and a 128 samples buffer size for all audio interfaces.
Loading Connectors
Once audio I/O have been setup for both PatchWork app instances, load as many instances of the Connector plug-in as you want to transfer audio from/to the DAW. In our example we have a first PatchWork instance with 8 stereo I/O and another with just a single stereo connection (you could also do multi-mono if you need to, you just need more instances of the Connector plug-in):
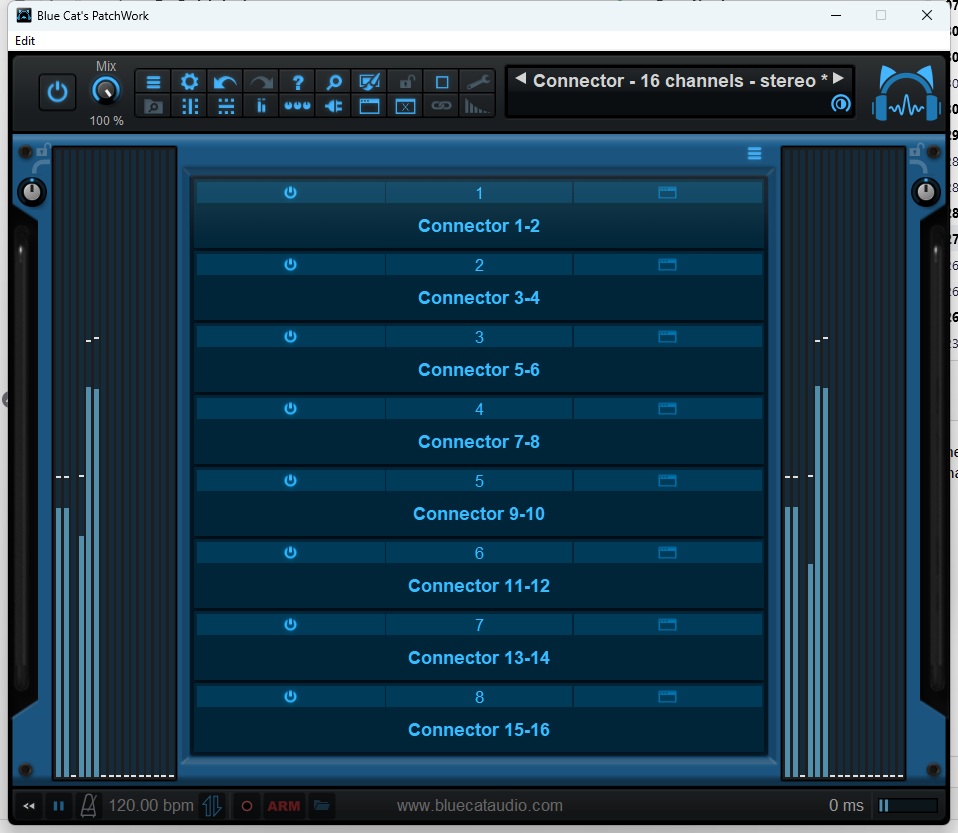
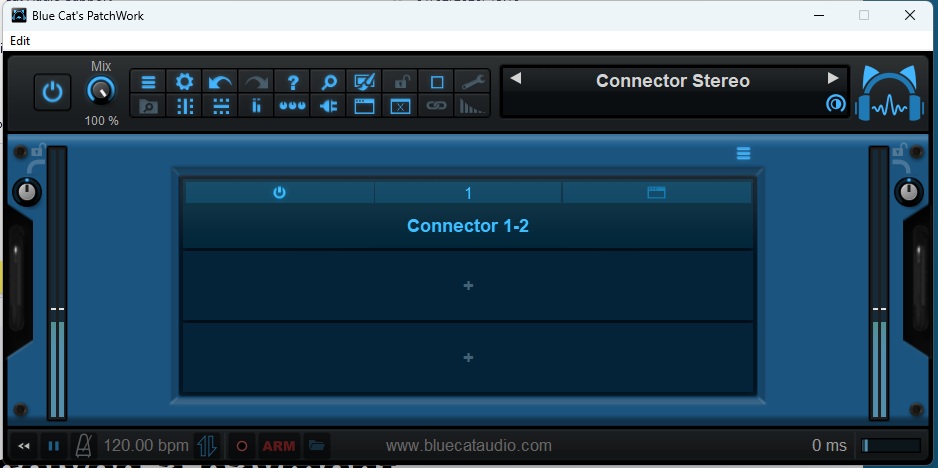
Note: Connector instances have been renamed to reflect the channel numbers that will be used to stream audio. Click on each plug-in and click “Rename…” to do this.
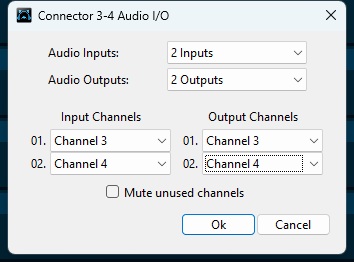
You can now choose the audio I/O for each Connector instance, to select which input and output channels are assigned to them, by clicking on each instance and selecting ” Audio I/O”:
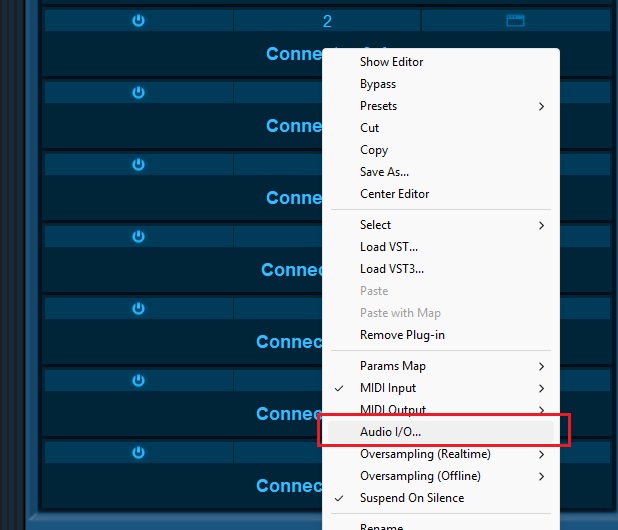
As shown above, we’ll be using stereo pairs for each Connector instance, so they’ll be using Channels 1-2, then 3-4… Up to 15-16, as both input and output:
All right! We now have one PatchWork app with 8 stereo Connectors and another with one stereo Connector, ready to be configured for streaming.
Setting Up Connectors
We can now configure each connector instance to send and receive audio on the local machine on different ports, so that each input and each output can be used independently in our DAW:
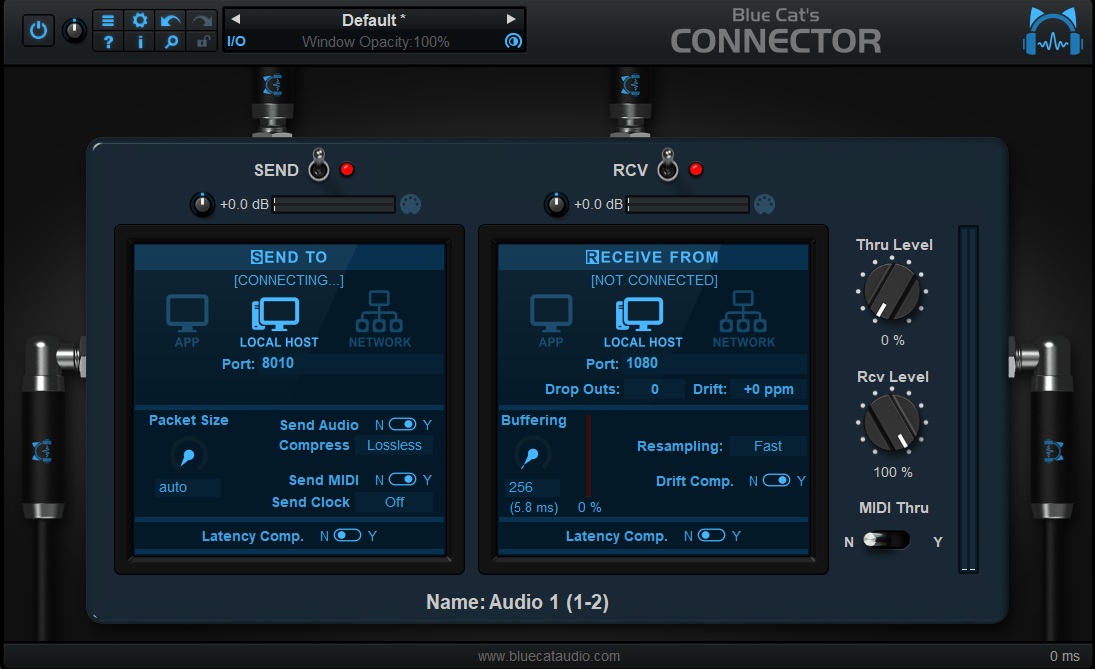
Essential points to configure your Connectors:
- Enable drift compensation, unless your audio interfaces are synchronized (with wordclock or digital i/O).
- Reception buffering: use at least twice the buffer size (256 here), to make sure that there is no audio dropout. Depending on the DAW and the audio interfaces, you may need a larger buffer.
- Name each instance wisely: here we have used “Audio 1” for all Connector using the first audio interface and “Audio 2” for the other one, followed by channel numbers. It makes it easier to identify the physical audio inputs you are receiving from and outputs you are sending to in the DAW.
- Simple Ports Numbering Scheme: since Connector requires you to choose the actual network port numbers manually, choose a simple scheme to make the connections or it will become a mess quite quickly. A good way to do it is split the umber in two parts and swap them for sending vs receiving to/from the same instance, as explained below.
In our example, we have chosen number 80 for Audio interface 1 and 81 for audio interface 2. And since we have at most 8 stereo pairs to connect for each, we’ll be using 10, 20 ,30, 40, … 90 for the second part (skipping 80 or the numbering won’t work as we’ll get 8080 for both send/receive). Which gives us:
| Stereo Pair | Sending Port | Receiving Port |
| Audio 1 (1-2) | 8010 | 1080 |
| Audio 1 (3-4) | 8020 | 2080 |
| Audio 1 (5-6) | 8030 | 3080 |
| Audio 1 (7-8) | 8040 | 4080 |
| Audio 1 (9-10) | 8050 | 5080 |
| Audio 1 (11-12) | 8060 | 6080 |
| Audio 1 (13-14) | 8070 | 7080 |
| Audio 1 (15-16) | 8090 | 9080 |
| Audio 2 (1-2) | 8110 | 1081 |
Note: since port numbers are shared by all apps doing network communication, you may sometimes end up conflicting with another app (Connector won’t be able to connect), so you may have to choose another numbering scheme in this case, or close applications that may be using the ports you would like to use.
At this stage, both audio interfaces are now ready to send and receive audio signals as stereo pairs via the Connector protocol, with the port numbers defined above. It’s time to get into the DAW!
Tip: save your PatchWork setups as presets, it will be very fast to recall them. You probably do not want to restart from scratch everytime!
Download Sample PatchWork Presets (using Connector VST2)
In The DAW
How to get the audio from these extra interfaces in the DAW? It’s now quite simple.
Audio Inputs
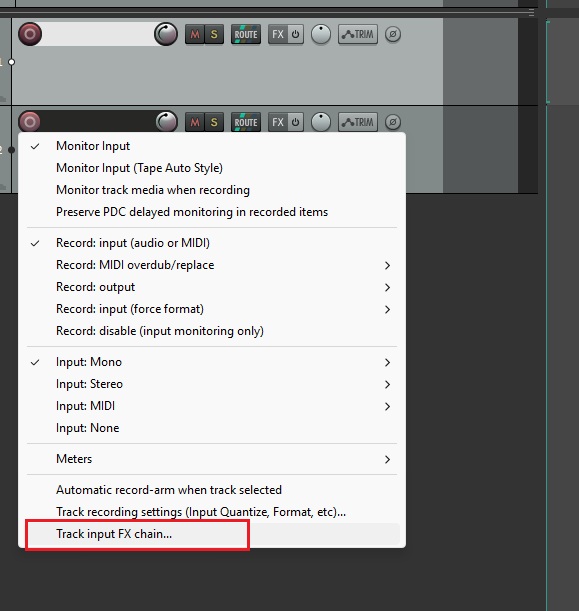
Reaper has this nice feature where you can add input effects to each track, which makes the process of connecting with Connector very easy. It is not available in all DAWs (in this case you may have to create an aux input track to get the audio from Connector – each DAW has a different way of doing it).
To receive audio from one of the interfaces on a track, simply add Connector as an input FX plug-in:
Then setup Connector as a receiver, with appropriate buffer size (256) and drift compensation enabled, as explained earlier. And choose the receiving port number from the table above to select the appropriate audio interface and audio channels.
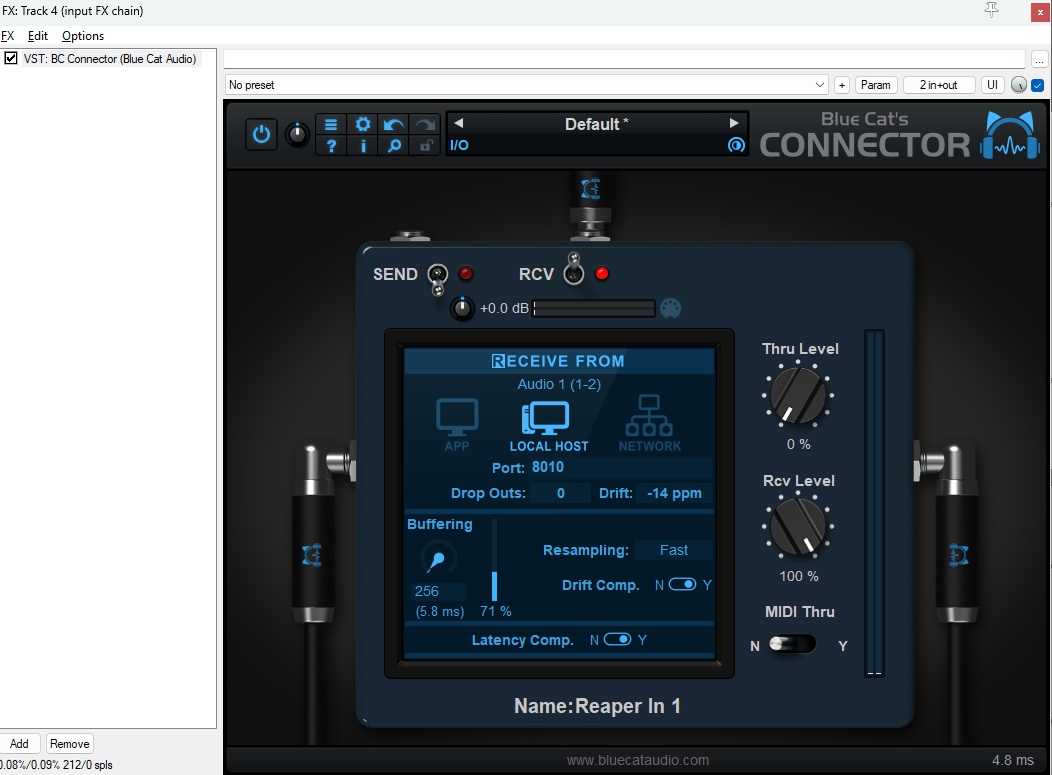
When using multiple audio interfaces with different buffer sizes, you can enable latency compensation to make sure that all the audio inputs align properly and get recorded in sync. Here you go, you are now ready to record audio from other audio interfaces within Reaper!
Audio Outputs
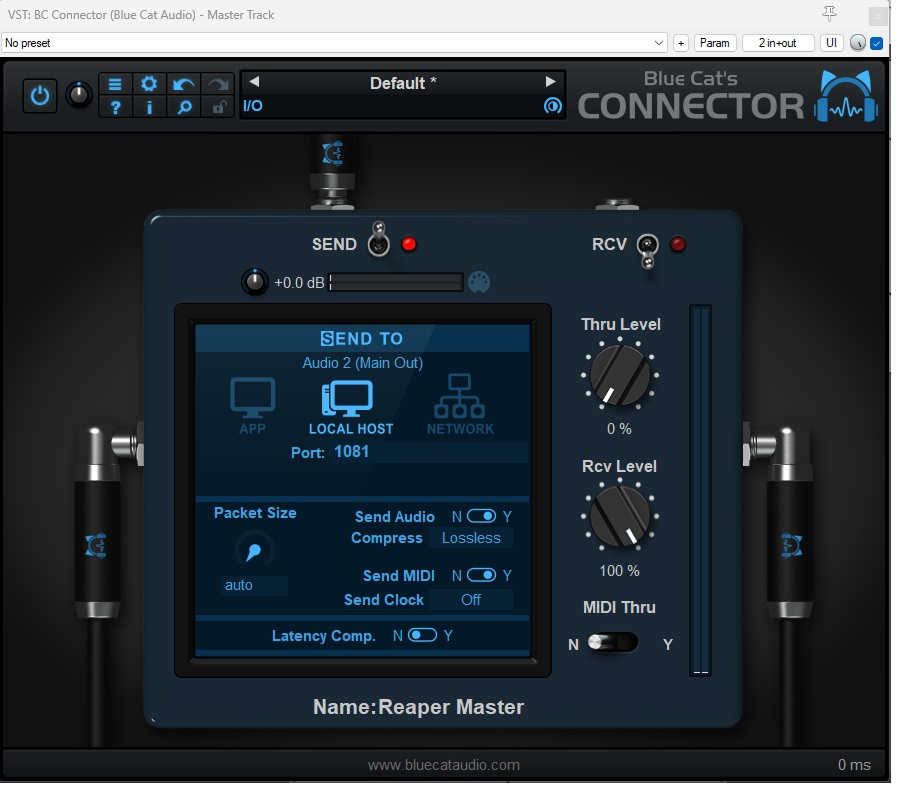
It is exactly the same thing for audio outputs. Simply load a Connector instance anywhere you want to grab the audio signal from (typically from a bus or as the last plug-in of a track), and set it up to send it to the appropriate port:
And voilà! You are now able to use all three audio interfaces within your DAW and route from/to anywhere quickly. If you own multiple machines and want to use many more audio interfaces that may be physically far away, you can use the same method and stream audio thru a local network, and even via the Internet (although the latency will be a bit higher)!
Enjoy!


Good afternoon. I need to use 2 audio interfaces with one DAW on the same computer. Accordingly, I have to purchase one license for PatchWork and one license for Connector. Is that correct?
Yes that’s correct. It is recommended to try the demo versions before buying to see is it works fine for you.