


")


Table Of Content
Introduction
Blue Cat's DP Meter Pro (DPMP) is a unique audio analysis tool that combines very flexible and customizable audio meters with advanced side chaining control capabilities thanks to its MIDI and automation outputs.
The metering capabilities of the DPMP plug-in let you control and monitor audio signals exactly the way you want: almost every aspect of the peak, RMS and crest factor meters can be customized. It proposes five different scales by default, including Bob Katz's popular K-System scales (K-12, K-14, K-20), and you can create your own.
Large colored statistics displays following your own scales are included for an overview of a track, while histograms give you a precise measurement of the dynamic range of the track. The graphs show the evolution of the audio envelopes over time, and the mid-side switch lets you verify mono compatibility problems and check the "stereoness" of your audio sources very easily. Whether you are working with mono, stereo or surround tracks, this plug-in will fit into your workflow.
The plug-in can analyze mono, stereo (left/right or mid/side) or surround/multichannel streams (up to 16 channels).
All envelopes (peak, RMS, crest factor...) can be reused for additional monitoring or side chaining purposes: combined together, reversed, modified and recorded as automation curves or sent as MIDI CC messages, they can control other effects in real time.
The DP Meter Pro Tutorials explain how to use these unique capabilities in your favorite host. Possibilities are endless, from voice over and ducking to side chain compression, multiple tracks monitoring or dynamic stereo enhancement. It is also possible to control external MIDI hardware (such a synths, MIDI effects), video effects or lighting systems with an audio signal.


Typical applications: Audio levels monitoring, crest factor measurement, dynamic range display, ducking, advanced side chaining techniques, signal-based envelope generation.
System Requirements
MacOS
- An Intel or Apple Silicon processor.
- Mac OS 10.9 or newer.
- Any VST / Audio Unit / AAX compatible application (64-bit) .
Windows
- An SSE2-enabled processor (Pentium 4 or newer).
- Microsoft Windows Vista, Windows 7, 8, 10 or 11.
- Any VST / AAX compatible host software (32 or 64 bit).
For more information about supported platforms, see our Knowledge Base.
Demo Limitations:
- Limited number of instances of the plug-in per session.
- The plug-in is regularly bypassed for a few milliseconds.
Installation
The plug-ins versions cannot be run standalone: they require a host application (see the System Requirements chapter for more information). Depending on which host application you use, you might need to install the plug-ins in different locations.
Before installing one of the plug-in versions, you should close all your host applications.
Windows
Install
All versions of the plug-in provide an installation program. Follow the steps of the wizard to install the software on your machine. During the installation you will be asked where you want the software to be installed. For the VST version, you should install the plug-in inside the VST plug-ins folder used by your host application(s). The default path set in the installer should work for most applications, but you should check your host software documentation to know where it looks for VST plug-ins. For other plug-in types, you should just use the standard path.
Some applications will not automatically rescan the new plug-ins, so you might have to force a refresh of the plug-ins list.
Upgrade
When a new version of the software is released, just launch the new installer: it will update the current installation.
Uninstall
To uninstall the software, simply launch the "Uninstall" program that is available in the start menu or in the configuration panel. It will take care of removing all files from your computer.
Mac
Install
On Mac the plug-ins are available as drive images with an installer. After download, double click on the dmg file to open it. You can then double click on the installer (.pkg file) to install the package.
Note for Mac OS 10.15 Catalina or newer: you may have to right click on the installer and select "Open" instead of double clicking on the file to launch the installation if your computer is not connected to the Internet.
Upgrade
When a new version of the software is released, just launch the new installer: it will update the current installation.
Uninstall
To uninstall the software, simply remove the component(s) from their install location (move them to the trash):
- AAX plug-ins are installed in the /Library/Application Support/Avid/Audio/Plug-Ins/ folder
- Audio Units (AU) are installed in the /Library/Audio/Plug-Ins/Components/ folder
- RTAS Plug-ins are installed in the /Library/Application Support/Digidesign/Plug-Ins/ folder
- VST plug-ins are installed in the /Library/Audio/Plug-Ins/VST folder
- VST3 plug-ins are installed in the /Library/Audio/Plug-Ins/VST3 folder
If you want to completely remove all settings and configuration files, you can also remove these additional directories that may have been created on your computer:
- ~/Library/Preferences/Blue Cat Audio/[Plug-in name and TYPE], where TYPE is VST, AU, RTAS or AAX: global preferences.
- ~/Library/Preferences/Blue Cat Audio/[Plug-in name]: license information
- ~/Documents/Blue Cat Audio/[Plug-in name]: user data, such as presets, additional skins and user-created plug-in data.
Please be aware that these directories may contain user data that you have created. Remove these directories only if you do not want to reuse this data later.
First Launch
Blue Cat Audio plug-ins cannot be run standalone, they require a host application (see the System Requirements chapter for more information). Some host applications will require you to scan the plug-ins before they are available in the application.
If the plug-in is not available in the application, please check that it has been installed in the appropriate directory (with no host application running), and that the host application has scanned it.
Using Blue Cat's DP Meter Pro
Introduction
Blue Cat's DP Meter Pro is an all-in-one audio levels meter. It provides a comprehensive and accurate picture of the audio levels. It is also able to generate envelopes for parameters modulation.
Disclaimer
This Plug-in is NOT a loudness meter, as specified in the ITU and EBU recommendations. It is an audio levels meter that measure physical quantities, as opposed to perception-related quantities.
Levels?
Before using the plug-in, it is important to understand what it is measuring. Several types of values are measured and displayed by Blue Cat's DP Meter Pro.
In a few words:
- Peak level is the maximum level of the waveform, important for your DAW and equipment. Any value above 0 dBFS means clipping and distortion.
- RMS level is the energy the waveform, important for loudness and your ears. The larger the value, the louder the signal.
- Crest factor is the difference between the peak and RMS levels. The higher the crest factor, the more dynamics, the lower the crest factor, (probably) the more compression or clipping.
Peak level
The peak level is the measurement of the intensity of the signal, relative to "full scale", in decibels (dB).
In the digital domain where audio samples are represented with floating point numbers, full scale (0 dBFS) corresponds to a value of 1. The example below shows two sine waves with a peak value of 1 and 0.5 (resp. 0 dBFS and -6 dBFS):
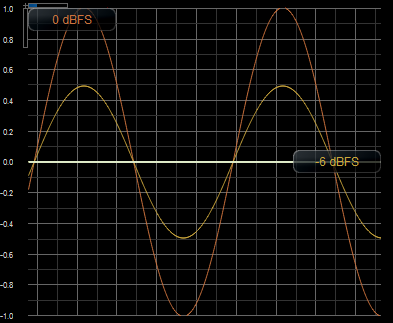
As you can see, the peak value is the "top value" of the waveform. When the intensity of the waveform varies over time, the peak value changes as well. That's the reason why the plug-in lets you adjust the attack, hold, and release time of the envelope following algorithm. It manages how fast the plug-in reacts to level changes.
The peak level does not tell you how loud the signal is (our hears are more sensitive to the short term energy than the actual peak), but it is what your Digital Audio Workstation (DAW) is sensitive to: at the output of the DAW, levels above 0 dBFS will clip and result in distortion.
RMS Level
RMS stands for "Root Mean Square". The RMS level is the square root of the average of the squared signal. To put it simply, it is an average value that relates to the energy of the signal.
The "scientific" value of the RMS level for a 0 dBFS sine wave (as shown in the previous paragraph) is -3 dB. However, audio engineers have been used to calibrating their level meters such as the RMS level of a sine wave is 0 dB. This is the reason why the plug-in offers a +3 dB boost option. It is used by default, except for the "scientific" scale. The values expressed in this manual will refer to the audio RMS value, with the +3 dB boost.
Since the RMS value is also a time-varying value, the plug-in lets you manage the length of the sliding window used to compute the value.
Since the RMS value relates to the energy of the signal, it is a good representation of loudness, as a "physical" quantity. Exact perceived loudness, is a different thing though, since the ear is not equally sensitive to all frequencies. But physical loudness is the only quantity which absolute value has a physical meaning inside the DAW, since the actual perceived loudness will also depend on the acoustic reproduction system. the listening setup (speakers, room) and amplification level.
Crest Factor
The crest factor, also known as peak over average ratio (PAR), is the difference in decibels between the peak and the RMS levels.
On the graph below that shows a typical audio waveform, you can see how this value relates to the distance between peaks and the average:
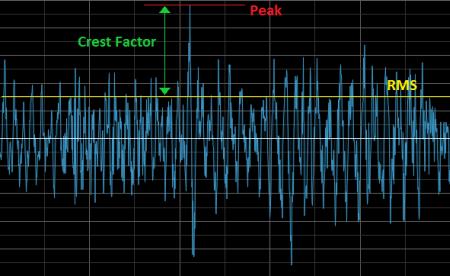
Crest factor is thus mainly used to understand the shape of the waveform, and quantify its "dynamics". A higher crest factor means more dynamics, while lower values mean more compression, and sometimes distortion: 0 dB will be reached with a pure sine wave, while a usual value for crest factor on mastered music is in the 6 to 15 dB range (from pretty compressed to pretty uncompressed).
Individual instruments may produce larger crest factors (especially percusive instruments). Also, you will notice jumps of the crest factor at playback start and stop, as there is a huge intensity gap between "silence" and "sound".
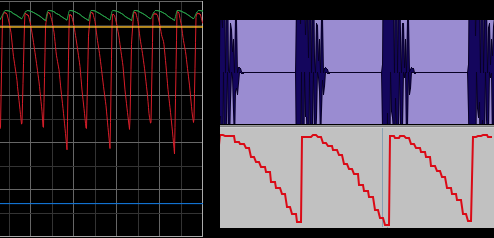
An interesting property of the crest factor is its independence from the average level of the signal: it is only dependent on the shape of the signal, as you can see in the picture below. It represents the peak (red), RMS (yellow) levels and the crest factor (blue), while playing the tail of a sound fed into a digital delay:
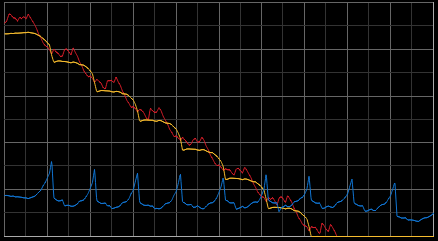
As you can see, the shape of the crest factor remains the same while the intensity of the signal is decreasing.
Since the crest factor is also a time-varying value, it is important to note that it is computed on the same temporal window as the RMS value. With shorter lengths, faster value changes.
Instant / Max / Average
While the meters show instant levels, the plug-in can also display longer term statistics:

The instant value is the short-term or real time value: "right now".
The average value is the average over time since last reset (you can click on the value to reset the average).
The max value is the absolute maximum value over time since last reset (you can click on the value to reset it).
Dynamic Range
The global dynamic range of a song is the difference between the loudest and quietest levels. This value is however not very useful if you have no idea of the exact distribution of levels during the song (how long are quiet versus loud moments?). That's the reason why the plug-in proposes other ways of looking at the dynamics.
Dynamic Range vs Crest Factor
Some people make the confusion between the crest factor and the dynamic range, but these two terms have different definitions. While the crest factor may give a good idea of how much compression has been applied to a track, it may have no relationship with the overall dynamic range at all: as seen above, the crest factor is independent of the loudness, and it is only related to the shape of the waveform.
Histograms
In order to get a good picture of the dynamic range, the plug-in proposes histograms that show the distribution of levels in a chosen timeframe (up to 1000 seconds).
The distribution of RMS values (yellow) gives a good idea of the actual dynamic range and how much "dynamic" the song will sound. The distribution of peak values (red) and its relationship to RMS is also a good indicator of the dynamics (related to compression or limiting this time).
Last, the distribution of crest factor (blue) indicates how much the dynamics of the song changes over time. You can look at it as how natural the song sounds: no changes in the crest factor may mean that the song is too "flat" and sounds the same from the beginning to the end (possibly inducing listener fatigue). The screenshot below illustrates this with an over-compressed song:
As you can see, all three histograms are flat, and the difference with the jazz song above is obvious.
Please note that the sample above is artificial (it was generated by pushing an already mastered song into a brickwall limiter)
Envelope Generation and Side Chaining
As you can see, this plug-in generates a lot of meaningful information from the incoming audio signal. This information can be visualized in the user interface, but it can also be reused for other purposes.
The idea is that all computed parameters (levels, crest factor etc.) can be recorded as automation curves in most DAWs (and then reassigned to other parameters), or sent as MIDI CC messages in order to control other equipments (plug-ins, software or hardware synths etc.). It is thus possible to control your DAW with sound or develop advanced side chaining techniques.
The envelopes can be precisely generated by the "transformed" parameter, as its shape can be controlled in details, as shown later in this manual.
The User Interface
Note: The main toolbar, menus and basic features available with all our plug-ins are detailed in the Blue Cat Audio Plug-ins Basics section.
The Plug-in comes in three flavors (Mono, Stereo or Surround) that all share similar characteristics. The user interface has been designed in a modular way, so that you can activate each view separately depending on the information that you want to display.
Overview
At the top of the interface, below the main toolbar, you will find a couple of buttons to activate or deactivate each view. There are also several functions that affect the entire plug-in:
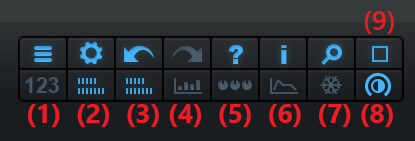
- Show/hide the statistics view.
- Show/hide the levels meters
- Show/hide the crest factor meters.
- Show/hide the histograms for all visible meters.
- Show/hide controls for analysis and envelope generation setup.
- Show/hide the history view (envelopes).
- Freeze all meters and graphs.
- Brightness control: use this knob to reduce the brightness of all meters and graphs.
- Select the size of the user interface (small, medium and large).
The other buttons at the top left are described in details later in this manual and are common to most Blue Cat Audio plug-ins.
Statistics
In the statistics view you can see, for each available channel, the maximum and average values for levels, and the average value of the crest factor.
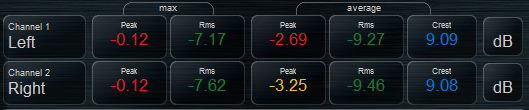
Values are displayed with colors that correspond to the scale chosen in the level meters view. It is possible to check quickly if levels are "right" thanks to their color. You can customize these scales to create your own green / yellow / red limits.
Clicking on a value will reset this value for all channels. Clicking on the dB button at the right of a row will reset all values for all channels.
For the mono and surround versions of the plug-ins, clicking on the channel name lets you rename it. The stereo version automatically renames the channels when changing to and from mid/side mode.
In case of clipping (signal above 0 dBFS), a "clipped" message will appear on the clipped channel. Clicking on it will reset the clip status for all channels.
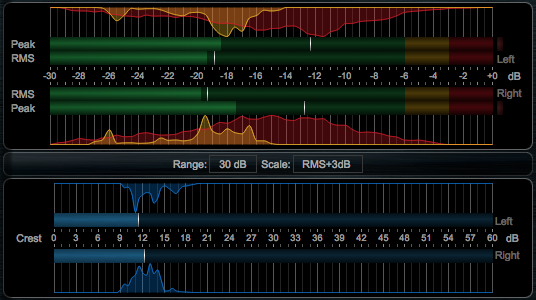
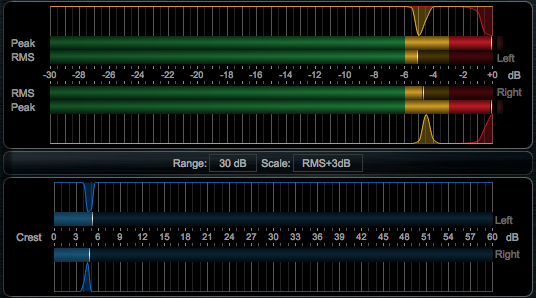
Level Meters
The level meters view displays peak and RMS levels as well as their histograms. It is also the place where you can customize the scales and color ranges:
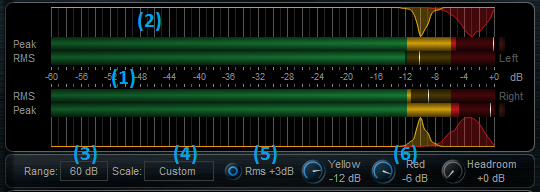
- Peak and RMS meters for each channel, with temporary hold meters.
- Histograms: peak histogram in red, and RMS in yellow. Clicking anywhere on the histogram will reset all histograms for all channels, including the crest factor. The integration time (length) for the histogram can be changed in the controls view.
- Select the meters range (120, 60 or 30 dB).
- Choose the scale:
- Scientific: dBFS scale, with no RMS boost (RMS meter is calibrated to -3dB for a sine wave).
- RMS+3dB: dBFS scale, with 3dB RMS boost (RMS meter is calibrated to 0dB for a sine wave - this is the recommendation for audio).
- K-12: Bob Katz's K-12 scale in the K-System, with 12 dB headroom.
- K-14: Bob Katz's K-14 scale in the K-System, with 14 dB headroom.
- K-20: Bob Katz's K-20 scale in the K-System, with 20 dB headroom.
- Custom: build your your own scale. You can customize it using the controls described in (5) and (6).
- +3dB RMS boost. Use this option to calibrate the RMS computation at 0 dB for a sine wave (instead of -3 dB).
- Customize the green, yellow and red color ranges, and choose your own headroom. Headroom will offset the 0 dB value so that 0 dBFS relates to +Headroom decibels. These changes also affect the values displayed in the statistics view.
Crest Factor Meters
This view displays the crest factor meters and histograms for each channel:
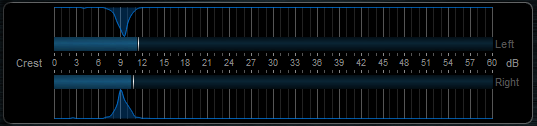
Clicking on the histograms will reset them for all channels.
Envelopes
The envelopes view displays the envelopes for peak, RMS and crest factors as well as the transformed envelope:
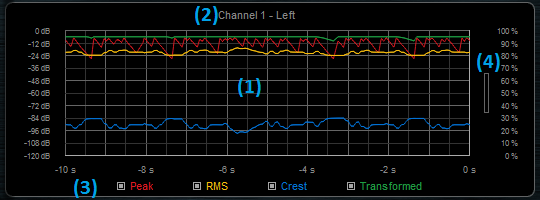
- Envelopes display. The left scale refers to levels (full scale), and the right scale is for the transformed envelope. Please note that the scale for the crest factor is not displayed (its range is half the range of other levels).
- The surround version lets you choose which channel you want to display by clicking on the name. The stereo version displays two graphs, one for each channel.
- Show/hide envelopes by clicking on the buttons.
- You can zoom to reduce the vertical range. Once zoomed, dragging the graph with the mouse will move it up and down.
This view is particularly useful to control the generated envelopes when using the plug-in as a side chain source.
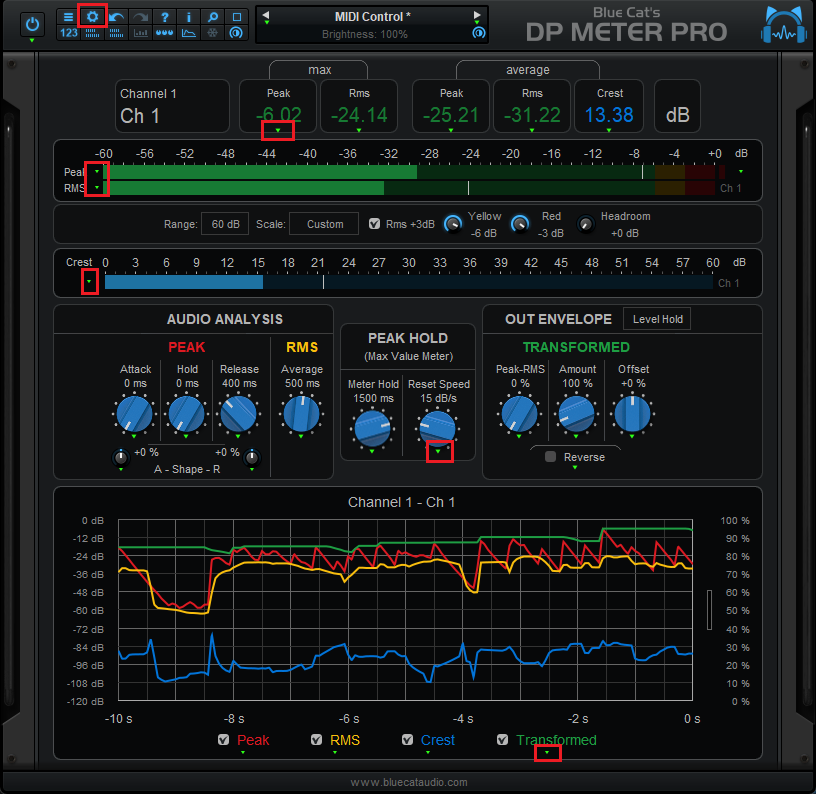
Controls
Analysis, metering and envelope generation settings can be controlled in details in this view:
The main parameters you will want to change to quickly adjust your meters are:
- The peak Release time (to control how fast the peak meter decreases).
- the RMS Average (to control how fast the RMS and crest meters react to signal changes)
- The history length (Hist.) to define histograms' memory.
Other parameters provide advanced control over the meters to really tweak their response. They are particularly useful for envelope generation and side chain control, or if you are looking for very specific ballistics.
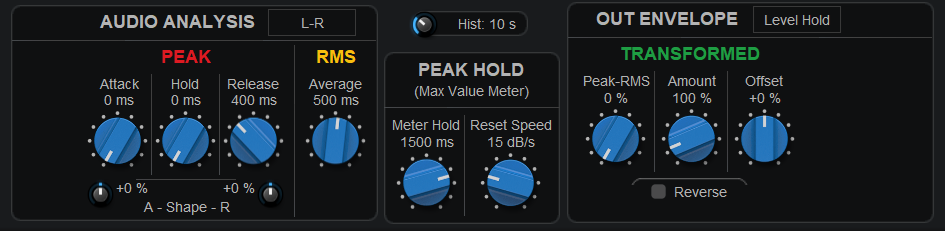
Audio Analysis
The stereo version offers a drop down menu at the top right of the analysis box to switch between stereo (left/right) and mid/side mode. In mid/side mode, the mid channel represents the mono part of the signal, and side the stereo part. This is useful to monitor how wide your mix is, and check that there is no mono compatibility (drops in the mid level shows that left and right channels may be out of phase).
Separate settings are available for peak and RMS/crest analysis:
Attack controls how fast the peak meter reacts to signal increases. You will usually keep this time short (or even set to zero) so that you can measure the actual peaks. But increasing the value will give the meter a more analog feel, missing peaks, like a VU-meter. It can also be used to generate smoother envelopes.
Hold controls how much time the peak meter will hold its current position before starting falling down, when the level is decreasing.
Release controls how fast the meter reacts to signal decreases. The shorter the value, the faster the meter will follow the decreasing signal. The duration correponds to a decrease of 20 dB when silence is fed into the plug-in while the peak level was non-null.
Attack and Release Shape modify the shape of the curves. Positive shape values will increase the duration over time, while with negative values, the meter will react faster over time:
 |
 |
 |
|
Shape = -25%
|
Shape = 0%
|
Shape = +25%
|
Changing the shape modifies the duration of the fall, but the initial slope of the curve remains unchanged.
Note: the effect is less noticeable on the attack because of the logarithmic nature of decibels, but the principle is the same, and it strongly affects the way peaks are caught.
RMS Average is the duration of the sliding window used to compute the RMS value. Decreasing the value will make the RMS meter react faster to the incoming signal, and increasing the value will turn the RMS value into a longer average, more stable over time. Please note that this also impacts the crest factor value in a similar way, as it is computed with the exact same duration.
Histogram
Drag the histogram knob to change the integration time. This controls the memory (duration) for the histogram. If you want a long memory, you can push it up to 1000 seconds.
Clicking on the button on the right will reset the memory for all histograms (just like clicking on a histogram).
Peak Hold
The temporary hold meters for all levels (including the crest factor) can be customized here. Set the "Reset Speed" to 0 dB/s if you want these meters to keep track of the maximum value forever.
Output Envelope Generation
The "Out Envelope" box is dedicated to the transformed envelope for parameter modulation and side chaining. It can also be used to monitor any value on the history view, in addition to regular peak and RMS curves.
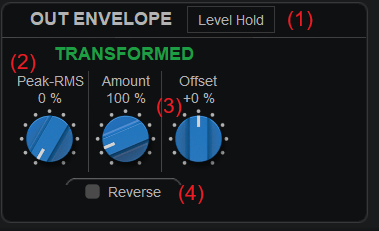
- Choose the value type: levels (peak/RMS), levels hold (Peak/RMS hold), Crest (crest factor), Crest Hold (crest factor hold).
- For "level" or "level hold" value types, you can blend peak and RMS levels together to compute the transformed envelope.
- Apply an offset (moving up and down), and an amount (increasing or decreasing amplitude) to the chosen value. This lets you precisely control the shape of the output envelope.
- Reverse the envelope after the amount and offset have been applied.
Example:
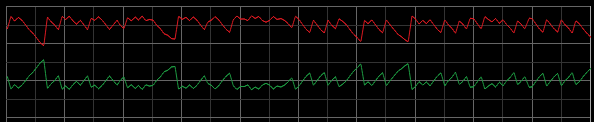
Note: if you are used to the previous version of the plug-in, beware that the behavior of the revert button has been changed: it is now applied after amount and offset. It makes it easier to switch between reverted and non reverted envelopes without having to change offset and amount values.
MIDI and Automation Control
Most parameters of the plug-in can be controlled by MIDI or automation, and the plug-in is also able to transform most measurements into MIDI and automation. To simplify the setup and streamline the workflow, when the "Show Controls Settings" button is active, fast access to automation and MIDI settings is enabled for most useful parameters, as shown below:
More details about these settings are available later in this manual. Also, remember that you can open the presets settings pane for a summary of all automation and MIDI-enabled parameters.
If you want to change the default settings for all current and future instances of the plug-in, you can do it in the global settings window.
The various elements of the user interface (knobs, sliders, buttons...) are simple and intuitive to operate, but more information about how to interact with them is available in the "Plug-ins Basics" chapter of this manual.
Operation
While using the plug-in to simply monitor audio levels is straightforward, other scenarios may require a bit more thoughts. Below are a few examples as well as tips and tricks to get the best out of your plug-in.
Levels Monitoring / Visualization
Make Choices
The plug-in offers a large amount of meaningful data. It can however become difficult to monitor everything at the same time, expecially with surround sources that multiply the number of parameters by the number of channels.
So once your meters are setup the way you like, it is wise to carefuly choose which parameters you are interested in and hide all other views that are not essential, so that you can focus on what is important to you.
Histograms: use reference tracks to make decisions
In order to get the best out of the histograms, you should take a look at their shape for reference tracks that you like (and which sound good to you). This way, you will be able to compare your tracks with these references and make decisions about your levels accordingly.
Song Crest Factor
Sometimes you may be interested in measuring the crest factor for an entire song (the overall peak to average ratio). Be aware that the average crest factor is not the value that you are looking for: it is the average of locally computed crest factors, which is different. The crest factor of the entire song (sometimes wrongly called dynamic range or DR) is simply the difference from the maximum peak value and the RMS average, provided that you have reset these values before playback.

So if your maximum peak is 0 dB, the crest factor will simply be the opposite of the average RMS value.
Offline Analysis
In order to display the statistics for an entire song, you can play the entire song into the meter while listening to it. But this will take some time. So if your host application allows it, you may want to use offline rendering and read the values after processing: you will be able to read the statistics for the whole song almost instantly.
Real time side chaining with MIDI
One of the particularities of this plug-in is that you can reuse the levels of a track to trigger effects on other tracks, using MIDI.
Setup
Setting up your DAW for such of applications depends on the way your host handles MIDI routing, but the principle remains the same on most platforms:
- Instantiate the plug-in on the source track, setup its MIDI output.
- Instantiate a destination plugin you want to control on another track, setup its MIDI inputs (or postpone setup for MIDI learn).
- Create a separate MIDI track to carry the MIDI data and connect the the source and destination plug-ins.
- At this stage, you can use MIDI learn to automatically connect the destination plug-in with the source plug-in.
Once everything is setup, the parameters of the destination plug-in are controlled by the audio level of the source track, or whatever other quantity you have chosen.
More information and detailed tutorials for several major host applications are available at this location. The list of tutorials is also available at the end of this manual.
Tweak Ranges
In addition to the "Amount" and "Offset" modifiers offered with the transformed envelope, you will probably want to adjust the range of the parameters being controlled. All our plug-ins give you this capability using the MIDI control settings. It makes source to destination mapping much easier since you can set the boundaries of the side chain control.
Using smaller ranges and tweaking response curves is also a way to improve precision: remember that MIDI CCs can handle only 128 values.
Examples
Possibilities and applications are endless, but here are a few basic examples to get started:
- Ducking: using a reversed peak envelope as the source and gain as a destination, you can quickly perform ducking of a track by another (a typical application is automated voice over). "Attack", "Release" and "Hold" will let you control ducking speed, while "Amount" is, well, the amount of ducking.
- Loudness ducking: the same as the previous example, using RMS envelopes instead of peak.
- Volume controlled effect: using a peak envelope as the source, and a "dry/wet" or "mix" parameter as a destination, an effect can be controlled by the volume of a track. In real time and with a microphone, you can control the amount of effect applied simply with your voice: no need to shout at the sound engineer anymore, just shout at the DAW!
- More advanced techniques: what about controlling the ratio of a compressor or an expander with the crest factor, in order to increase or decrease the dynamics? Or the frequency of a lowpass filter with the RMS envelope? Feel free to experiment: you can improve your workflow and automate many tasks.
If your DAW and equipment supports it, it is possible to use the same principle to control external hardware as well.
Automation Output
Similarly, it is possible in most DAWs to record output parameters as automation curves. There are a couple of reasons why you would want to do that:
Monitoring
While real time monitoring is important, it can be handy to visualize levels on top of a waveform, to detect exactly the location where problems arise (clipping, level drops...). Recording this information as automation curves exactly provides this capability, as most host applications will display automation curves close to the original waveform:

In the simple example above, automation curves show exactly where clipping occurs, whereas it is not obvious on the waveform: clipping is actually due to the EQ plug-in in the first insert in this case! Using this technique, you can easily and quickly locate the origin of problem, even in large projects using complex routings and effect chains.
Offline Side Chain
Just like with MIDI Side chaining, you can perform similar tasks "offline": simply re-assign generated automation envelopes to other parameters. It can be useful if you want to tweak generated envelopes to exactly match your needs.
For example, you can start with real time side chaining using MIDI for a rough approximation, and then switch to automation envelopes that you can tweak offline with more precision.
Setup
To setup automation recording:
- Enable automation for the parameters you are interested in within the plug-in (with the control setting dialog or the preset settings pane) .
- Some hosts will require you to also arm parameters for automation individually.
- Start playback: the parameters will be recorded as automation envelopes.
More information and detailed tutorials for several major host applications are available at this location.
This manual covers only basic scenarios, but we hope that it will give you the idea and help you improve your audio production workflow.
Blue Cat Audio Plug-Ins Basics
This chapter describes the basic features that are common to all our plug-ins. If you are already familiar with our products, you can skip this part.
User Interface Basics
About Skins
Like all Blue Cat Audio plug-ins, Blue Cat's DP Meter Pro uses a skinnable user interface. It means that the appearance and behavior of the user interface can be entirely customized.
Especially with third party skins, the experience may be quite different from the one offered by the default skins that we provide. However, our plug-ins and our skinning engine have several standard features that will be available whatever your favorite skin.
More information about custom skins can be found in the skins section.
The Main Toolbar
In most skins, an optional toolbar at the top of the user interface gives you access to the main options and settings of the plug-in:

Smooth Bypass
On the left, the power button can be used to smoothly bypass the plug-in.
Presets Area
At the center of the toolbar, you can see the current preset area (the "Default Settings" box). It displays the name of the current preset, with a "*" at the end if it has been modified since loaded.
The arrows on the left and right let you navigate thru the (factory and user) presets available for the plug-in.
Clicking on the preset name opens the presets menu which lets you manage the presets of the plug-in.
Using the knob on the bottom right of this area, you can reduce the opacity of the window, and make it transparent (the actual result may depend on the host application). Additional messages may appear in the area next to this knob, depending on the plug-in.
Some plug-ins may also propose you to manually select the audio I/O inside the plug-in (bottom left of the presets area), regardless of the host configuration. It can be useful for example to save CPU by selecting mono to stereo configurations (instead of full stereo sometimes chosen by default by the host), or add extra channels to manage side chain internally, when the host does not provides any side chain input. Please note that this does not change the number of I/O seen by the host application.
Commands
The icons in the toolbar give you access the to the following commands that are detailed in the next paragraph:
| Icon | Name | Function |
|---|---|---|
|
|
Menu | Open the main menu |
|
|
Control Settings | Display the controls settings menu (to manage automation and MIDI control, as described here). |
|
|
Undo | Undo |
|
|
Redo | Redo |
|
|
Manual | User Manual |
|
|
About | About |
|
|
Zoom | Scale the user interface (from 70% to 200%). |
The Main Menu
The main menu is available from the main toolbar, or if you right click anywhere on the background of the plug-in:
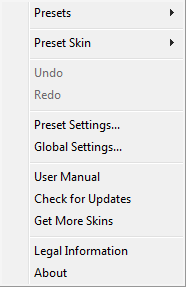
- Presets: opens the presets menu to manage presets.
- Preset Skin: opens the skins menu to choose the skin for the current preset and manage alternative skins for the software.
- Undo/Redo: undo or redo the latest modifications. This includes all changes made to the current preset settings such as MIDI or automation preferences.
- Presets Settings: open the presets settings window. It lets you change the skin, MIDI and automation settings for the current preset.
- Global Settings: open the global settings window. It lets you change the skin, MIDI and automation settings that are used by default in all instances of the plug-in (if not overridden by the current preset).
- User Manual: open this user manual.
- Check for Updates: opens up our website to let you check if any update for this software is available.
- Get More Skins: get more skins for this software.
- Legal Information: browse licensing and misc legal documents.
- About: displays the “about” dialog box.
Controls
Examples
Here are a few examples of typical controls you will encounter in the user interface of our plug-ins:
| slider | slider | knob | button | Text control |
|
|
 |
 |
|
|
Interacting with Controls
You can interact with the controls of the plug-in interface either with the mouse or the keyboard.
Setting the keyboard focus on a control (so that it responds to key strokes) may be automatic (when you pass the mouse over it it gets focus) or manual (you have to click on the control to set the focus on it). Note that all host applications behave differently regarding keyboard handling. In some applications you may not be able to use all keys described later in this manual to interact with our plug-ins. It is usually made obvious to you to know the active surfaces of the skin (the places where you can click with the mouse): the mouse cursor usually changes when you can do something on a control. In the default skins delivered with the plug-in, the cursor changes to a small hand or an arrow to tell you when your mouse is over an active control.
Mouse
Various mouse movements will let you interact with the controls:
| Mouse Interaction | Action |
|---|---|
| Left Click | Acquire focus and start dragging or push (button) |
| Left Click + Alt Key | Set the value to default |
| Left Double Click |
Acquire focus and launch the “fine
tuning” edit box (except button):
 |
| Right Click | Set the value to default |
| Mouse Wheel | Increment or decrement the position (focus required) |
| Mouse Drag | Change the control position depending on mouse movement (except button) |
Keyboard
All control widgets support the following keys (note that some of them are caught by the host and thus never forwarded to the control. For example in Steinberg Cubase SX you cannot use the arrow keys to control the plug-in):
Keys Common to All Controls
| Key | Action |
|---|---|
| Up Arrow | Small increment of the position (up or right) |
| Down Arrow | Small increment of the position (down or left) |
| Left Arrow | Same as Down Arrow |
| Right Arrow | Same as Up Arrow |
| Page Up | Large increment of the position (up or right) |
| Page Down | Large decrement of the position (down or left) |
| + | Small increment of the value of the control |
| - | Small decrement of the value of the control |
| d | Set to default value (same as mouse right click) |
| e |
Opens the 'fine tuning' window to precisely
set the parameter:
|
| SHIFT | When the key is down, the fine tuning mode is on, and you can modify the value with better precision when moving the mouse, the mouse wheel or using the keyboard. Just release the key to get back to the normal mode. |
Keys Specific to Buttons
| Key | Action |
|---|---|
| Enter | Pushes the button |
Presets
To get started with the plug-in and discover its capabilities, a couple of factory presets are provided. You can also save your own presets and recall them later for other projects. Our plug-ins propose a full-featured preset manager to let you save, browse, organize and recall its presets.
The Presets Menu
The presets menu can be opened from the main menu or the main toolbar. It displays the list of presets available for the plug-in as well as commands to load, save or organize presets:
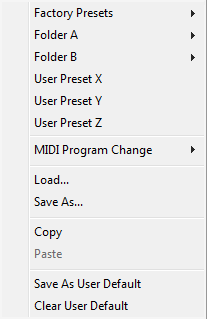
- Factory Presets: shows the list of factory presets delivered with the plug-in.
- "Folder A" to "User Preset Z": user presets and categories.
- MIDI Program Change: activate MIDI Program Change support (see below).
- Load: load preset from file.
- Save: save current state to last loaded user preset.
- Save As: save current preset to a file.
- Copy copy preset to the system clipboard.
- Paste paste preset from the system clipboard, if available.
- Save As User Default: save the current state as the default preset. This preset is used every time a new instance of the plug-in is created.
- Clear User Default: reset the default preset to its factory state: this makes the plug-in forgets the custom settings you might have saved as a default preset.
More about Presets
There are two types of presets: factory presets (read only) that are provided with the plug-in, and user presets that can be created and stored by the user.
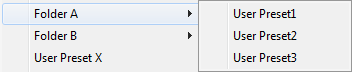
The user presets are stored in a subdirectory of the documents folders of your profile ("Documents" on Mac, and "My Documents" on Windows): Blue Cat Audio/[Plug-in Name]/Presets. Each preset is stored as an individual file. You can create folders and subfolders in the Presets directory to classify your presets, as shown in the example below:
If you save a preset named "Default" in the root Presets directory, it will override the factory default preset (that's what "Save As Default" does). To restore the factory default preset, you can just remove this file or use the "Reset Default" command.
MIDI Program Change
It is possible to load presets remotely using MIDI "Bank Select" and "Program Change" messages. To enable this feature, select a MIDI channel to receive the events from in the MIDI Program Change menu item from the presets menu:
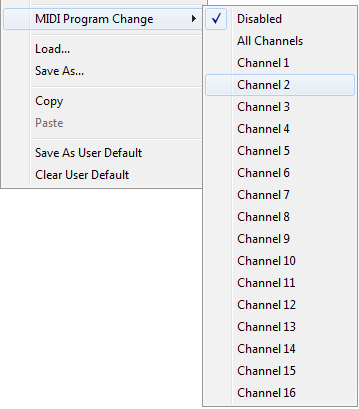
This setting is saved for each plug-in istance with your session but not in presets (except for the default preset, using the "Save as User Default command"). Once activated, the plug-in menu will display the bank number followed by the preset number for each preset:
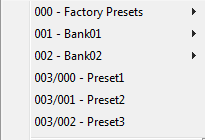
Every root folder is considered as a new bank, starting with the factory presets (bank 0). Program and bank numbers may change while you add folders and presets, so you should be careful when naming them if bank and program numbers matter to you. It is recommended to use folders to make this task simpler. As a side note, sub folders do not define additional banks (all presets contained in sub folders are associated with the current bank.
As specified by MIDI, bank select messages are not used until a program is actually selected.
MIDI Implementation note: the software supports all types of Bank Select methods. You can use either MIDI CC 0 or MIDI CC 32 to select banks. If both are used simultaneously, they are combined together so that you can use more banks (in this case CC0 is LSB and CC32 is MSB, and actual bank number is 128*CC0+CC32).
MIDI and Automation Control
Blue Cat's DP Meter Pro can also be remotely controlled via MIDI using MIDI CC ("Control Change") messages or automation curves, if your host application supports it. It is possible to customize the channel, control numbers, range and response curve used for each parameter in the settings panel available from the main menu (see the Plug-in Settings chapter for more details).
MIDI and Automation Settings Menu
The main menu
Most skins also provide the ability to change MIDI and automation settings directly in the main user interface. Clicking on the control settings icon in the main toolbar opens the following menu:
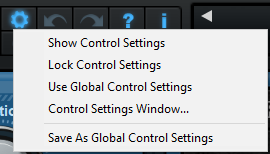
- Show Control Settings: show direct access to individual control settings for each parameter in the user interface (see next paragraph).
- Lock Control Settings: lock the current controls settings for MIDI and automation so that they remain unchanged when loading presets.
- Use Global Control Settings: ignore the current MIDI/automation settings and use the global settings instead.
- Control Settings Window: display the control settings window, to change control settings for all parameters.
- Save As Global Control Settings: save the current settings as global settings (used by default, when no specific MIDI/Automation setting has been set for the cuirrent preset).
Individual Control Settings
When this feature is activated using the "Show Control Settings" item in the MIDI and Automation Settings menu, dropdown menu buttons appears next to the main controls displayed by the plug-in:
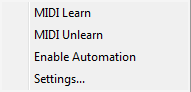
Clicking on this button shows the MIDI/Automation settings menu:
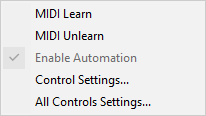
- MIDI Learn: launches MIDI learn mode for the control: touch your MIDI controller and the control will learn from it the MIDI channel and CControl Number. To end the learn mode, reopen this menu and deselect the option.
- MIDI Unlearn: deactivates MIDI control for this parameter.
- Control Settings: launches the advanced settings panel described below. This controls the settings for the current preset.
- All Control Settings: display the control settings window, with access to all parameters.
Advanced MIDI and Automation Settings
You can completely customize the way the plug-in is controlled by automation and MIDI. For a global view of all parameters at a time, you can use the Plug-in Settings window for the current preset which is available from the main menu.
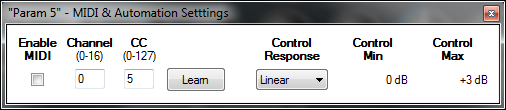
MIDI Settings:
- Enable MIDI: enable/disable the MIDI control of the parameter.
- Channel: MIDI Channel for the parameter control. If set to 0, the plug-ins will accept Control Change Messages from all MIDI Channels (MIDI Omni mode).
- CC: Control Change Number.
- Learn: click on this button to activate the MIDI learn functionality. When it is activated, you can move your MIDI controller, and the plug-in will automatically detect the control settings .
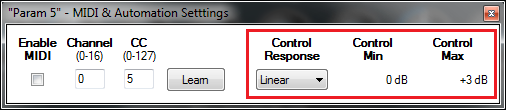
MIDI and automation settings:
- Response: response curve of the MIDI or automation control: from very fast to slow control.
- Min: minimal value of the parameter when MIDI controlled or automated.
- Max: Maximum value of the parameter when MIDI controlled or automated.
Note: if the Min value is higher than the Max value, the response curve will be reversed: increasing the control value will decrease the parameter value.
Note: if you double click on the parameter text control boxes for the max and min values, a “fine tuning” edit box will appear and let you change the min and max values with more precision:
MIDI and Automation Output
Blue Cat's DP Meter Pro can also generate MIDI CC Events or automation curves thanks to its output parameters.
You have access to the same settings for the output parameters as for input parameters using the dropdown menu, except that you can also enable or disable automation.
The output parameters MIDI and Automation Menu:
The advanced output parameters MIDI and Automation settings window:

More
Check our online tutorial for more screenshots and more examples of our plug-ins user interfaces.
Blue Cat's DP Meter Pro Parameters
All parameters described below can be automated and controlled via MIDI if your host application supports it. You can precisely define this behavior in the settings panels described later in this manual.
Input
The input parameters of this plug-in available for automation or MIDI control are shortly described below. For more details, please refer to the beginning of this manual.
|
Name |
Unit |
Description |
|---|---|---|
|
Bypass |
|
Bypass the plugin (stops analysis). |
|
Stereo Mode |
Chooses between Left/Right (Stereo) and Mid/Side modes (stereo version only). |
|
|
Peak Meter |
||
|
Attack |
ms |
Attack time for the Peak Follower (see the graph below). |
|
Hold |
ms |
Hold time for the Peak Follower (see the graph below). |
|
Release |
ms |
Release time for the Peak Follower (see the graph below). |
|
Attack Shape |
% |
Shape of the attack for the peak envelope follower: positive values will make attack time increase over time, whereas negative values will do the opposite, resulting in diffrent shapes. |
|
Release Shape |
% |
Shape of the attack for the peak envelope follower: positive values will make release time increase over time, whereas negative values will do the opposite, resulting in diffrent shapes. |
|
RMS Meter |
||
|
RMS Average |
ms |
RMS computation time, also used for crest factor computation. |
|
RMS Boost |
|
3dB offset for the RMS value. It allows the peak and RMS levels of a pure sine wave to be equal as recommened for audio applications. |
|
Peak Hold Meter |
||
|
Meter Hold |
ms |
Time during which the local maximum value remains unchanged. |
|
Reset Speed |
dB/s |
Reset speed for the local maximum value (peak hold meter). |
|
Transformed Output Envelope |
||
|
Enevlope Type |
% |
Selects the type of envelope to use to generate the transformed enevlope: level, level hold, crest or crest hold. |
|
Peak-RMS |
% |
Ratio of Peak/RMS levels for the output envelope, for level or level hold enevlope types. |
|
Reverse |
|
Reverse the transformed output peak envelope. |
|
Amount |
% |
Amount for the transformed output peak envelope: percentage of the original envelope used to generate the transformed envelope. If > 100% variations of the transformed envelope will be larger than for the original envelope, if <100% they will be smaller. |
|
Offset |
% |
Offset for the transformed output envelope. |
|
Histograms |
||
|
Enable Hist |
|
Enable histograms computation. |
|
Hist Length |
seconds |
Histograms integration time (duration). |
|
Hist Reset |
|
Value changes reset the histograms. |
|
Reset |
||
|
Clip Reset |
|
Value changes reset the clip output attribute. |
|
Max Peak Reset |
|
Value changes reset the maximum peak value. |
|
Max RMS Reset |
|
Value changes reset the maximum RMS value. |
|
Max Crest Reset |
|
Value changes reset the maximum crest factor value. |
|
Avg Peak Reset |
|
Value changes reset the average peak value. |
|
Avg RMS Reset |
|
Value changes reset the average RMS value. |
|
Avg Crest Reset |
|
Value changes reset the average crest factor value. |
|
Reset All |
|
Value changes reset all clip/max/average values. |
Output
The plug-in provides output parameters that can be recorded as automation curves or sent as MIDI CC to other plugins for advanced monitoring and universal side chaining.
These (read only) parameters are shortly described below. On stereo and surround version, parameters are repeated for each channel:
|
Name |
Unit |
Description |
|---|---|---|
|
Peak |
dBFS |
Peak level. |
|
RMS |
dBFS |
RMS level. |
|
Crest |
dB |
Crest Factor. |
|
Transformed |
% |
Tranformed Envelope: the crest, peak and RMS levels combined according to selected envelope type, “peak-rms” percentage. Also transformed using the reverse, amount and offset parameters. Use this parameter for side chaining capabilities. |
|
Max Peak |
dBFS |
Global maximum peak level (can be reset by “Max Peak Reset” parameter changes) |
|
Max RMS |
dBFS |
Global maximum RMS level (can be reset by “Max RMS Reset” parameter changes) |
|
Max Crest |
dB |
Global maximum crest factor (can be reset by “Max Crest Reset” parameter changes) |
|
Avg Peak |
dBFS |
Global average peak level (can be reset by “Avg Peak Reset” parameter changes) |
|
Avg RMS |
dBFS |
Global average RMS level (can be reset by “Avg RMS Reset” parameter changes) |
|
Avg Crest |
dB |
Global average crest factor (can be reset by “Avg Crest Reset” parameter changes) |
|
Peak Hold |
dBFS |
Local maximum Peak value. The behavior of this output is controlled by the 'Meter hold' and 'Reset Speed' parameters. |
|
RMS Hold |
dBFS |
Local maximum RMS value. The behavior of this output is controlled by the 'Meter hold' and 'Reset Speed' parameters. |
|
Crest Hold |
dB |
Local maximum crest factor value. The behavior of this output is controlled by the 'Meter hold' and 'Reset Speed' parameters. |
|
Clipped |
|
This value set to 1 if the audio signal clips (meaning its peak level is above 0 dBFS). This information can be reset by changing the “Reset Clip” input parameter. |
Plug-in Settings
In addition to the controls offered in the main user interface, Blue Cat's DP Meter Pro has various settings that let you fine tune the behavior of the plug-in. You can choose to change these settings either for the current preset or globally for all instances of the plug-in.
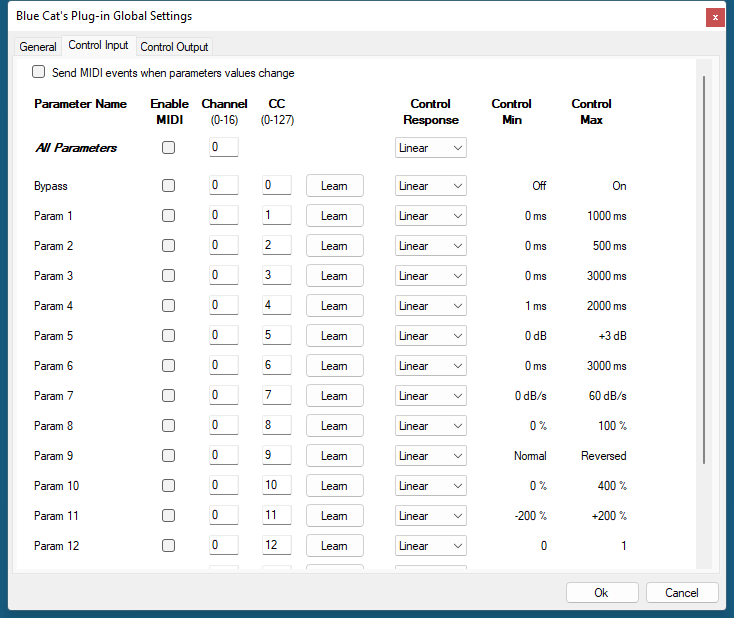
The Global Settings Window
The settings available in this window apply to all instances of the plug-in, for all presets, if not overridden in the presets settings. Consider these settings as “default” settings.
General
You can change the default skin for all instances of the plug-in: write the skin file path in the text edit box or click on the button to open a file chooser dialog. If you have several instances of the plug-in opened in your session, you will have to re-open the user interfaces of these plug-ins to see the skin change.

The output data refresh rate can also be customized for all instances of the plug-in. It controls the refresh rate of non-audio data produced by the plug-in (parameters, curves...). It also controls the refresh rate of output MIDI CC messages or output automation data. The higher the refresh rate, the better precision, but also the higher cpu usage (some host applications may also have trouble recording MIDI data at high refresh rates). The default value is 50 Hz.
Global Control Input Settings (MIDI and Automation)
The plug-in offers a couple of settings that affect the way it is controlled by MIDI messages or automation. While the first settings only apply to MIDI control, the "Control Response", "Min" and "Max" settings apply to both automation and MIDI control.
For each parameter you can define a default MIDI channel and CC number. You can then control the plug-in with an external MIDI controller or one of our plug-ins that generate MIDI messages.
The settings below are available for each plug-in parameter.
MIDI Settings:
- Enable MIDI: enable/disable the MIDI control of the parameter.
- Channel: MIDI Channel for the parameter control. If set to 0, the plug-ins will accept Control Change Messages from all MIDI Channels (MIDI Omni mode).
- CC: Control Change Number.
- Learn: click on this button to activate the MIDI learn functionality. When it is activated, you can move your MIDI controller, and the plug-in will automatically detect the control settings .
MIDI and automation settings:
- Response: response curve of the MIDI or automation control: from very fast to slow control.
- Min: minimal value of the parameter when MIDI controlled or automated.
- Max: Maximum value of the parameter when MIDI controlled or automated.
Note: if the Min value is higher than the Max value, the response curve will be reversed: increasing the control value will decrease the parameter value.
Note: if you double click on the parameter text control boxes for the max and min values, a “fine tuning” edit box will appear and let you change the min and max values with more precision:
"Send MIDI events when parameters values change": activate this option when using a control surface that accepts MIDI events as input. MIDI messages will be sent to the output of the plug-in when the user change the parameters values in the user interface, to keep the software and the controller in sync. MIDI is only sent for parameters that are activated for MIDI control.
Global Control Output Settings (MIDI and Automation)
You can set the same properties for the output parameters as for the input parameters: in this case, they may trigger MIDI CC messages or generate automation curves when modified. Since it's output, you cannot set the channel to MIDI Omni, so you must choose a channel.
Output parameters can also generate automation curves in most host applications. You can enable automation for any output parameters you are interested in (see the "Enable Autom." checkbox).
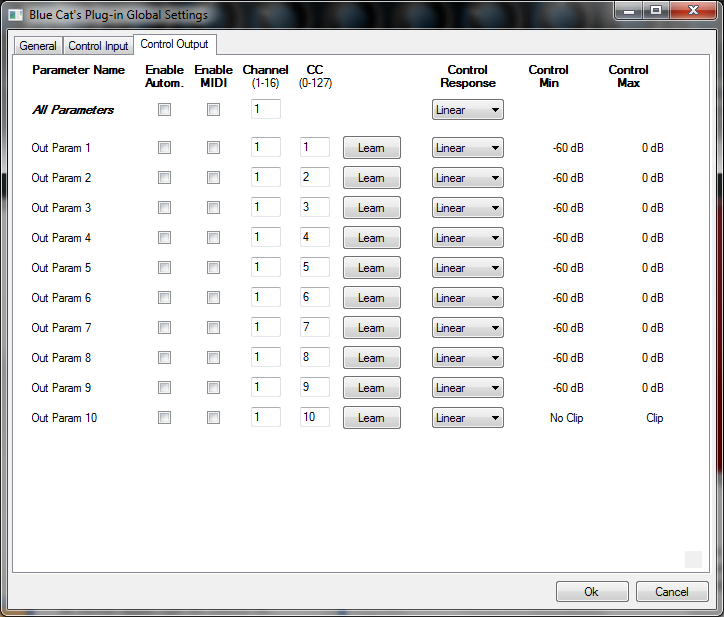
Note: if the Min value is higher than the Max value, the response curve will be reversed: increasing the control value will decrease the parameter value.
Note: if you double click on the parameter text control boxes for the max and min values, a “fine tuning” edit box will appear and let you change the min and max values with more precision:
The Current Preset Settings Window
In this window you can change the settings for the current preset of the current instance of the plug-in only.
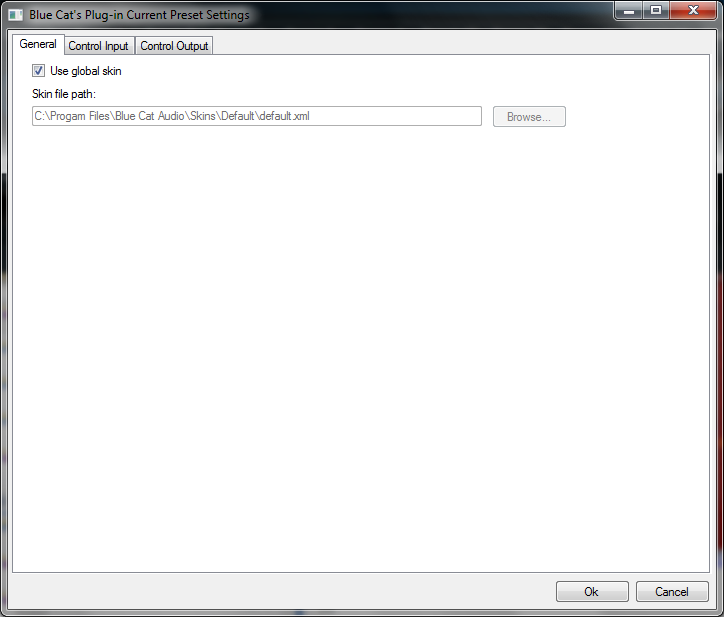
Preset Skin
You can choose to use the global skin setting or to change the skin for the current preset. This way you can have different skins for different instances of the plug-in in the same session in order to differentiate them.
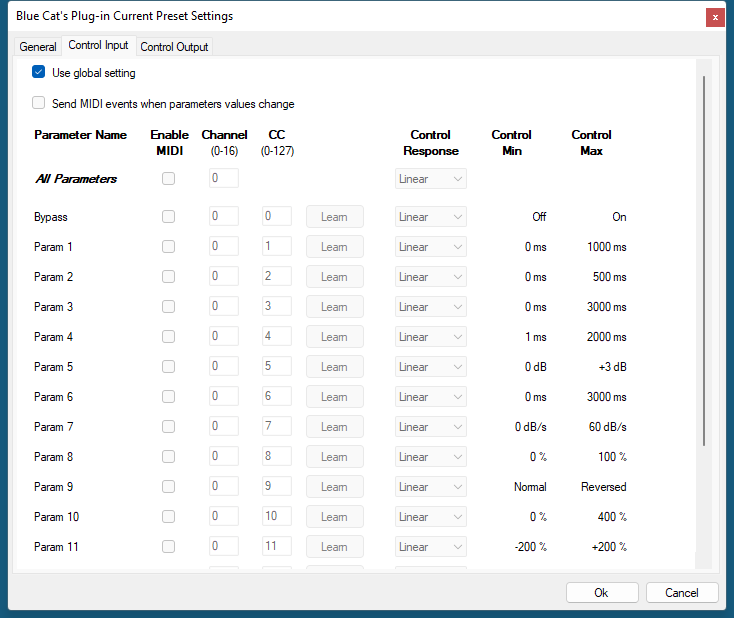
Preset Control Input Settings (MIDI and Automation)
Use the global settings or override them for the current preset. The parameters are the same as for the global input settings.
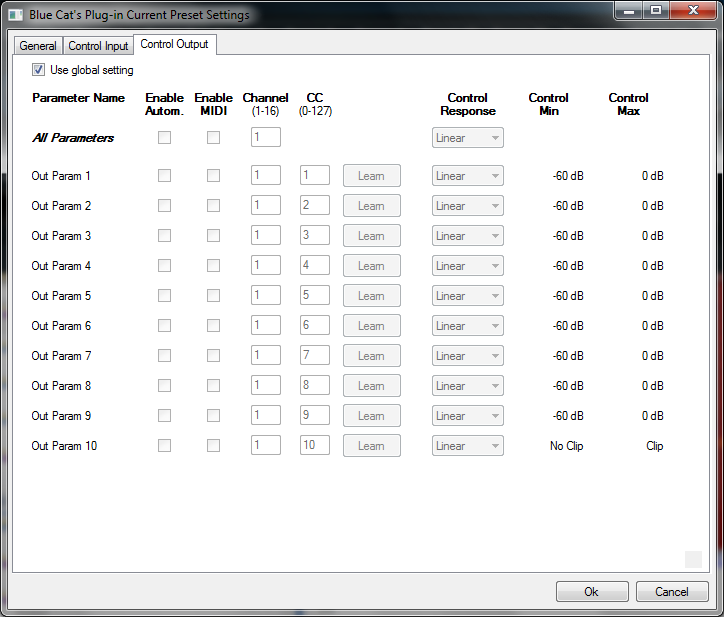
Preset Control Output Settings (MIDI and Automation)
Use the global settings or override them for the current preset. The parameters are the same as for the global output settings.
About Skins
Blue Cat's DP Meter Pro integrates Blue Cat's skinning engine that allows you to customize the user interface. You can download alternate skins for your plug-in at the following address:
If you don't find a skin that fits your need or if you want a custom one, you can choose to create your own skin.
Choosing the Skin
There are two ways to select the skin of your plug-in: you can change the default (or 'global') skin, or change the skin for the current preset only (either in the preset settings page or from the main menu). The global skin applies to all plug-in instances (choose this one if you want to use the skin used by default, regardless of the session or preset), whereas the current preset skin only applies to the current preset of the current plug-in instance (use this one if you want to change only the skin for the current session/preset).
Note: in some host applications, the plug-in window won't resize automatically when you choose a skin with a different size. In this case, just close the window and re-open it: it will be displayed with the right size.
The Skins Menu
The skins menu can be opened from the main menu. It displays the list of skins available for the plug-in as well as commands to manage the skin used by default when no preset skin has been selected:
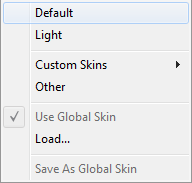
- First Section - Factory Skins: shows the list of factory skins delivered with the plug-in ("Default" and "Light" in this example).
- Second Section - User Skins: shows the list of user skins that have been installed in the Documents Skins folder for the plug-in (see below).
- Use Global Skin: use the global skin for the current preset/session (unloads any custom skin previously selected for the current preset).
- Load: opens a file browser dialog to manually select the skin from the file system.
- Save As Global Skin: use the current preset skin as the global skin (loaded by default if no preset skin has been defined).
Installing User Skins
To select user skins directly from the skins menu, install them in the "Skins" directory available in the plug-in's documents folder:
[Your Documents Folder]/Blue Cat Audio/[Plugin Name]/Skins/
The skin engine will scan this folder for new skins (xml files) and display them in the menu. The skin files should be in the root skins folder or in a subdirectory inside this folder: subdirectories are not scanned recursively.
Other Methods to Select Skins
You can also select the skins in the settings panels available from the main menu:
The global skin (used by default if no preset skin has been selected) can be changed in the global settings pane. The current preset skin can be changed in the preset settings page .
Create a Custom Skin
You can create custom skins for your plug-in in order to adapt it to your exact needs. You can change its look and feel and make it completely integrated in your virtual studio!
Just read the Blue Cat's Skinning Language manual and download the samples for the tutorial on http://www.bluecataudio.com/Skins. You can get ready to create your own skins in a few minutes. You can then share your skins on our website.
More...
This manual only covers the main aspects of Blue Cat's DP Meter Pro. Our website offers many additional resources for your Blue Cat's DP Meter Pro plug-in. It is constantly updated, so keep an eye on it!
Updates
As you can see in the history log below, we care about constantly updating our products in order to give you the latest technology available. Please visit our website often to check if Blue Cat's DP Meter Pro has been updated, or subscribe to our Newsletter to be informed of the latest news about our products.
Note: minor version updates are available from the same location as the original full version download (link received by email upon purchase). The demo version publicly available on our website will not let you register.
You can also follow us on twitter, facebook and instagram for almost real time updates notification, and subscribe to our YouTube channel to watch the latest videos about our software.
Versions History
V4.42 (2025/09/08) |
|
V4.41 (2025/08/12) |
|
V4.4 (2025/04/08) |
|
V4.33 (2024/09/09) |
|
V4.32 (2022/12/15) |
|
V4.31 (2022/12/12) |
|
V4.3 (2021/10/19) |
|
V4.22 (2020/11/12) |
|
V4.21 (2020/07/07) |
|
V4.2 (2019/05/21) |
Warning: because of a bug of the initial VST3 release, this new version may not work with existing sessions that used the VST3 format. See this blog post for more details and how to fix it. |
V4.1 (2016/03/03) |
|
V4.05 (2014/01/09) |
New Features:
|
V4.04 (2013/06/21) |
|
V4.03 (2013/05/14) |
|
V4.02 (2013/04/15) |
|
V4.01 (2013/03/07) |
|
V4.0 (2013/02/19) |
New Features:
|
V3.5 (2011/07/11) |
|
V3.42 (2011/02/10) |
|
V3.41 (2010/11/29) |
Fixed incompatibility issues with older presets in the previous version. |
V3.4 (2010/11/18) |
|
V3.32 (2010/03/19) |
This update only concerns the RTAS version of the plug-in:
|
V3.31 (2010/02/25) |
|
V3.3 (2010/02/15) |
|
V3.21 (2009/05/05) |
Mac VST update: fixed incompatibility issues with Cubase 5 on Mac. |
V3.2 (2009/02/27) |
|
V3.1 (2008/12/10) |
|
V3.0 (2008/03/03) |
|
V2.4 (2006/12/11) |
|
V2.3 (2006/11/29) |
|
V2.2 (2006/09/27) |
|
V2.1 (2006/09/05) |
|
V2.0 (2006/09/04) |
|
V1.1 (2005/01/10) |
|
V1.0 (2004/11/01) |
First DirectX Version |
Thanks again for choosing our software!
See you soon on www.bluecataudio.com!