")


")


Table Of Content
Introduction
Blue Cat's Destructor is a powerful distortion and amp sim modeling tool capable of replicating a vast spectrum of distortion styles, from the edgiest digital mayhem to velvety smooth compression, and even pristine guitar amp recreations (yes, it nails those pristine clean tones too!). The best part? It helps you discover and forge your own signature sound for guitars, bass, drums, synths, vocals, or even full mixes!
Experience Destructor, the ultimate tone-sculpting tool, loaded with hundreds of presets and ready-to-rock models. Inspired by iconic gear like guitar and bass amps, cabinets, compressors, pedals, and tape machines, or crafted by our destructive minds, these presets will serve as your sonic playground to build your own tone.
But here's where the magic truly happens: Destructor's customizability knows no bounds. Tweak every parameter of existing presets to create a limitless universe of distortion simulations - no need to purchase additional presets or amp models. And if you want to keep it simple, use tone maps to create new sounds without diving into the details.
Our approach, rooted in perceptual modeling rather than electronic designs or impulse responses, streamlines the tone-tweaking process, ensuring it seamlessly fits into your mix. You can also load and transform your own impulse responses to add color to your tone.
Destructor boasts an exclusive adaptive shaper, providing an organic, analog-like responsiveness that musicians yearn for. Yet, it also ventures into uncharted digital territory, offering a realm of effects that transcend the boundaries of the "real" world.
Tailor the plug-in's appearance with over 600,000 visual styles, selectable module by module. Choose "EZ mode" for rack or guitar pedal-style control with just a handful of parameters.
For precision tone matching, import reference curves measured with Blue Cat's FreqAnalyst Multi.
If you are seeking a comprehensive amp simulation package with built-in effects, check out Blue Cat's Axiom. To delve into frequency-selective or multiband distortion, you can seamlessly pair the plug-in with Blue Cat's MB-7 Mixer.
")

")
Typical applications: Distortion modeling, guitar amp simulation, non-linear tone shaping channel strip, overdrive, bit crushing, analog compression, hard & soft clipping, coloring, tape saturation, Lo-fi, fuzz, digital noise, aliasing, filter effects.
Credits: this plug-in includes several factory presets created by Sink and Hans Van Even.
System Requirements
MacOS
- An Intel or Apple Silicon processor.
- Mac OS 10.9 or newer.
- Any VST / Audio Unit / AAX compatible application (64-bit) .
Windows
- An SSE2-enabled processor (Pentium 4 or newer).
- Microsoft Windows Vista, Windows 7, 8, 10 or 11.
- Any VST / AAX compatible host software (32 or 64 bit).
For more information about supported platforms, see our Knowledge Base.
Demo Limitations:
- 5 instances of the plug-in allowed per session.
- The effect is bypassed for half a second every minute.
Installation
The plug-ins versions cannot be run standalone: they require a host application (see the System Requirements chapter for more information). Depending on which host application you use, you might need to install the plug-ins in different locations.
Before installing one of the plug-in versions, you should close all your host applications.
Windows
Install
All versions of the plug-in provide an installation program. Follow the steps of the wizard to install the software on your machine. During the installation you will be asked where you want the software to be installed. For the VST version, you should install the plug-in inside the VST plug-ins folder used by your host application(s). The default path set in the installer should work for most applications, but you should check your host software documentation to know where it looks for VST plug-ins. For other plug-in types, you should just use the standard path.
Some applications will not automatically rescan the new plug-ins, so you might have to force a refresh of the plug-ins list.
Upgrade
When a new version of the software is released, just launch the new installer: it will update the current installation.
Uninstall
To uninstall the software, simply launch the "Uninstall" program that is available in the start menu or in the configuration panel. It will take care of removing all files from your computer.
Mac
Install
On Mac the plug-ins are available as drive images with an installer. After download, double click on the dmg file to open it. You can then double click on the installer (.pkg file) to install the package.
Note for Mac OS 10.15 Catalina or newer: you may have to right click on the installer and select "Open" instead of double clicking on the file to launch the installation if your computer is not connected to the Internet.
Upgrade
When a new version of the software is released, just launch the new installer: it will update the current installation.
Uninstall
To uninstall the software, simply remove the component(s) from their install location (move them to the trash):
- AAX plug-ins are installed in the /Library/Application Support/Avid/Audio/Plug-Ins/ folder
- Audio Units (AU) are installed in the /Library/Audio/Plug-Ins/Components/ folder
- RTAS Plug-ins are installed in the /Library/Application Support/Digidesign/Plug-Ins/ folder
- VST plug-ins are installed in the /Library/Audio/Plug-Ins/VST folder
- VST3 plug-ins are installed in the /Library/Audio/Plug-Ins/VST3 folder
If you want to completely remove all settings and configuration files, you can also remove these additional directories that may have been created on your computer:
- ~/Library/Preferences/Blue Cat Audio/[Plug-in name and TYPE], where TYPE is VST, AU, RTAS or AAX: global preferences.
- ~/Library/Preferences/Blue Cat Audio/[Plug-in name]: license information
- ~/Documents/Blue Cat Audio/[Plug-in name]: user data, such as presets, additional skins and user-created plug-in data.
Please be aware that these directories may contain user data that you have created. Remove these directories only if you do not want to reuse this data later.
First Launch
Blue Cat Audio plug-ins cannot be run standalone, they require a host application (see the System Requirements chapter for more information). Some host applications will require you to scan the plug-ins before they are available in the application.
If the plug-in is not available in the application, please check that it has been installed in the appropriate directory (with no host application running), and that the host application has scanned it.
Using Blue Cat's Destructor
Introduction
Overview and Signal Flow
Blue Cat's Destructor is based on a simple scheme that replicates the behavior of most systems that generate distortion in the real world:
- Pre-filtering or pre-emphasis.
- Non-linear distortion that generates overtones.
- Post-filtering.
The plug-in also includes a gate and a compressor at the input to control noise and peaks before applying distortion, as well as an output brickwall limiter to avoid overshoots:

The purpose of the plug-in is to help you build your own distortion tone (and many other non-linear effects in general, such as compression), either using existing module presets or creating it from scratch.
About Distortion
Distortion is the alteration of the original shape of a waveform, resulting in the production of extra overtones that enriches the sound.
To perform this step, Blue Cat's Destructor employs a special dynamic waveshaping technique, using a shaping curve that may vary over time, based on the incoming signal:

The green curve above shows how incoming values are transformed into an output signal. As you can see above, the shape of the reference sine wave (blue curve) is transformed into a more-squared version (red curve) by the transfer curve.
It results in the creation of harmonics in the frequency domain, as shown by the orange curve below (compared to the blue spectrum of the original sine wave):

The number of harmonics and their frequencies depend on the shape of the transfer function (more on this later).
About Filtering
Post Filter
As seen in the previously, distortion will generate many high order harmonics, which usually sounds quite harsh. So you will naturally want to filter them to control their intensity, using post-filtering:

In the real world, such filtering happens at many stages. For example, when recording a guitar amp, the tubes, cabinet and microphone all add their own filtering, with more or less control over it. With Blue Cat's Destructor, you can precisely define how much of each frequency you want to hear in the end. All editing can happen in a single place.
Pre Filter
So what is pre-filtering for, then? Also called pre-emphasis, pre-filtering lets you choose the impact of frequencies on the distortion: frequencies that are attenuated by the pre filter will generate less harmonics that the frequencies that are emphasized.

For example, if the lower end of the spectrum is emphasized, the destruction step will generate many harmonics in the mid range (sometimes masking the original sound), whereas if treble is boosted, most harmonics will reside in the high end of the spectrum, enriching the original sound with less masking. (This is of course dependent on the content of the original sound)
A common practice is to boost some areas of the spectrum with the pre-filter and then attenuate them with the post filter (or vice versa), to produce a more balanced spectrum.

Shape Dynamics
As mentioned earlier, the shaping curve in Blue Cat's Destructor is dynamic, and can be controlled by the audio signal, using a dedicated envelope follower.
In many cases, this is what gives a natural feeling to the distortion produced by the plug-in, as it will react to changes in the dynamics of the incoming signal.
It is also possible to feed this detector with an external side chain signal, to trigger the distortion with another track for creative purposes. Just give it a try with a kick drum as a side chain to distort a synth or guitar track: it will give you the idea!
Using Modules
The pre and post filters as well as the destruction processor are built as independent modules. All of them offer a wide variety of presets that can be used as predefined models to create your own tone.
As described in details later in the manual, all three modules have an "easy" and an "edit" mode. The easy mode gives access to only a few parameters of the underlying model, and the edit mode is a more advanced view with "full access" to the module. When building a tone, you should usually start in easy mode, loading existing presets for and changing "easy" parameters. You can then enter the edit mode for fine adjustments, or to create your own distortion model.
It is also possible (and recommended) to create your own presets with your favorite settings for each module, to reuse and combine them later. Given the number of parameters available, it is in often much faster to reuse such presets and only touch the controls offered by in "easy mode" to adapt the tone to specific situations.
Using Tone Maps
Destructor 1.5 introduces a new feature called tone maps: it lets you create visual 2D maps of existing presets (global tone, or for each module), which location on the map is based on their tonal characteristics:

It is a very useful tool to navigate thru presets (tones that are similar will be close to each other) or to create brand new tones out of existing presets: place the cursor in the middle of several presets, and the plug-in will create a new tone based on the chosen location.
Destructor for GUITAR Players
As you can see Destructor is pretty deep and gives you many options to craft your tone (be it clean, crunch, overdrive, distrtion or high gain...). If you are a guitar player however, you may not want to jump (at first) into the naughty details of the plug-in.
If you want to emulate guitar amps or pedals, all you need to know is that:
- The input gate can be used as a noise gate to eliminate noise with heavy distortion tones. Increase the ratio and the threshold for less noise.
- The input comp stage helps with keeping control over the input level, or add some compression effect in front of an amp. Increase the ratio and decrease the threshold for more compression, and then adjust the attack/release accordingly.
- The PREAMP (pre-filter) section corresponds to the first gain stages of a guitar amp or pedal, shaping the tone before it hits the distortion stages. You will usually want to remove the low end and increase the treble in many cases for more clarity in the guitar tone.
- The DESTRUCTION (distortion) section is where the magic happens. From compression to static distortion, it is capable of many types of effects and can be adapted to your own playing thanks to the dymamics settings. Many guitar-specific presets are provided to get you started.
- The POST FILTER section roughly corresponds to the cabinet section in most traditional amp simulations. But it is a bit more than that, as some amps will actually perform some additional filtering after the distortion stages. Anyway, here again many presets are provided, and you can use tone maps to build your own cabinets by ear.
As you will see in the long list of presets, you can simulate pretty much any kind of tone, including guitar amps or pedals. The aim to to let you find your own easily, using the approach that works for you (multiple tools are provided for this purpose. You can experiment to find the one that best matches your expectations).
The other great thing about Destructor is that even if it may look like a "regular" amp simulator in some aspects, it is much more than "just" that. It brings new ways of crafting your guitar tone quickly and also gives you access to sounds that are not available elsewhere.
Getting Started
That's enough theory for now... Let's get started! To become familiar with the plug-in, you can first browse and test the global presets to hear what the plug-in can do. Enter the edit mode for presets that you like, to have a better understanding of the underlying models. You can use tone maps to browse the presets and find out which ones have similar characteristics.
You can also try to switch between different module presets to hear the difference, and check how they have been built with the edit mode. You can also use locks to keep the settings of a section you are satisfied with, while browsing presets to change other settings.
Once you have a good understanding of the role of each module and its influence on the tone, you can create your own models, based on existing presets, from scratch or using tone maps.
The reference curve import feature can also be helpful to build your filters, especially if you want to mimic existing gear that you can measure with our audio analysis tools.
The User Interface
Note: The main toolbar, menus and basic features available with all our plug-ins are detailed in the Blue Cat Audio Plug-ins Basics section.
Overview
The user interface mostly follows the signal flow described in the previous chapter from top to bottom and from left to right:

Main Components
- The main toolbar, with from left to right: the bypass button, in and out gain controls, the main toolbar buttons, the presets manager and text display LCD.
- The input gate controls.
- The input compressor controls.
- The pre-filter module, in "easy" mode.
- The destruction module, in "easy" mode.
- The post-filter module, in "easy" mode.
- The brickwall limiter switch, to enable or disable the limiter. You will usually want to keep it enabled to protect the output of the plug-in. in this case you should try to adjust the output gain so that the limiter is not triggered, unless you explicitly want its pumping effect.
EZ Modes
Starting with version 1.3 and 1.6, you can now turn the plug-in into a "minimized rack-style" or "pedal-style" plug-in, only showing the main controls that you would find in a guitar amp, a distortion unit or a guitar distortion or compressor pedal:


The the minimized views can be activated from the main toolbar by clicking on the "EZ" icon:

They follow the look and feel defined in the "full edit view":
- if the destruction module is active, its style is applied to the minimized view.
- else if the post filter module is active, its style is applied to the minimized view.
- else if the pre filter module is active, its style is applied to the minimized view.
Note: the bass, mid, treble, tone and gain knobs control the parameters with the same names in the post filter or preamp sections (depending on the selected "EQ" setting), and the drive parameter controls the destruction module.
Note: if you drag and drop an impulse response (IR) file onto the minimized view, it will be loaded into the post filter module.
Meters
Level meters are available to monitor the audio level at each stage of the processor. Please note that no clipping happens between modules, so it is not a necessity to keep levels below 0 dB. It is however a good practice, in order to precisely control the dynamics and the distortion stages.
The reverse blue meter next to the "PRE" level meter displays the gain reduction performed by the gate and compressor, while the same meter in the "OUT" section displays the activity of the output brickwall limiter.
Browsing Presets
In order to browse both factory and user presets, you can either use the simple presets menu or open the full featured presets browser from the toolbar that remains visible until you close it:
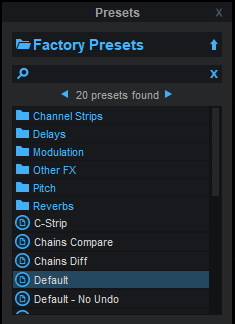
Click on preset files and folders to open them, or use the arrows to navigate between displayed presets. You can navigate upward in the folders tree by clicking on the current folder at the top. Type in the search box to find presets by name (it also searches in folder names). The search is performed recursively in the currently selected folder (displayed at the top).
Search Tips: you can search for multiple terms by separating them with commas. Wildcards are also supported (with * and ? characters), but they are applied to the full path of the preset. For example, to search for all presets containing the word "phase", type *phase* in the search box. To look for these presets only in the factory presets, you can type Factory Presets/*phase*.
Both global plug-in presets (main) and sub-presets for each module (Preamp, Destruction, Post Filter) can be found in the presets browser - just click on the appropriate category to find them:

Tone Maps
Another way to browse presets (and create new tones) is to use tone maps. Click on the tone map icon in the main toolbar to open the tones explorer window. It shows a presets browser on the left to look for presets (and load them), and a tone map on the right, which can be used to navigate presets and morph between them:

Tone maps are available for global presets ("main") or for each module (click on the selected module in the preset browser to see the associated tone map). The preset browser pane shown here is the same as the main presets browser described earlier, with an additional "+" button that can be used to add presets to the current map.
The tone explorer window can be resized: move the mouse to the border of the window until an arrow appears, then click and drag to resize accordingly.
Tone Map Features
The main feature of the tone map area is to browse presets on a 2D map. You can click on the presets icons that appear on the map to load the presets, or move around the green cursor to explore other areas and morph between presets in two dimensions.
Note: while loading a preset will load all parameters values contained in this preset, morphing between presets with the cursor does not alter the drive parameter: this lets you morph between several tones without affecting the amount of distortion or compression.
Note: the same rule applies to gate settings and impulse responses (IR) loaded into either the pre or post filter. They are not analyzed nor modified by tone maps.
Located at the top of the tone map panel, the toolbar provides additional commands, from left to right:
- Save your maps and reload them later using the menu icon. Use the left and right arrows to go thru existing maps.
- If you modify the presets that compose a map, you can recompute the map using the refresh icon (presets that cannot be found anymore will also disappear from the map).
- Use the trash icon to reset and start with an empty map.
- Use the target icon to reveal the mouse cursor in the map (that may have disappeared once zoomed).
- The last icon lets you find the closest location on the map that fits the current settings. If the current settings have been loaded from a preset that is on the map, it will find this preset. An approximate location is computed otherwise (and will affect the current tone).
Once the map and its (green) cursor have focus, you can zoom the map using the mouse wheel. Once it has been zoomed, drag the map with the mouse to move it (or use the find cursor command to locate the cursor).
Tip: you can hide the tone map panel (using the arrow at the top of the window) if you want to use this window as a floating presets browser.
Getting Started With Tone Maps
The easiest way to get started with tone maps is to load factory preset maps that are included with the plug-in:
- Choose the type of presets for the map: click on the icon at the top of the left pane (Main, Pre, Dest or Post).
- Click on the menu icon and choose a map from the list.
- Start browsing!
Creating Your Own Maps
Factory maps are nice, but you will probably want to create your own and navigate your own tonal space with your favorite presets:
- Start with an empty map (click on the trash icon), or with an existing map that you like.
- Find presets with the browser, and add them to the map with the "+" icon (the "+" icon at the top of the results list add all of them).
- The map is computed on the fly and shows presets that sound similar at the same location. Adding new presets to an existing map may completely change its layout - it is the same as looking at an object from a completely different angle.
Note: the drive parameter is not taken into account to compute the location of a preset on the tone map, just like it is not modified when morphing between presets. The same tone with different amounts of drive will appear at the same location on the map.
Main Tone Maps and Locks
Exploring The Modules
The three main modules have a similar user interface, with from left to right:
- The power button to enable/disable the module (clicking on the title works too).
- The module presets area: left and right arrows can be used to switch presets for the module, while clicking on the preset title opens the following menu to manage the presets:
- The level meter displays the audio level at the output of the module.
- The arrow button opens a menu to select a GUI style, either from the 1400 presets available or build your own from individual components (more than 200 000 possible combinations!). The style will be applied to the "easy" view of the module, as shown in the following example:
- The "+" button lets you enlarge or reduce ("-") the current view. For the destruction module in edit mode, it will also show or hide the advanced settings (dynamics, oversampling and phase distortion).
- The "e" button switches the module between easy and edit modes.


Gate and Compressor
The gate and compressor placed at the input of the plug-in offer standard controls:
- Attack/Release control how fast the gate or compressor reacts to level increase/decrease. They can be set to 0 to follow the signal instead of its level, causing extra distortion.
- Threshold is the level at which the gate or compressor starts being active. The gate closes below the threshold, whereas the compressor compresses above the threshold.
- Ratio controls the amount of compression/gating: increase the value to get more.
- Makeup Gain is the post-compressor gain, usually used to compensate the gain reduction of the compressor.
To disable the gate or the compressor, just set the ratio to 1 (or right click with the mouse on the ratio control).
Pre and Post Filters
Pre and post filters have the exact same user interface and controls. settings can actually be exchanged between the two using copy/paste, and their presets are compatible.
Easy Mode
In this mode, the simplified controls are straightforward: Bass, Mid, Treble, Tone (if active) and Gain.

The knobs of the easy view control the gain (frequency for TONE) of some of the filters which characteristics are set in the edit view. So the frequencies, bandwidth and ranges of these knobs may vary.
Edit Mode
Behind the scenes, several filters are combined to build a custom frequency response and can be edited in details in this mode:
 A low cut filter with variable slope, to remove lower frequencies.
 A low shelf filter, corresponding to the BASS control of the easy view.
 Four peak filters. The pink filter corresponds to the MID control of the easy view.
 A high shelf filter, corresponding to the TREBLE control of the easy view.
 A high cut filter with variable slope, to remove the higher frequencies. If the slope is not 0 (filter inactive), the TONE control will be available in the easy view.
 Two Comb filters to create "holes" in the spectrum.
The additional slider on the right controls the gain of the module (same as the GAIN control of the easy view).
When a filter is active, its characteristics are displayed in the main LCD screen at the top of the plug-in. Also. knobs will appear at the bottom of the edit view for fine tuning:

Additional controls at the bottom right give you access to the following features, from left to right:
- Select the dB range for the edit view and for the gain controls in the easy view: this setting affects both views so that the range of the knobs can be limited from the edit mode.
- Activate spectrum analysis and select spectrum display type. When "spectrogram" is selected, an extra knob appears to let you adjust the contrast.
- Load impulse responses (IR) files that will be mixed with the filter. Extra controls appear at the bottom to manipulate impulse responses when loaded (you can also drag and drop files onto the pre or post filter views to load impulses).
- Show/hide the reference curve (pink curve in the above screenshot). The reference curve can be used to match external filters measured with Blue Cat's FreqAnalyst Multi or copied from the filter module.
- Open the reference curve menu to load reference curves or paste them from the FreqAnalyst Multi plug-in. The current filter curve can also be copied or saved similarly:

Once an impulse response (IR), has been loaded, you can further manipulate it using the shift and mix controls, so that it mixes properly with other filters and perfectly matches the tone you are looking for:

The shift control lets you shift the spectrum of the IR to the left or right, and "mix" sets the amount of filtered vs dry signal (for the impulse response).
The Destruction Module - Easy Mode
The destruction module is the core distortion generator of the plug-in. The easy view display very simple controls over the distortion, which exact behavior depends on the other settings of the module:

- Drive: more drive means more distortion. However in some cases (when the destruction curve is setup in particular ways), it can control the amount of compression instead.
- Dynamics: the more dynamics, the more the destruction will vary depending on the audio signal. When increasing the drive parameter, you may want to decrease the dynamics parameter.
- Mix: controls how much non-distorted (dry) signal is blended with distorted signal (wet). 100% if for full wet signal, whereas 0% will completely bypass the destruction stage.
- Gain: the gain applied at the output of the destruction module, to compensate gain changes due to distortion.
The Destruction Module - Basic Editing
When switching to edit mode, the destruction curve as well as decimation settings can now be edited:

The destruction curve (also called "Shaper") has its own preset manager (displayed below the graph), so it is possible to save the settings or recall destruction shapes instantly.
Before getting into the edition of the curve, you can see that several curves are displayed:
- The white curve ("user curve") is the curve specified by the user-selected points as well as the "Smooth", "Symmetric" settings available on the right of the LCD screen.
- The green curve ("computed curve") is the actual curve currently applied to the signal, using additional settings (drive, shape mix, rectify) as well as the dynamics response of the signal, if used.
- The blue curve is a reference sine wave (pure tone waveform).
- The pink curve is the result of the destruction shaper applied to the sine wave, to help you understand what the curve actually does.
Editing the Shaper Curve
The basic shape of the curve can be set with three points (the white dots and the arrow on the right).
Additional Curve Controls
Additional controls affect the shape of the distortion curve. You can experiment with them to see the impact on the curve:
- Smooth: performs smoothing between points. Reduces harshness of the distortion.
- Rectify: performs rectification on the curve for asymmetric distortion (and more).
- Bit Depth: simulates bit reduction by quantifying the distortion curve.
- Shape Mix: acts like a dry/wet knob but applied to the destruction curve.
Visual Feedback
The shaper curve display provides additional visual feedback about the processed signal: the input (blue) and output (pink) histograms show the distribution of the audio signals at the input and output of the shaper. They are also reported on the green curve using yellow dots to highlight the current activity of the curve and its impact on the signal.
Decimation
In addition to the drive, mix and gain settings already seen on the easy view, it is possible to apply sample rate reduction after the shaper stage. This is ideal to produce typical digital Lo-fi effects.
You can choose the amount of antialiasing used during decimation. With antialiasing set to off, decimation will produce additional digital artifacts (aliasing).
Customizing the Behavior of the Drive Parameter
The Drive parameter affects the amount of distortion / compression by changing the transfert curve. Its behavior can be customized in details to match the characteristics of the distortion unit that you are trying to model (be it real or imaginary!).
- RANGE: depending on the shape of the curve and the desired effect, you may want to limit the range of the drive parameter, so that the drive parameter has the proper range for your preset (for example, a clean tone should not distort even when pushed to 11, maybe only "crunch" a little bit). The dropdown menu at the top right of the drive knob lets you choose the appropriate range (you can also use the mouse wheel).
- VOL: When increasing distortion or compression with the drive parameter, the perceived loudness may increase. While it may be expected (that's the way some guitar amps behave), it is often a good idea to compensate (part of) this loudness increase to focus on the tone (your ears will usually prefer louder signals, regardles of the actual tone!). The dropdown menu at the bottom right of the drive knob lets you choose the volume drop when the drive parameter is at its maximum (you can also use the mouse wheel).
- DYN: When increasing the drive, you may sometimes want to alter the behavior of the dynamics response of the distortion curve (for example a guitar amp may have lots of dynamics at lower gains and have a more statuc response at higher gains). The dropdown menu at the bottom left of the drive knob lets you choose the amount of dynamics drop when the drive parameter is at its maximum (you can also use the mouse wheel). Choosing values over 100% actually reverses the ceiling and threshold parameters, reverting the behavior of the dynamics section (more details in the next paragraph).
The Destruction Module - Advanced Edit
After clicking on the "+" button of the destruction module while in edit mode, additional controls are available:

Shape Dynamics
As mentioned earlier, the destruction curve can become dynamic, adapting to the incoming sound (or another track using side chain). The "Shape Dynamics" section lets you control this behavior.
You choose the source of the signal to be analyzed by the envelope follower with the drop-down box (plug-in input / after the gate, comp or preamp / external side chain). You can then set the attack and release time and shape that define the envelope, and monitor the current measured envelope on the meter on the right.
The two arrows define the threshold (blue) and ceiling (pink) that control the range in which the dynamics control has an effect. If the ceiling is set below the threshold, the dynamics effect is simply reversed.
More details about these parameters can be found in the next chapter.
Oversampling
The non-linear parts of the destruction algorithms can be processed at a higher sample rate (up to 4x upsampling) to avoid digital artifacts. This is particularly useful when using lower sample rates (44.1 or 48 kHz).
Phase Shift
Additional phase shift can be applied to the signal before it hits the destruction curve. You can select here the center frequency and amount of phase shift.
Locks
EQ Selection

It is a good way to keep a shortcut to the appropriate EQ when running the plug-in in EZ mode.
For example in the early days guitar amps had their tone stack in the first gain stages (hence before distortion), while more modern amps with more gain (since the 80s) have their tone stack after the distortion stage (post EQ).
Using the Controls
The various elements of the user interface (knobs, sliders, buttons...) are simple and intuitive to operate, but more information about how to interact with them is available in the "Plug-ins Basics" chapter of this manual.
Operation
This section describes how to build your tone using the specific controls of each module. An overview of the modules and their controls is available in the previous chapter. A complete list of the parameters exposed by the plug-in is available in the next section.
Getting Started
Explore the Presets
As explained earlier, the best way to get started is to explore existing presets first, then modify the tone by switching presets provided for each module, or to morph between presets that you like using tone maps. The plug-in contains hundreds of presets and sub presets so that it can be used almost exclusively with presets (and module presets) if you do not wish to get into the details of editing. Also, tone maps give you access to an infinite number of tones by letting you morph between these existing presets.
Note about levels: since distortion is highly dependent on the input level and the content of the input signal, you may have to adjust the input and output gains of the plug-in when using using presets on your own material.
As a rule of thumb, you should try to make sure that the input level never exceeds 0 dB and that the output brickwall limiter is never triggered (unless its pumping effect is desired).
Tip: adjust Drive and Dynamics. It is not because an existing preset was set for "crunch" that it won't work well when pushing the drive to 11 or reducing it to get a clean sound. Also, feel free to experiment with the "Dynamics" setting: the preset will react very differently depending on the incoming sound and the way you play.
Editing Presets
If a preset is close to the desired effect but note quite, you can first try to tweak the parameters available in easy mode. It should give you enough control to adjust the tone in most cases.
For finer tuning, you can turn the modules you want to change into edit mode and access the more advanced parameters. Remember that you can save your changes as new presets for each module and reuse them later.
Creating a Sound from Scratch
Once you are familiar with each module and the impact of its parameter on the tone, you may want to create new sounds from scratch.
The exact methodology depends on the type of sounds you are looking for and the instrument to process. In general, you will likely want to start with a post-fiter that (at least) reduces higher frequencies (see the "Lowpass" preset). For guitar sounds, using a cabinet or amp preset for the post-filter will probably be a good choice, since it has a very large impact on the overall sound.
Just remember that all three module have a deep interaction with each other, so any drastic change on one of them may require some more editing on other. For example, boosting frequencies with the pre-filter for emphasis is likely to require some compensation on the post filter.
Using Tone Maps
As explained earlier, tone maps are a great starting point to explore the existing presets and create your own tone without dealing with the details of Destructor:

Tip: remember that using locks on each module, or browsing maps for individual modules, you can affect some parts only of the processing chain. If you are almost happy with your tone but feel that the post filtering is not adequate, use post-filter tone maps, or lock all other sections while navigating main presets maps. Note that since individual module maps affect much less parameters than global maps, they can be more intuitive to use.
Tip: remember that the drive parameter is not used in maps. So if you are looking for clean tones, adjust the drive accordingly (or simply click on one preset in the map to get a good starting point).
Exploring
In order to explore presets without having to listen to them all one by one, add a large number of presets to a map, and check their location: presets that are close to each other will sound similar, while others will produce different tones (drive parameter aside). It is a good way to find out quickly presets that you may like or dislike, based on their location compared to presets that you already know.
Tip: when maps contain many presets, enlarge the window and zoom to get more control over the location of cursor, as changes in tone may be drastic even when moving very slowly.
Simple Morphing
If you like some presets and want to explore what tones you can get between them, gather them into a map (keep it preferably simple, like 3 to 5 presets) and move the cursor around. You might be very surprised by the results!
Use the "Locate" Command
Typical (References) Maps
In the built-in factory maps, you will find "typical" guitar and bass preamp settings maps. We have created these after analyzing the shape of hundreds of possible settings for the pre-filter in guitar amps, and they are a good representation of the typical tones that can be found for the preamp section for guitar and bass amp tones.
Use these maps to create your own amp tones from scratch quite intuitively by moving the cursor between these typical tones (with a given Destruction and Post-Filter setup)
You can create similar maps for yourself for all modules, using your own typical tones that will set the boundaries for the map, and let you explore new tones in your own territory.
Another interesting way of using typical maps is to use them as an reference to explore existing presets: load the typical map then load another preset into it to see how it compares to your reference tones. It may be closer to them than you think (or completely off the map).
Learn From Tone Maps
While exporing tones thru the maps, open the modules in "full edit" mode and observe how the curves move: this will help you learn how the shapes of the various curves influence the tone.
Project Tones Onto Your Maps
When you create a tone map with your favorite settings, you create a playground with reference tones that you like. The tones available on the map, while (almost) in infinite number, is reduced compared to the overall tones that you can create with the plug-in. Creating tones on the map is like adding constraints to the plug-in so that it stays in a particular area of the space of all possible tones, which are more likely to please you.
So once you have created a tone map that you like, you may want to explore other presets that are not on the map and use the "locate" button to project them onto this map: it will create a new tone that's located on your own playground, using the current settings as a starting point.
You can use the same idea with the random function: create a random preset and project it onto one of your maps. It is like choosing a random location between your favorite tones.
Try it out: you might get surprisingly good tones out of it!
Using the Destruction Module
The destruction module is the core of the Destructor plug-in. This is where harmonics are generated and what causes the distortion.

Setting Up the Shaper Curve
The first step is to choose the shape of the destruction curve: load a shape preset or edit the curve using the white dots or arrows. Keep in mind that the shape of the curve continues with the same slope beyond 0dB:

This sets the behavior of the Destruction module when fed with signals above 0 db (overshoots).
Note: unlike the dot controls, the arrow sets a point that is not affected by the drive parameter, as shown in the graph below:
Tip: while changing the shape of the curve, you should keep an eye on the reference sine wave to check an audio signal is actually affected.
Shaper Curve & Sound
As a general rule, the more edges in the shaper curve, the more harmonics, and the harsher the distortion. A quick look at the shape of the transformed sine wave in the following examples will give you the idea:

You can use the "smooth" parameter to reduce edges and soften higher order harmonics for a more analog-like sound.
Symmetrical vs Asymmetrical
The plug-in lets you setup symmetrical or asymmetrical distortion in several ways: first, increasing the rectify parameter will produce an asymmetrical curve. Also, in non-symmetric mode, additional points can be specified for the lower part of the shaper:

Asymetric clipping is known to produce mainly even order harmonics, whereas symmetric clipping emphasizes odd harmonics. The difference is subtle but noticeable (especially with post-filter disabled). Try by yourself and check if you can hear the difference.
As an example, tube amplifiers using several stages with rectification are known to be asymmetrical, whereas most designs with transistors or early single stage tube amplifiers are likely to be more symmetrical. However, this is not a general rule (typically, fuzz pedals use transistors to produce highly asymmetrical clipping).
Also, what makes the biggest difference between such types of distortion circuits is not the symmetry of the shape but its dynamics, as explained later in this manual.
The Drive Parameter
Increasing the drive offsets the destruction curve towards the origin as if the input gain was increased, and produces more distortion, without necessarily increasing the peak levels (it depends on the shape of the curve, though):

Tip: a good practice is to setup the shape in such a way that the distortion is barely noticeable when the drive is set to 0, so that you can then use the its entire range efficiently (remember, it goes to 11!).
Adding Dynamics
As mentioned earlier, the dynamics of the destruction shape is what makes the biggest difference between distortion tones, especially for very expressive instruments such as guitars, and even more for small amounts of distortion ("crunch sounds").
If you haven't experimented with shape dynamics yet, you may have noticed at this stage that static distortion can sound flat and tiring in some cases.
Adding dynamics to the destruction process can greatly improve the distortion and the feeling while playing an instrument into the plug-in, simply because it implies a direct interaction between the instrument and the distortion effect.
Very basically, dynamics control is a system that defines how much the curve affects the signal - just like the "Shape Mix" parameter - based on the measured level ("envelope") of the signal.
Shape Dynamics Controls
Shape dynamics is impacted by four categories of parameters, which are similar to what compressors usually offer:
The source: the source selector lets you choose which signal affects the destruction curve. You may want to use the input signal before the compressor and gate if you want finer control from the instrument, or directly at the preamp stage, if you prefer to simulate the dynamics effect of electronic circuits. The external side chain source lets you trigger the distortion from another audio source, and produces very interesting side chain distortion effects.
The range: this is the amount of dynamics applied to the curve. This is the main control to choose how much the curve may change over time, based on the signal envelope coming from the selected source. When it is set to 100%, there will be no distortion at all (straight curve) when the envelope goes below the threshold (or above, if the ceiling is lower than the threshold).
The envelope settings: just like for a compressor, the attack time sets how fast the plug-in reacts to level increases, whereas the release time sets how fast the plug-in will decrease its envelope when the signal level drops. For each of these times, the shape parameter changes the shape of the attack and release curves:

For positive values, the overall time will be increased, because the envelope follower becomes slower and slower. Whereas for negative values, the overall time will be reduced, because the envelope follower gets faster and faster. You can experiment and check the envelope meter on the right to visualize the impact of these parameters.
If you are familiar with our dynamics processing plug-ins, the behavior is very similar.
The threshold ("cold") and ceiling ("hot"): when the envelope meter reaches the ceiling (and beyond), the destruction curve is the same as if no dynamics was applied (100% wet). When the envelope reaches the threshold (and beyond), the distortion is reduced by the amount specified by the range parameter.
The green curve on the graph reflects these changes in real time. The threshold can be set below or above the ceiling, which simply reverts the effect: ceiling above threshold means more distortion when the signal gets louder, while ceiling below threshold means more distortion when the signal gets quieter.
Shape Dynamics Examples
Many of the guitar presets use a dynamic destruction curve (check out the crunch section) to replicate the feeling of tube distortion, which usually includes some kind of compression.
You can even simulate analog compressors using gentle distortion curves that adjust the gain dynamically and produce very few harmonics. It is also possible to create custom gates, expanders etc.
When setting up the threshold and ceiling in reverse mode and with large range values, you can also create interesting effects where the distortion only happens on the tail of the sound, when it gets quieter (see the "Reverse" presets).
And do not forget the side chain applications too!
Adding Phase Shift
Phase shifting has two types of impacts: first, with high amounts of phase shift (10 and beyond), smearing will start to be audible around the center frequency, a bit similar to a sweeping filter. Second, it will produce phase cancellation effects between the dry and wet signals when blended together using the mix knob.
The latter is a typical effect used in analog distortion circuits that can produce very interesting distortion tones.
Oversampling
As described earlier, you can use oversampling to improve the quality of the distortion and avoid aliasing. Oversampling increases audio quality but uses more CPU, so this is a tradeoff between quality and performance. Further more, at higher sample rates the difference may not be audible, depending on the audio signal and the amount of distortion.
Pre and Post Filters
The pre and post filter are similar to parametric equalizers, but with several twists: emphasis and post filtering steps often require radical settings compared to what you would use an EQ for.
Comb Filters
You may have noticed the presence of a comb filter, in addition to usual cut, peak and shelving filters:

It can be used to add color to the sound (most often on the post filter, but not only). A typical use case is when you want to replicate the phase cancellation effects produced by room or cabinet reflections, or the combination of several microphones.
Impulse Reponses
With version 1.4, you can load your own impulse responses in both the pre and post filters, and manipulate them with the shift and mix controls:

Impulse responses let you capture the exact response of a system (guitar cabinet, room reverb, ...) and reuse it as a filter. You can import them to add color to the pre and post filtering stages, or replicate the exact behavior of an existing component. You can find many free and commercial impulse response libraries including guitar cabinets, reverbs and other types of filters.
Note: there is no limitation on the length of impulse reponses that you can load. You should however be aware that longer impulse responses consume more CPU.
Easy Mode
Also, when building a filter shape to be reused in "easy" mode, keep in mind that the three pink filters as well as the hi cut filter will define how the LOW, MID, TREBLE and TONE controls affect the signal.
Using the Gate and Compressor
While the gate and compressor at the input of the signal chain can be used for creative purposes (check out some of the radical factory presets!), their main purpose is to control the dynamics at the input of the plug-in: you will usually setup the gate to catch the noise, and the compressor to limit the dynamics: for heavy distortion, pre-compression is often fully part of the tone.
Reference Curves and Tone Matching
Both the pre and post filters give you the ability to load reference filter curves that have been measured using Blue Cat's FreqAnalyst Multi, as shown for example in this tutorial:

You can create a filter curve that mimics the response of the measured gear. To get the perfect tone, the match is not required to be exact: you just need to make sure that the main characteristics of the response are reproduced. Keep in mind that the measuring process may also add its own artifacts - typically room interferences when measuring cabinets.
Also, the idea here is to use such references as a starting point, to build your own tone. If you really need an exact replica of the frequency response, you will probably want to use an impulse response instead.
Note: if you are measuring gear such as guitar amplifiers, you will need to make sure that you can measure the preamp (for the pre-filter), and the power-amp / cabinet combination (for the post filter) separately.
Chaining Several Instances
Using a plug-in chainer such as Blue Cat's PatchWork or when inside Axiom (or directly in your DAW), you can chain several instances of the plug-in to create different tones. For example you can try a pedal preset in front of an amp preset to create a very high gain tone on guitars.
Tip: very high gain guitar tones will typically require two distortion stages, with the first stage using simpler filtering (usually a simple high cut filter is enough).
Blue Cat Audio Plug-Ins Basics
This chapter describes the basic features that are common to all our plug-ins. If you are already familiar with our products, you can skip this part.
User Interface Basics
About Skins
Like all Blue Cat Audio plug-ins, Blue Cat's Destructor uses a skinnable user interface. It means that the appearance and behavior of the user interface can be entirely customized.
Especially with third party skins, the experience may be quite different from the one offered by the default skins that we provide. However, our plug-ins and our skinning engine have several standard features that will be available whatever your favorite skin.
More information about custom skins can be found in the skins section.
The Main Toolbar
In most skins, an optional toolbar at the top of the user interface gives you access to the main options and settings of the plug-in:

Smooth Bypass
On the left, the power button can be used to smoothly bypass the plug-in.
Presets Area
At the center of the toolbar, you can see the current preset area (the "Default Settings" box). It displays the name of the current preset, with a "*" at the end if it has been modified since loaded.
The arrows on the left and right let you navigate thru the (factory and user) presets available for the plug-in.
Clicking on the preset name opens the presets menu which lets you manage the presets of the plug-in.
Using the knob on the bottom right of this area, you can reduce the opacity of the window, and make it transparent (the actual result may depend on the host application). Additional messages may appear in the area next to this knob, depending on the plug-in.
Some plug-ins may also propose you to manually select the audio I/O inside the plug-in (bottom left of the presets area), regardless of the host configuration. It can be useful for example to save CPU by selecting mono to stereo configurations (instead of full stereo sometimes chosen by default by the host), or add extra channels to manage side chain internally, when the host does not provides any side chain input. Please note that this does not change the number of I/O seen by the host application.
Commands
The icons in the toolbar give you access the to the following commands that are detailed in the next paragraph:
| Icon | Name | Function |
|---|---|---|
|
|
Menu | Open the main menu |
|
|
Control Settings | Display the controls settings menu (to manage automation and MIDI control, as described here). |
|
|
Undo | Undo |
|
|
Redo | Redo |
|
|
Manual | User Manual |
|
|
About | About |
|
|
Zoom | Scale the user interface (from 70% to 200%). |
The Main Menu
The main menu is available from the main toolbar, or if you right click anywhere on the background of the plug-in:
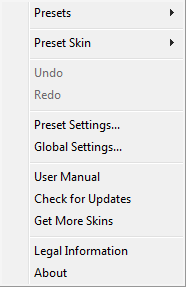
- Presets: opens the presets menu to manage presets.
- Preset Skin: opens the skins menu to choose the skin for the current preset and manage alternative skins for the software.
- Undo/Redo: undo or redo the latest modifications. This includes all changes made to the current preset settings such as MIDI or automation preferences.
- Presets Settings: open the presets settings window. It lets you change the skin, MIDI and automation settings for the current preset.
- Global Settings: open the global settings window. It lets you change the skin, MIDI and automation settings that are used by default in all instances of the plug-in (if not overridden by the current preset).
- User Manual: open this user manual.
- Check for Updates: opens up our website to let you check if any update for this software is available.
- Get More Skins: get more skins for this software.
- Legal Information: browse licensing and misc legal documents.
- About: displays the “about” dialog box.
Controls
Examples
Here are a few examples of typical controls you will encounter in the user interface of our plug-ins:
| slider | slider | knob | button | Text control |
|
|
 |
 |
|
|
Interacting with Controls
You can interact with the controls of the plug-in interface either with the mouse or the keyboard.
Setting the keyboard focus on a control (so that it responds to key strokes) may be automatic (when you pass the mouse over it it gets focus) or manual (you have to click on the control to set the focus on it). Note that all host applications behave differently regarding keyboard handling. In some applications you may not be able to use all keys described later in this manual to interact with our plug-ins. It is usually made obvious to you to know the active surfaces of the skin (the places where you can click with the mouse): the mouse cursor usually changes when you can do something on a control. In the default skins delivered with the plug-in, the cursor changes to a small hand or an arrow to tell you when your mouse is over an active control.
Mouse
Various mouse movements will let you interact with the controls:
| Mouse Interaction | Action |
|---|---|
| Left Click | Acquire focus and start dragging or push (button) |
| Left Click + Alt Key | Set the value to default |
| Left Double Click |
Acquire focus and launch the “fine
tuning” edit box (except button):
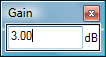 |
| Right Click | Set the value to default |
| Mouse Wheel | Increment or decrement the position (focus required) |
| Mouse Drag | Change the control position depending on mouse movement (except button) |
Keyboard
All control widgets support the following keys (note that some of them are caught by the host and thus never forwarded to the control. For example in Steinberg Cubase SX you cannot use the arrow keys to control the plug-in):
Keys Common to All Controls
| Key | Action |
|---|---|
| Up Arrow | Small increment of the position (up or right) |
| Down Arrow | Small increment of the position (down or left) |
| Left Arrow | Same as Down Arrow |
| Right Arrow | Same as Up Arrow |
| Page Up | Large increment of the position (up or right) |
| Page Down | Large decrement of the position (down or left) |
| + | Small increment of the value of the control |
| - | Small decrement of the value of the control |
| d | Set to default value (same as mouse right click) |
| e |
Opens the 'fine tuning' window to precisely
set the parameter:
|
| SHIFT | When the key is down, the fine tuning mode is on, and you can modify the value with better precision when moving the mouse, the mouse wheel or using the keyboard. Just release the key to get back to the normal mode. |
Keys Specific to Buttons
| Key | Action |
|---|---|
| Enter | Pushes the button |
Presets
To get started with the plug-in and discover its capabilities, a couple of factory presets are provided. You can also save your own presets and recall them later for other projects. Our plug-ins propose a full-featured preset manager to let you save, browse, organize and recall its presets.
The Presets Menu
The presets menu can be opened from the main menu or the main toolbar. It displays the list of presets available for the plug-in as well as commands to load, save or organize presets:
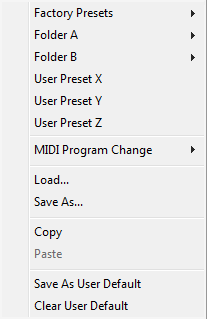
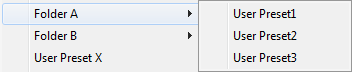
- Factory Presets: shows the list of factory presets delivered with the plug-in.
- "Folder A" to "User Preset Z": user presets and categories.
- MIDI Program Change: activate MIDI Program Change support (see below).
- Load: load preset from file.
- Save: save current state to last loaded user preset.
- Save As: save current preset to a file.
- Copy copy preset to the system clipboard.
- Paste paste preset from the system clipboard, if available.
- Save As User Default: save the current state as the default preset. This preset is used every time a new instance of the plug-in is created.
- Clear User Default: reset the default preset to its factory state: this makes the plug-in forgets the custom settings you might have saved as a default preset.
More about Presets
There are two types of presets: factory presets (read only) that are provided with the plug-in, and user presets that can be created and stored by the user.
The user presets are stored in a subdirectory of the documents folders of your profile ("Documents" on Mac, and "My Documents" on Windows): Blue Cat Audio/[Plug-in Name]/Presets. Each preset is stored as an individual file. You can create folders and subfolders in the Presets directory to classify your presets, as shown in the example below:
If you save a preset named "Default" in the root Presets directory, it will override the factory default preset (that's what "Save As Default" does). To restore the factory default preset, you can just remove this file or use the "Reset Default" command.
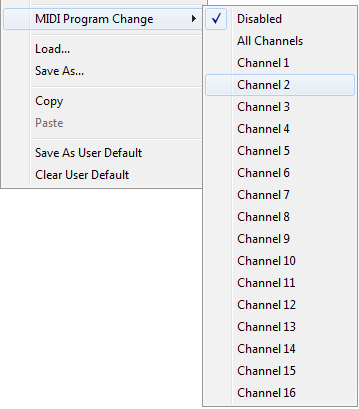
MIDI Program Change
It is possible to load presets remotely using MIDI "Bank Select" and "Program Change" messages. To enable this feature, select a MIDI channel to receive the events from in the MIDI Program Change menu item from the presets menu:
This setting is saved for each plug-in istance with your session but not in presets (except for the default preset, using the "Save as User Default command"). Once activated, the plug-in menu will display the bank number followed by the preset number for each preset:
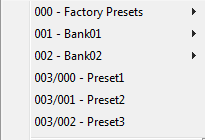
Every root folder is considered as a new bank, starting with the factory presets (bank 0). Program and bank numbers may change while you add folders and presets, so you should be careful when naming them if bank and program numbers matter to you. It is recommended to use folders to make this task simpler. As a side note, sub folders do not define additional banks (all presets contained in sub folders are associated with the current bank.
As specified by MIDI, bank select messages are not used until a program is actually selected.
MIDI Implementation note: the software supports all types of Bank Select methods. You can use either MIDI CC 0 or MIDI CC 32 to select banks. If both are used simultaneously, they are combined together so that you can use more banks (in this case CC0 is LSB and CC32 is MSB, and actual bank number is 128*CC0+CC32).
MIDI and Automation Control
Blue Cat's Destructor can also be remotely controlled via MIDI using MIDI CC ("Control Change") messages or automation curves, if your host application supports it. It is possible to customize the channel, control numbers, range and response curve used for each parameter in the settings panel available from the main menu (see the Plug-in Settings chapter for more details).
MIDI and Automation Settings Menu
The main menu
Most skins also provide the ability to change MIDI and automation settings directly in the main user interface. Clicking on the control settings icon in the main toolbar opens the following menu:
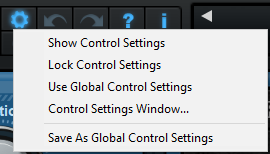
- Show Control Settings: show direct access to individual control settings for each parameter in the user interface (see next paragraph).
- Lock Control Settings: lock the current controls settings for MIDI and automation so that they remain unchanged when loading presets.
- Use Global Control Settings: ignore the current MIDI/automation settings and use the global settings instead.
- Control Settings Window: display the control settings window, to change control settings for all parameters.
- Save As Global Control Settings: save the current settings as global settings (used by default, when no specific MIDI/Automation setting has been set for the cuirrent preset).
Individual Control Settings
When this feature is activated using the "Show Control Settings" item in the MIDI and Automation Settings menu, dropdown menu buttons appears next to the main controls displayed by the plug-in:
Clicking on this button shows the MIDI/Automation settings menu:
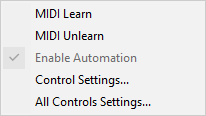
- MIDI Learn: launches MIDI learn mode for the control: touch your MIDI controller and the control will learn from it the MIDI channel and CControl Number. To end the learn mode, reopen this menu and deselect the option.
- MIDI Unlearn: deactivates MIDI control for this parameter.
- Control Settings: launches the advanced settings panel described below. This controls the settings for the current preset.
- All Control Settings: display the control settings window, with access to all parameters.
Advanced MIDI and Automation Settings
You can completely customize the way the plug-in is controlled by automation and MIDI. For a global view of all parameters at a time, you can use the Plug-in Settings window for the current preset which is available from the main menu.
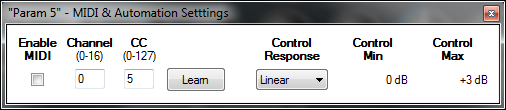
MIDI Settings:
- Enable MIDI: enable/disable the MIDI control of the parameter.
- Channel: MIDI Channel for the parameter control. If set to 0, the plug-ins will accept Control Change Messages from all MIDI Channels (MIDI Omni mode).
- CC: Control Change Number.
- Learn: click on this button to activate the MIDI learn functionality. When it is activated, you can move your MIDI controller, and the plug-in will automatically detect the control settings .
MIDI and automation settings:
- Response: response curve of the MIDI or automation control: from very fast to slow control.
- Min: minimal value of the parameter when MIDI controlled or automated.
- Max: Maximum value of the parameter when MIDI controlled or automated.
Note: if the Min value is higher than the Max value, the response curve will be reversed: increasing the control value will decrease the parameter value.
Note: if you double click on the parameter text control boxes for the max and min values, a “fine tuning” edit box will appear and let you change the min and max values with more precision:
More
Check our online tutorial for more screenshots and more examples of our plug-ins user interfaces.
Blue Cat's Destructor Parameters
All parameters described below can be automated and controlled via MIDI if your host application supports it. You can precisely define this behavior in the settings panels described later in this manual.
The parameters of this plug-in exposed for automation and MIDI control are described below:
| Name | Unit | Description |
|---|---|---|
| General | ||
| Bypass |
|
Bypass the effect. |
| In Gain | dB | Input gain, right at the input of the plug-in, before any processing occurs. |
| Side Chain |
|
Selects the signal used for shape dynamics: input, comp, gate, preamp or external (for external side chain). |
| Gate | ||
| G Threshold | dB | Threshold for the gate: the gate starts reducing the gain when the signal is below the threshold. |
| G Ratio |
|
(Compression) ratio applied to the signal by the gate when the signal is below the threshold. Set to 1:1 for no effect. |
| G Attack | ms | Attack time for the gate. |
| G Release | ms | Release time for the gate. |
| Compressor | ||
| C Threshold | dB | Threshold for the compressor: the compressor starts reducing the gain when the signal is above the threshold. |
| C Ratio |
|
(Compression) ratio applied to the signal by the compressor when the signal is above the threshold. Set to 1:1 for no effect. |
| C Attack | ms | Attack time for the compressor. |
| C Release | ms | Release time for the compressor. |
| Makeup Gain | dB | Gain to be applied after the compression stage, to compensate the gain reduction. |
| Pre Filter | ||
| Pre Enabled | On/Off | Enable of disable (bypass) the pre-filter module. |
| Pre LC Frequency | Hz | Cutoff Frequency of the low cut filter. |
| Pre LC Slope | dB/Oct | Slope of the low cut filter. When set to 0 dB/Octave, the filter is not active |
| Pre LS Frequency | Hz | Cutoff Frequency of the low shelf filter. |
| Pre LS Gain | dB | Gain of the low shelf filter (BASS control). When set to 0 dB, the filter is not active. |
| Pre P1 Frequency | Hz | Center Frequency of the first peak filter. |
| Pre P1 Bandwidth | Octaves | Bandwidth of the first peak filter. |
| Pre P1 Gain | dB | Gain of the first peak filter. |
| Pre P2 Frequency | Hz | Center Frequency of the second peak filter. |
| Pre P2 Bandwidth | Octaves | Bandwidth of the second peak filter. |
| Pre P2 Gain | dB | Gain of the second peak filter (MID control). |
| Pre P3 Frequency | Hz | Center Frequency of the third peak filter. |
| Pre P3 Bandwidth | Octaves | Bandwidth of the third peak filter. |
| Pre P3 Gain | dB | Gain of the third peak filter. |
| Pre HS Frequency | Hz | Cutoff Frequency of the high shelf filter. |
| Pre HS Gain | dB | Gain of the high shelf filter (TREBLE control). When set to 0 dB, the filter is not active |
| Pre HC Frequency | Hz | Cutoff Frequency of the high cut filter. |
| Pre HC Slope | dB/Oct | Slope of the high cut filter. When set to 0 dB/Octave, the filter is not active |
| Pre Comb Frequency | Hz | Frequency of the first peak/notch of the comb filter. |
| Pre Comb Mix | % | Amount of wet vs dry signal in the comb filter. Negative values produce out of phase filtering. |
| Pre Gain | dB | Gain at the output of the pre-filter module. |
| Pre Analysis | On/Off | Enable or disable the spectrum analyzer at the output of the pre-filter module. |
| Destruction - Shape Dynamics | ||
| Destruction | On/Off | Enable of disable (bypass) the destruction module. |
| Dyn Range | % | Amount of dynamics sensitivity for the destruction curve ("DYNAMICS" control in easy mode). |
| Dyn Attack | ms | Controls how fast audio level boosts impact the dynamics of the destruction curve. |
| Dyn Attack Shape | % | Attack shape for the envelope detection. Positive values will slow down the attack, while negative values will speed it up (see the operation chapter for more details). |
| Dyn Release | ms | Controls how fast audio level drops impact the dynamics of the destruction curve. |
| Dyn Release Shape | % | Release shape for the envelope detection. Positive values will slow down the release phase, while negative values will speed it up (see the operation chapter for more details). |
| Dyn Threshold | % | "Cold" point that defines the range for shape dynamics (see the operation chapter for more details). |
| Dyn Ceiling | % | "Hot" point that defines the range for shape dynamics (see the operation chapter for more details). |
| Destruction - Advanced Options | ||
| Oversample | 1x to 4x | Oversampling ratio for the destruction stage. |
| Shift Freq | Hz | Center Frequency for phase shifting. |
| Shift Amount | 0-100 | Amount of phase shift at the center frequency. |
| Destruction - Curve Shape | ||
| X+ & Y+ Down, Up, Max |
|
Coordinates of the control points for the upper part of the destruction curve. |
| X- & Y- Down, Up, Max |
|
Coordinates of the control points for the lower part of the destruction curve. Used only if "Symmetric" is set to "No". |
| Smooth | % | Smooth the destruction curve (use higher values to remove edges to reduce higher order harmonics). |
| Rectify | % | Amount of rectification for the lower part of the destruction curve, for an asymmetric shape. |
| Bit Depth | bit | Simulates bit reduction by quantifying the distortion curve. |
| Shape Mix | % | Acts like a dry/wet control but applied to the destruction curve. |
| Destruction - Main Controls | ||
| Drive | 0-11 | Controls the amount of distortion. |
| Decimation |
|
Downsampling ratio at the output of the destruction stage (sampling rate reduction). |
| Anti Alias |
|
Amount of anti aliasing to use during sampling rate reduction. Use 0 for maximal aliasing artifacts. |
| Mix | % | Amount of wet versus dry signal for the destruction module. |
| Gain | dB | Gain at the output of the destruction module. Used to compensate gain changes caused by the distortion. |
| Post Filter | ||
| Same as Pre Filter | ||
| Output | ||
| Out Gain | dB | Gain at the output of the plug-in, before the brickwall limiter. |
| Limiter | On/Off | Enable or disable the 0 dB brickwall limiter. |
Plug-in Settings
In addition to the controls offered in the main user interface, Blue Cat's Destructor has various settings that let you fine tune the behavior of the plug-in. You can choose to change these settings either for the current preset or globally for all instances of the plug-in.
The Global Settings Window
The settings available in this window apply to all instances of the plug-in, for all presets, if not overridden in the presets settings. Consider these settings as “default” settings.
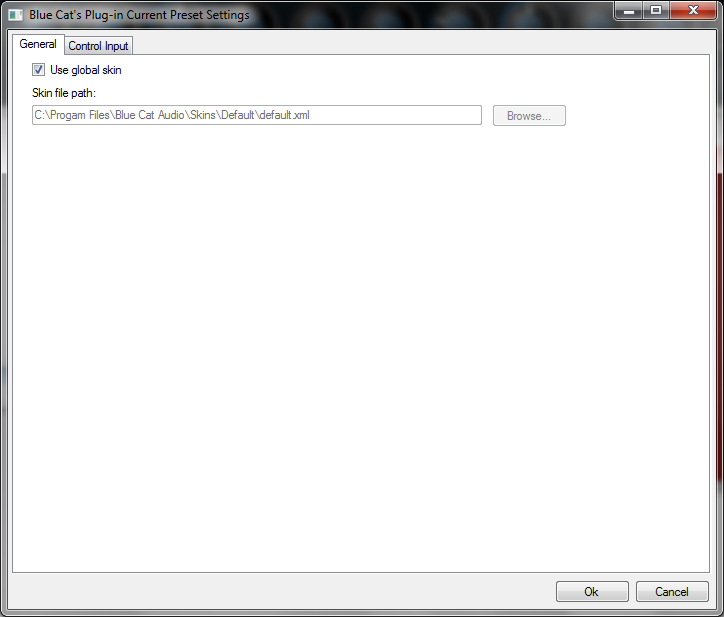
General
You can change the default skin for all instances of the plug-in: write the skin file path in the text edit box or click on the button to open a file chooser dialog. If you have several instances of the plug-in opened in your session, you will have to re-open the user interfaces of these plug-ins to see the skin change.
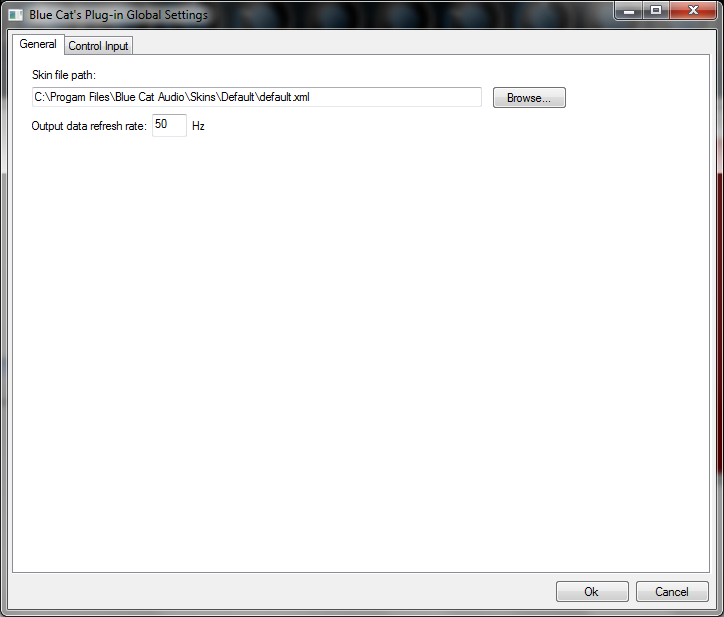
The output data refresh rate can also be customized for all instances of the plug-in. It controls the refresh rate of non-audio data produced by the plug-in (parameters, curves...). It also controls the refresh rate of output MIDI CC messages or output automation data. The higher the refresh rate, the better precision, but also the higher cpu usage (some host applications may also have trouble recording MIDI data at high refresh rates). The default value is 50 Hz.
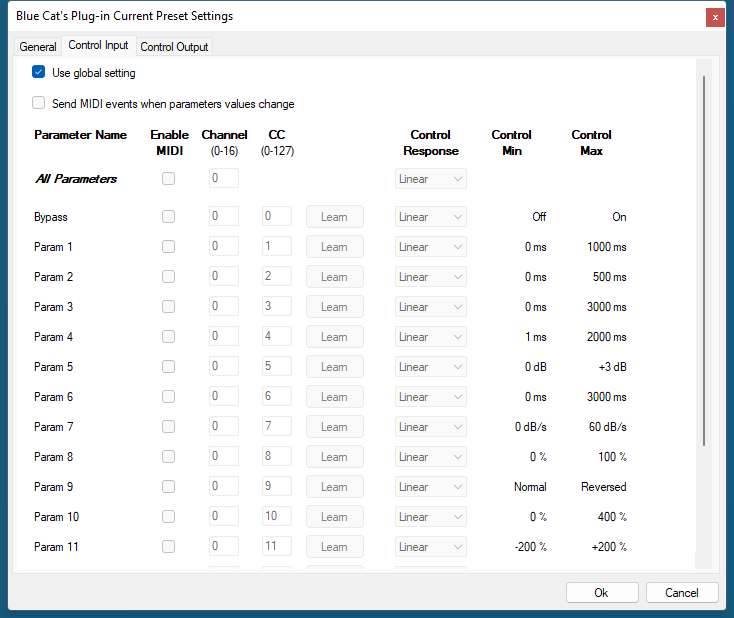
Global Control Input Settings (MIDI and Automation)
The plug-in offers a couple of settings that affect the way it is controlled by MIDI messages or automation. While the first settings only apply to MIDI control, the "Control Response", "Min" and "Max" settings apply to both automation and MIDI control.
For each parameter you can define a default MIDI channel and CC number. You can then control the plug-in with an external MIDI controller or one of our plug-ins that generate MIDI messages.
The settings below are available for each plug-in parameter.
MIDI Settings:
- Enable MIDI: enable/disable the MIDI control of the parameter.
- Channel: MIDI Channel for the parameter control. If set to 0, the plug-ins will accept Control Change Messages from all MIDI Channels (MIDI Omni mode).
- CC: Control Change Number.
- Learn: click on this button to activate the MIDI learn functionality. When it is activated, you can move your MIDI controller, and the plug-in will automatically detect the control settings .
MIDI and automation settings:
- Response: response curve of the MIDI or automation control: from very fast to slow control.
- Min: minimal value of the parameter when MIDI controlled or automated.
- Max: Maximum value of the parameter when MIDI controlled or automated.
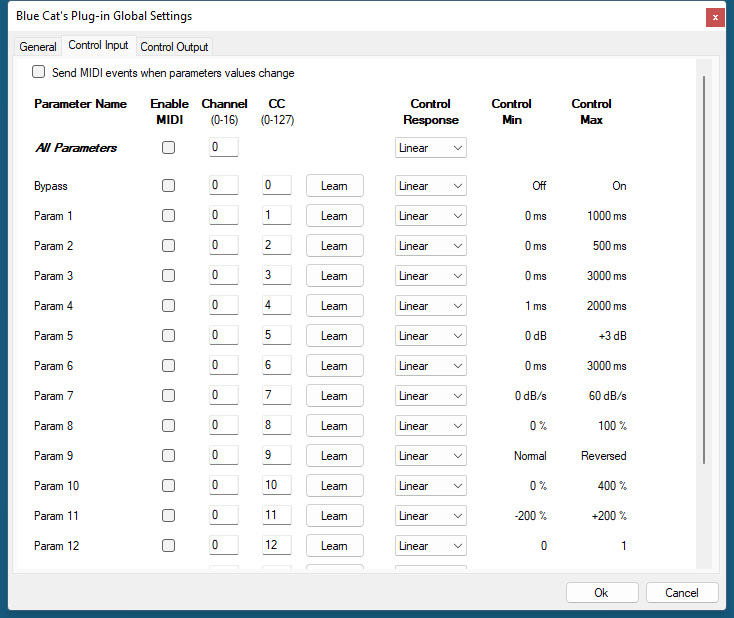
Note: if the Min value is higher than the Max value, the response curve will be reversed: increasing the control value will decrease the parameter value.
Note: if you double click on the parameter text control boxes for the max and min values, a “fine tuning” edit box will appear and let you change the min and max values with more precision:
"Send MIDI events when parameters values change": activate this option when using a control surface that accepts MIDI events as input. MIDI messages will be sent to the output of the plug-in when the user change the parameters values in the user interface, to keep the software and the controller in sync. MIDI is only sent for parameters that are activated for MIDI control.
The Current Preset Settings Window
In this window you can change the settings for the current preset of the current instance of the plug-in only.
Preset Skin
You can choose to use the global skin setting or to change the skin for the current preset. This way you can have different skins for different instances of the plug-in in the same session in order to differentiate them.
Preset Control Input Settings (MIDI and Automation)
Use the global settings or override them for the current preset. The parameters are the same as for the global input settings.
About Skins
Blue Cat's Destructor integrates Blue Cat's skinning engine that allows you to customize the user interface. You can download alternate skins for your plug-in at the following address:
If you don't find a skin that fits your need or if you want a custom one, you can choose to create your own skin.
Choosing the Skin
There are two ways to select the skin of your plug-in: you can change the default (or 'global') skin, or change the skin for the current preset only (either in the preset settings page or from the main menu). The global skin applies to all plug-in instances (choose this one if you want to use the skin used by default, regardless of the session or preset), whereas the current preset skin only applies to the current preset of the current plug-in instance (use this one if you want to change only the skin for the current session/preset).
Note: in some host applications, the plug-in window won't resize automatically when you choose a skin with a different size. In this case, just close the window and re-open it: it will be displayed with the right size.
The Skins Menu
The skins menu can be opened from the main menu. It displays the list of skins available for the plug-in as well as commands to manage the skin used by default when no preset skin has been selected:
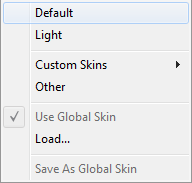
- First Section - Factory Skins: shows the list of factory skins delivered with the plug-in ("Default" and "Light" in this example).
- Second Section - User Skins: shows the list of user skins that have been installed in the Documents Skins folder for the plug-in (see below).
- Use Global Skin: use the global skin for the current preset/session (unloads any custom skin previously selected for the current preset).
- Load: opens a file browser dialog to manually select the skin from the file system.
- Save As Global Skin: use the current preset skin as the global skin (loaded by default if no preset skin has been defined).
Installing User Skins
To select user skins directly from the skins menu, install them in the "Skins" directory available in the plug-in's documents folder:
[Your Documents Folder]/Blue Cat Audio/[Plugin Name]/Skins/
The skin engine will scan this folder for new skins (xml files) and display them in the menu. The skin files should be in the root skins folder or in a subdirectory inside this folder: subdirectories are not scanned recursively.
Other Methods to Select Skins
You can also select the skins in the settings panels available from the main menu:
The global skin (used by default if no preset skin has been selected) can be changed in the global settings pane. The current preset skin can be changed in the preset settings page .
Create a Custom Skin
You can create custom skins for your plug-in in order to adapt it to your exact needs. You can change its look and feel and make it completely integrated in your virtual studio!
Just read the Blue Cat's Skinning Language manual and download the samples for the tutorial on http://www.bluecataudio.com/Skins. You can get ready to create your own skins in a few minutes. You can then share your skins on our website.
More...
This manual only covers the main aspects of Blue Cat's Destructor. Our website offers many additional resources for your Blue Cat's Destructor plug-in. It is constantly updated, so keep an eye on it!
Updates
As you can see in the history log below, we care about constantly updating our products in order to give you the latest technology available. Please visit our website often to check if Blue Cat's Destructor has been updated, or subscribe to our Newsletter to be informed of the latest news about our products.
Note: minor version updates are available from the same location as the original full version download (link received by email upon purchase). The demo version publicly available on our website will not let you register.
You can also follow us on twitter, facebook and instagram for almost real time updates notification, and subscribe to our YouTube channel to watch the latest videos about our software.
Versions History
V2.04 (2025/09/08) |
|
V2.03 (2025/08/12) |
|
V2.02 (2024/09/09) |
|
V2.0 (2023/11/07) |
|
V1.62 (2022/12/12) |
|
V1.61 (2021/10/19) |
|
V1.6 (2021/06/29) |
New Features & Improvements:
|
V1.52 (2020/05/28) |
|
V1.51 (2019/09/25) |
|
V1.5 (2019/09/23) |
|
V1.41 (2018/12/06) |
|
V1.4 (2018/10/09) |
|
V1.32 (2018/05/15) |
|
V1.31 (2018/03/29) |
|
V1.3 (2018/03/19) |
|
V1.21 (2017/11/24) |
|
V1.2 (2017/11/21) |
|
V1.11 (2016/12/29) |
|
V1.1 (2016/12/15) |
|
V1.01 (2016/11/22) |
|
V1.0 (2016/10/11) |
First release. |
Thanks again for choosing our software!
See you soon on www.bluecataudio.com!