This tutorial shows how to use the connectivity capabilities of our plugins within Logic. We use Blue Cat's DP Meter Pro plugin (DPMP) as an example, but you can use any other audio plugin which provides output parameters, such as our audio analysis plugins.
These capabilities let you use any characteristic of a source audio signal to perform a side chain on any parameter of the destination track. Our example shows how to perform side chain filtering with this system: the DP Meter Pro plugin (aka DPMP) is used to generate an envelope based on this source track amplitude to control the band pass filter gain of the Triple EQ free plugin on another track.
Our Logic session is initially composed of two audio tracks: a source and destination track. We then use Logic's powerful environment to route the side chain control data from the source to the destination.
As of today (Logic Pro 9.1), Logic does not support MIDI routing between plug-ins, so the solution we propose here is based on Logic's environment. It requires a bit more learning if you are not familiar with it, but it is also more powerful than what some other hosts provide.
Most recent versions of Logic have a bug regarding this capability. It can be avoided using this trick explained on the forum.
Step By Step
01 - Our intial project is composed of a source and a destination track:

02 - Insert the DPMP Plugin on the source track:

03 - Open the Preset Settings Window of the DPMP and enable automation for the transformed output:

04 - Insert the plugin you want to control on the destination track:

05 - Open the Environment window:

06 - Add a transformer object in order to filter messages:

08 - Add a slider to the environment to see and map parameter changes:

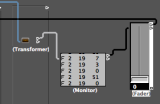
09 - (Optional) Add a monitor object in order to check what messages are being transmitted:
 Add a monitor object in order to check what messages are being transmitted.png "Step 09 - (Optional) Add a monitor object in order to check what messages are being transmitted")
10 - Connect the wires:

10.1 - The flow is the following:
- Source track to transformer.
- Transformer to monitor (optional).
- Monitor to slider.
- Slider to destination track.
10.2 - A quick note about Logic's Environment:
Logic uses a terminology similar to MIDI for the parameters that you can manage in its environment, but it does not correspond to actual MIDI parameters that our plug-ins may expose in other host applications.
Every plug-in on a track is assigned a "channel" number: the first plug-in is channel 2, the second channel 3 etc. For each plug-in, every parameter is assigned a number (just like a CC number with MIDI), starting at 1. Plug-in parameters can be controlled using "Fader" type. Beware that "Control" message type does not let you control other plug-ins parameters. But it lets you have access to mixer properties (such as balance, volume and more, using standard MIDI CC values).
In our example, the "transformed" output parameter for the DPMP is the 19th parameter (you can easily count parameters for our plug-ins using the preset settings window and start counting with input parameters then output parameters). For the Triple EQ plug-in, the parameter we want to control (Mid Gain) is the 6th parameter. Both plug-ins are the first in the list of plug-ins on their own track. It means that we want to map parameter number 19 on channel 2 to parameter 6 on channel 2, so that the DPMP's transformed envelope controls the Triple EQ's mid gain parameter.
Note: you can also use the monitor object to see which channel/number the parameter you are interested in is assigned to.
10.3 - The Monitor Object is very helpful to debug your setup - insert it anywhere you want to see messages:

11 - Click on the transformer to configure it so that it lets only the transformed envelope events go thru:

12 - Click on the fader and configure it to map source and destination parameters (Choose Fader type for in and out):
.png "Step 12 - Click on the fader and configure it to map source and destination parameters (Choose Fader type for in and out)")
13 - Your environment is now set up so that the envelope of the source controls the mid band of the destination:

14 - You can now adjust the generated envelope to fit your needs:

15 - You can also choose to control the mixers properties by changing the fader output to control type on channel 1:

15.1 - Many parameters are available:

You have just learnt how to connect our plugins together in Logic Pro. This simple scenario shows how to setup a control side chain between an amplitude follower and a band pass filter. You can now experiment with many other effect sources and destination parameters. You can also check our other tutorials for more ideas.
You can also add more modules from Logic's environment in order to improve your parameter mapping and perform additional processing on the side chain.
Any questions, comments? You want to submit your own tutorial to win a free license? Please post on our Forum!