This tutorial shows how to customize the FreqAnalyst Pro plugin's user interface by changing the color of the displayed curves. It is a very basic skinning tutorial. All you need to know is how to express a color with the html hexadecimal RGB color codes.
If you need more information about how to load another skin for your plugin, please read our Getting Started (UI) tutorial or your plugin user manual.
Step By Step
01 - Locate the skins for your freqAnalyst Pro (Mono) plugin:
The FreqAnalyst Pro skins are located in the plugin installation folder: [Plugin Folder]\FreqAnalystPro(Mono) data\skins\
Note that the default installation path is "C:\Program Files\Blue Cat Audio\DX Plugins" for the DirectX version and "C:\Program Files\Steinberg\VSTPlugins" for the VST version. We advise you to copy the skins directory and make the modifications in the copy rather than in the original folder.
02 - Open the colors.inc file with a text or an xml editor:

03 - Your editor will display color definitions for various parts of the user interface:

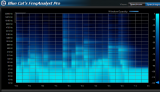
04 - Let's change the color for the spectrogram view:

05 - Here is the graphical result with the new colors:

06 - The following modifications lead to a completely different color scheme (see below):
.png "Step 06 - The following modifications lead to a completely different color scheme (see below)")
07 - Fire colors spectrogram (changes above applied):
.png "Step 07 - Fire colors spectrogram (changes above applied)")
08 - Fire colors (changes above applied):
.png "Step 08 - Fire colors (changes above applied)")
You are now able to change the display of the FreqAnalyst Pro plugin curves and customize the user interface colors to fit your habits. You can download the skins shown in this tutorial for free on the FreqAnalyst Pro Skins page. Do not hesitate to experiment with different color schemes.
Tip: it is also a good way to compare the spectrum on several tracks use the window opacity feature to make a window transparent and apply different skins to each plugin instance. You are now able to vizualize several spectrum curves for different tracks in real time!
To learn more about how to skin the Blue Cat Audio plugins and perform more advanced customization of your favorite plugins, please refer to our Create Skins page.
Any questions, comments? You want to submit your own tutorial to win a free license? Please post on our Forum!