This tutorial shows how to perform side chain dynamic equalizing with the Dynamics plugin product and the Stereo Parametr'EQ stereo equalizer plugin. The destination track can of course be the same track as the source track so that you perform dynamic EQ on a given audio track. The goal is to apply dynamics processing (expansion, compression, gating...) to one or several given frequency bands only.
This tutorial uses Cakewalk Sonar as a host, but you can use any other host provided it supports MIDI CC. For more information, check our other Tutorials for other hosts (the Digital Peak Meter Pro tutorials explain how to use MIDI I/O in many hosts).
Step By Step
01 - Insert the Dynamics plug-in on the source track:

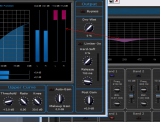
02 - Open the presets settings window (right click on the background) of the Dynamics plug-in:
 of the Dynamics plug-in.png "Step 02 - Open the presets settings window (right click on the background) of the Dynamics plug-in")
03 - Setup the MIDI output channels and CC numbers for left and right total gain parameters:

04 - Change the range to -40, +40 dB (since it's the parametrEQ parameters max range):
.png "Step 04 - Change the range to -40, +40 dB (since it's the parametrEQ parameters max range)")
05 - Insert a Stereo Parametr'EQ plug-in on the destination track (it can be the same as the source track):
.png "Step 05 - Insert a Stereo Parametr'EQ plug-in on the destination track (it can be the same as the source track)")
06 - Open the presets settings window for the parametr'EQ plug-in:

07 - Assign the left and right gain for filter 1 MIDI input channels and CC number to the same values as the Dynamics output:

07.1 - Note that you could assign these values to any other gain parameter:
You can use any filter (either band filter or low-shelf, or high-shelf) as a destination. The choice depends on what result you are expecting.
08 - On a MIDI track, connect the Parametr'EQ plugin MIDI input:

09 - Activate the left and right Band 1 filters and adjust the frequency and bandwidth to your needs:

10 - Set the Dry-Wet ratio to 0 on the dynamics plug-in so that the source track is not affected by the effect:

11 - Hit play:

12 - Tweak the parameters of the dynamics plugin on the source track, the dynamics response is now applied to the chosen frequency band on the destination track:

This tutorial has taught you a very simple way to apply dynamics processing to a chosen frequency band on stereo tracks. This process is applicable to mono tracks as well.
You can of course apply the processing to the mid / sides parts of the audio signal if you prefer (to do so, follow the same tutorial with the Widening Parametr'EQ equalizer. You can also activate several frequency bands at the same time (so that the frequency response is applied to a more complex spectrum): to do so, just assign the right CC number to several bands gains, as you did for the band filter 1 in this example. You can then change the way these frequency bands react to the dynamics input by changing the response curve of the MIDI input etc...
Another variation of this dynamics EQ can be achieved if you assign the dynamics output to the frequency of the filters instead of their gain (see our Wah Pedal for example): it will produce a dynamics-driven sweeping filter.
As a conclusion, you have endless possibilities, just experiment and have fun!Any questions, comments? You want to submit your own tutorial to win a free license? Please post on our Forum!