 This tutorial shows how to use the DP Meter Pro audio analysis plugin (DPMP) in MAGIX Samplitude, in order to modify the parameters of an effect on a track according to the envelope of an other track. This example shows a simple ducking application, using the envelope of a source track to modify the gain of a destination track. Note that Samplitude does not support VST MIDI output routing, so this tutorial uses automation curves for the control of parameters.
Step By Step
00 - Initial setup - a source track which will be used to control the destination track:

01 - On the source track insert the Digital Peak Meter Pro:

02 - Open the VST Automation window:

03 - Select the Digital Peak Meter Pro plugin:

04 - Select the left and right transformed peak envelope parameters:

04.1 - On the most recent versions of the plugin, check that automation output is enabled in the current preset settings:

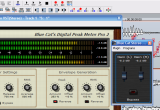
05 - Hit play and tweak the amount and offset parameters to generate the appropriate envelope:

06 - Once setup, hit play to record the transformed envelopes as automation curves:

07 - Swap the source and destination track audio objects:

08 - Insert the Stereo Gain plug-in:

09 - Open the VST automation window:

10 - Reset both parameters to nothing:

11 - Choose not to delete envelope points:

12 - Select the Stereo Gain VST plug-in:

13 - Now assign the envelopes to the left and right gain parameters:

14 - Play the track, the gain of the destination track is now controlled by the envelopes generated by the source track:

15 - Tweak the DPMP parameters and experiment with other effects:

Any questions, comments? You want to submit your own tutorial to win a free license? Please post on our Forum!